**Sourdough Cheese Crackers: A Delightful Snack for Any Occasion**
Indulge in the irresistible crunch and cheesy goodness of sourdough cheese crackers, a delectable snack that will tantalize your taste buds. These crackers are not only easy to make but also a healthier alternative to store-bought snacks, as they are made with wholesome ingredients like sourdough discard, shredded cheddar cheese, and a blend of herbs and spices. Whether you're looking for a quick bite to satisfy your cravings or a delightful addition to your party platter, these sourdough cheese crackers are sure to impress.
**Explore a Variety of Flavors:**
This versatile recipe offers three distinct flavor variations to suit every palate:
* **Classic Sourdough Cheese Crackers:** Experience the timeless combination of sourdough's tangy flavor and the richness of cheddar cheese, perfectly balanced with a sprinkle of salt and a hint of garlic powder.
* **Savory Herb Sourdough Cheese Crackers:** Elevate your snacking experience with a burst of savory herbs, including rosemary, thyme, and oregano, blended seamlessly with the cheesy sourdough base.
* **Spicy Sourdough Cheese Crackers:** Ignite your taste buds with a touch of heat from crushed red pepper flakes, perfectly complementing the sharp cheddar cheese and sourdough's tangy notes.
With these three flavor variations, you can cater to different preferences and create a delightful assortment of sourdough cheese crackers that will be the star of any gathering.
SOURDOUGH CHEESE CRACKERS
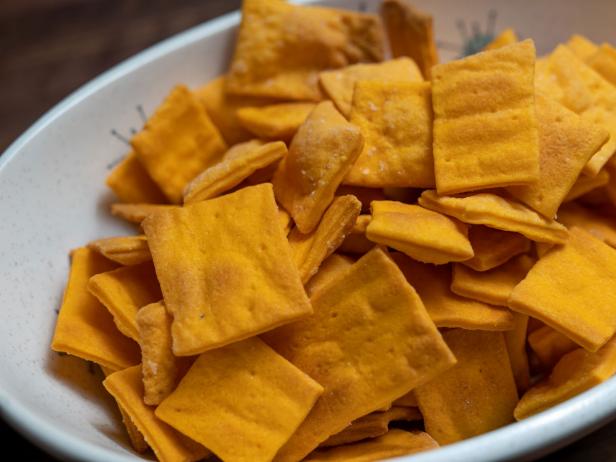
Provided by Alton Brown
Time 9h40m
Yield about 50 crackers
Number Of Ingredients 9
Steps:
- Whisk the flour, cheese powder and salt together in a small bowl.
- Place 3 tablespoons of the butter and the starter in the work bowl of a stand mixer fitted with the paddle attachment, and work on low speed until creamy and homogeneous, about 1 minute. Stop the mixer and sift the flour mixture over the creamed starter, return the mixer to low and work until a soft dough forms, about 1 minute more.
- Turn the dough out onto a lightly floured surface and divide into 4 equal pieces. Press each piece into a 1/4-inch-thick rectangle and wrap in individual pieces of plastic wrap. Refrigerate between 8 and 24 hours (see Cook's Note).
- Place two racks nearest the center of the oven and heat to 350 degrees F. Line two half-sheet pans with parchment paper.
- Retrieve one piece of dough from the refrigerator and dust both the dough and your pasta maker with flour. (Continue to dust the pasta roller and the dough as needed to prevent sticking.) Starting on the widest setting, typically labeled "1," feed the dough through the roller. Then fold the dough into thirds, as you would a letter, turn 90 degrees and run it through again. Fold the dough into thirds again, turn, and pass it through the roller.
- Adjust your pasta maker to the next setting and roll the dough through 3 times without folding. Repeat this step 3 times more on both the 3rd and 4th settings. Transfer the dough to one of the prepared half-sheet pans and repeat the process with the remaining dough, arranging two sheets of dough per pan.
- Melt the remaining 1 tablespoon of butter and brush onto the dough. Sprinkle with a generous pinch of kosher salt. Dock the dough thoroughly with a fork and cut into 1-inch squares with a pizza wheel.
- Bake for 10 minutes, then turn the pans 180 degrees and rotate from top to bottom. Continue baking until the crackers just begin to brown around the edges, 8 to 10 minutes more.
- Remove from the oven and immediately transfer the crackers on the parchment to a rack to cool completely before serving, about 20 minutes.
- Lid tightly and store at room temperature.
- To begin: Mix together 125 grams flour and 125 grams water with a clean hand in a medium glass bowl. Cover the bowl with a tea towel and let sit undisturbed at room temperature until the mixture is full of bubbles and has nearly doubled in size, usually 2 to 3 days. During this time, yeasts and bacteria from the air and from the flour and probably from you will set up housekeeping in the bowl (see Cook's Note).
- For daily feeding: Peel back any crust that may have formed and transfer 20% of the culture (50 grams) to a clean, wide-mouthed jar. Stir in 100 grams flour and 100 grams water, loosely screw on the lid and stash at room temperature for 24 hours. (The culture will have a stinky-sour smell at this point.) Discard the rest of the original mixture.
- Repeat step 2 every 24 hours for 5 days. By then the culture should smell yeasty-sweet-sour, which means you're ready to put the starter to work. The cheese crackers are to be made with the discarded percentage of starter.
SOURDOUGH CHEESE CRACKERS

I'm not going to say these are the best cheese crackers...yes, I am. These are the best cheese crackers and it's due to the complex chemistry of the sourdough starter, a culinary tool you should always have on hand. Why the 2 to 3 day wait for the starter? Even at refrigerator temperatures, the starter will continue to do its thing, consuming starches and creating complex (and tasty) chemical waste. Without this time, the crackers would lack in both flavor and flakey texture. So...your patience will be rewarded. This recipe first appeared in Season 1 of Good Eats: The Return.
Provided by Level Agency
Categories Appetizers
Time 9h40m
Number Of Ingredients 9
Steps:
- To begin: Mix together 125 grams flour and 125 grams water with a clean hand in a medium glass bowl. Cover the bowl with a tea towel and let sit undisturbed at room temperature until the mixture is full of bubbles and has nearly doubled in size, usually 2 to 3 days. During this time, yeasts and bacteria from the air and from the flour and probably from you will set up housekeeping in the bowl.
- For daily feeding: Peel back any crust that may have formed and transfer 20 percent of the culture (50 grams) to a clean, wide-mouthed jar. Stir in 100 grams flour and 100 grams water, loosely screw on the lid and stash at room temperature for 24 hours. (The culture will have a stinky-sour smell at this point.) Discard the rest of the original mixture.
- Repeat step 2 every 24 hours for 5 days. By then the culture should smell yeasty-sweet-sour, which means you're ready to put the starter to work. The cheese crackers are to be made with the discarded percentage of starter.
- Whisk the flour, cheese powder, and salt together in a small bowl.
- Place 3 tablespoons of the butter and the starter in the work bowl of a stand mixer fitted with the paddle attachment, and work on low speed until creamy and homogeneous, about 1 minute. Stop the mixer and sift the flour mixture over the creamed starter, return the mixer to low, and work until a soft dough forms, about 1 minute more.
- Turn the dough out onto a lightly floured surface and divide into 4 equal pieces. Press each piece into a 1/4-inch-thick rectangle and wrap in individual pieces of plastic wrap. Refrigerate between 8 and 24 hours (see Cook's Note).
- Place two racks nearest the center of the oven and heat to 350ºF. Line two half-sheet pans with parchment paper.
- Retrieve one piece of dough from the refrigerator and dust both the dough and your pasta maker with flour. (Continue to dust the pasta roller and the dough as needed to prevent sticking.) Starting on the widest setting, typically labeled "1," feed the dough through the roller. Then fold the dough into thirds, as you would a letter, turn 90 degrees and run it through again. Fold the dough into thirds again, turn, and pass it through the roller.
- Adjust your pasta maker to the next setting and roll the dough through 3 times without folding. Repeat this step 3 times more on both the 3rd and 4th settings. Transfer the dough to one of the prepared half-sheet pans and repeat the process with the remaining dough, arranging two sheets of dough per pan.
- Melt the remaining 1 tablespoon of butter and brush onto the dough. Sprinkle with a generous pinch of kosher salt. Dock the dough thoroughly with a fork and cut into 1-inch squares with a pizza wheel.
- Bake for 10 minutes, then turn the pans 180 degrees, and rotate from top to bottom. Continue baking until the crackers just begin to brown around the edges, 8 to 10 minutes more.
- Remove from the oven and immediately transfer the crackers on the parchment to a wire rack to cool completely before serving, about 20 minutes.
- Lid tightly and store at room temperature.
Tips:
- Use high-quality ingredients: The better the quality of your ingredients, the better your crackers will be. Use unbleached all-purpose flour, sharp cheddar cheese, and unsalted butter.
- Don't overwork the dough: Overworking the dough will make the crackers tough. Mix the ingredients just until they come together.
- Chill the dough before baking: Chilling the dough will help the crackers hold their shape and prevent them from spreading too much in the oven.
- Bake the crackers until they are golden brown: The crackers should be golden brown and crispy around the edges. If they are too light in color, they will be soft and chewy.
- Let the crackers cool completely before serving: The crackers will be easier to handle and will have a better flavor if you let them cool completely before serving.
Conclusion:
These sourdough cheese crackers are a delicious and easy snack that can be enjoyed by people of all ages. They are perfect for parties, picnics, or just a quick snack. With just a few simple ingredients, you can make these crackers in your own kitchen. So next time you are looking for a healthy and satisfying snack, give these sourdough cheese crackers a try!
Are you curently on diet or you just want to control your food's nutritions, ingredients? We will help you find recipes by cooking method, nutrition, ingredients...
Check it out »
You'll also love


