Best 2 Slinky The Snake Cake Recipes


**Slinky the Snake Cake: A Delightful Treat for Any Occasion**
For those with a sweet tooth and a love for creative desserts, look no further than Slinky the Snake Cake. This charming and delicious cake is sure to be the star of any party or gathering. With its vibrant green scales and playful snake-like shape, Slinky the Snake Cake is a visual masterpiece that will captivate the eyes of all who behold it. But its beauty is not just skin deep; the cake's interior is equally delightful, with layers of moist and fluffy vanilla sponge cake and a rich and creamy vanilla buttercream frosting. To add an extra touch of fun, the cake is decorated with colorful candy sprinkles and gummy worms, making it a feast for the eyes and the taste buds. Whether you're celebrating a birthday, hosting a party, or simply looking for a unique and delicious dessert, Slinky the Snake Cake is sure to be a hit.
**Explore Variations and Additional Recipes:**
1. **Slinky the Snake Cake with Chocolate Frosting:** For chocolate lovers, this variation features a decadent chocolate buttercream frosting that pairs perfectly with the vanilla sponge cake. The rich and creamy chocolate frosting adds a layer of indulgence to the cake, making it even more irresistible.
2. **Slinky the Snake Cake with Funfetti Frosting:** Add a pop of color and cheer to your cake with a funfetti frosting. This vibrant and playful frosting is made with rainbow sprinkles, giving the cake a festive and celebratory look. Perfect for birthday parties or any occasion where a touch of fun is desired.
3. **Slinky the Snake Cake with Cream Cheese Frosting:** For those who prefer a tangy and refreshing frosting, the cream cheese frosting is a delightful option. Made with a combination of cream cheese, butter, and sugar, this frosting has a smooth and creamy texture with a subtle tang that complements the sweetness of the cake perfectly.
4. **Slinky the Snake Cake with Ganache Frosting:** Indulge in a rich and decadent ganache frosting that takes the cake to the next level. Made with chocolate and cream, this glossy and smooth frosting is perfect for chocolate enthusiasts who appreciate a sophisticated and luxurious dessert.
5. **Slinky the Snake Cake Pops:** Transform the classic Slinky the Snake Cake into bite-sized cake pops for a fun and portable treat. Simply crumble the cake, mix it with frosting, and shape it into small balls. Dip the cake pops in melted chocolate or frosting and decorate with sprinkles or candy. These cake pops are perfect for parties, bake sales, or as a quick and easy snack.
SLINKY THE SNAKE (CAKE)
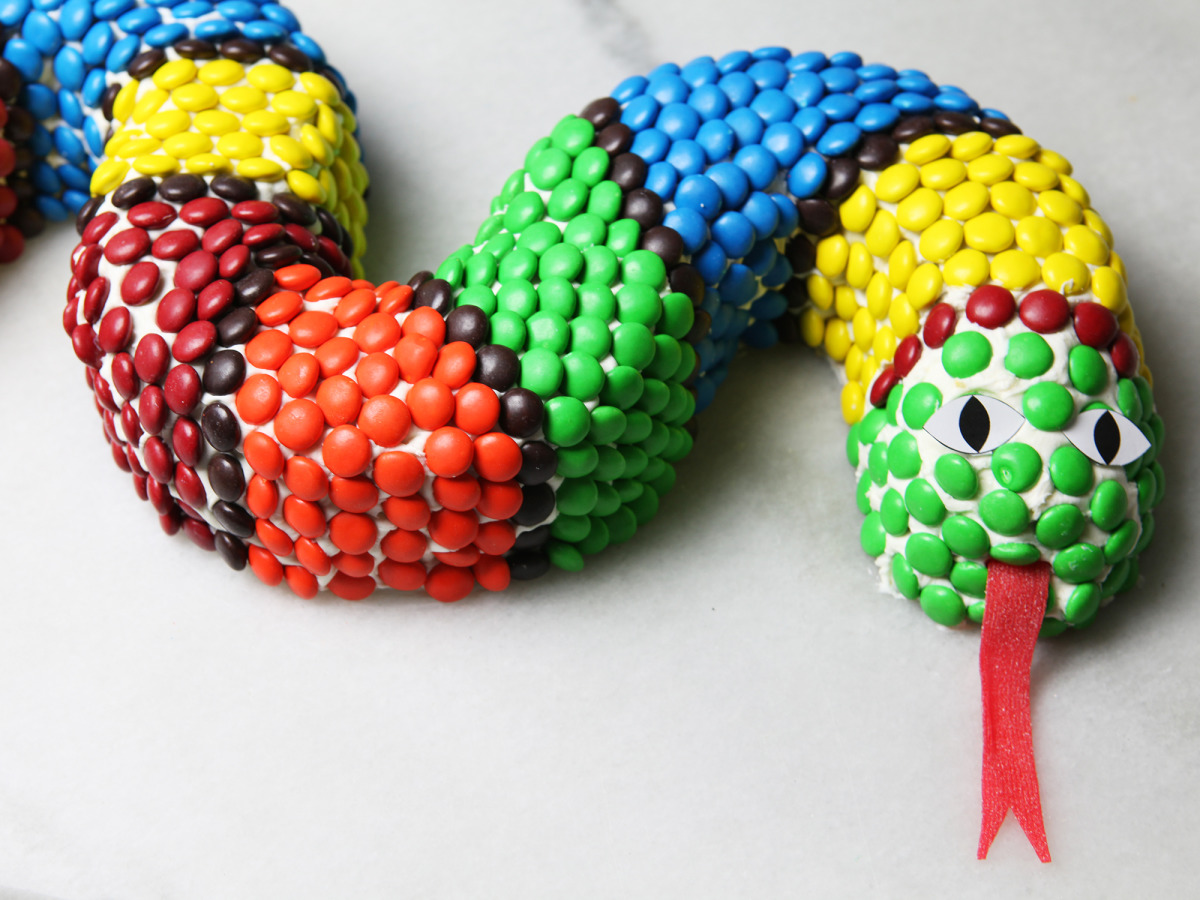
This is such a cute Idea for Halloween or a reptile themed birthday party. I made one for halloween! I have not included the time it takes to make the cakes.
Provided by CookbookCarrie
Categories Dessert
Time 15m
Yield 30 serving(s)
Number Of Ingredients 6
Steps:
- You will also need: 1 40x20 cake board covered in foil or paper Cut each bundt cake in half, NOT horizontally, vertically.
- Position pieces end to end to make a serpentine shape (like an"S" on it's side) Set it on the cake board with a little bit of frosting as the glue.
- Tint your frosting whatever color you'd like your snake to be.
- I did a green color.
- Frost entire length of cake with the colored frosting, frosting halfway down the sides.
- If you do the whole thing you'll need another can or two of frosting.
- Place the chocolate chips in a zip bag.
- Microwave on MEDIUM (50%) power for 20 to 30 seconds.
- Mush the bag a bit and microwave 20 more seconds on medium power until chocolate is melted.
- Clip the corner of the bag and use it to make a diamond pattern along the snake's back.
- cut the fruit roll-up into a strip that has a forked tongue shape on the end and set under one end of the cake Decorate the eyes and nostrils with the candies (I use M&M's).
SNAKE CAKE WITH VENOM GLAZE

Something tasty this way comes: a ganache-covered cheesecake. Stenciled with a green design, a coiled serpent augurs a dessert hour full of surprises. Beneath this coating lurks a chocolate cheesecake and chocolate crust. Maybe good witches do exist after all.
Provided by Martha Stewart
Categories Food & Cooking Dessert & Treats Recipes Cake Recipes
Yield Makes one 10-inch cake; Serves 10 to 12
Number Of Ingredients 24
Steps:
- Make the crust: Whisk together flour, cocoa powder, baking powder, baking soda, and salt in a large bowl. With an electric mixer on medium-high speed, beat butter and both sugars until fluffy, 3 to 4 minutes. Beat in yolk and vanilla. Reduce speed to low; mix in flour mixture, scraping sides of bowl as needed.
- Preheat oven to 350 degrees. Press dough evenly into bottom of a 10-inch springform pan to form a 1/4-inch-thick crust. Chill in freezer 15 minutes. Bake until firm, about 15 minutes. Transfer pan to a wire rack, and let cool completely. Leave oven on.
- Make the filling: Whisk together granulated sugar, flour, and cocoa powder. Beat cream cheese with an electric mixer on medium speed until fluffy, about 3 minutes, scraping sides of bowl as needed. Reduce speed to low. Gradually add the sugar mixture, and mix until smooth. Add sour cream and vanilla, and mix until smooth. Add whole eggs, 1 at a time, and the yolk, mixing just to combine after each addition. Add chocolate, and mix until combined.
- Wrap exterior of springform pan with a double layer of foil. Pour filling onto prepared crust, and set springform pan in a roasting pan. Fill roasting pan with enough boiling water to reach halfway up the sides of springform. Bake cheesecake 45 minutes.
- Reduce oven to 325 degrees. Continue to bake until set but slightly wobbly in the center, about 30 minutes more. Turn oven off; leave cake in oven with door ajar for 1 hour.
- Transfer springform pan to a wire rack, remove foil, and let cake cool completely. Run an offset spatula or a knife around edge of cake, and carefully unmold. Set cake on wire rack set over a rimmed baking sheet.
- Make the glaze: Combine chocolate and corn syrup in a heatproof bowl. Bring cream to a boil in a small saucepan; pour over chocolate mixture. Let stand 5 minutes, then whisk until smooth. (Do not whisk too much or bubbles will form.) Let cool 10 minutes. Pour glaze over cake in a circular motion, starting at the center and slowly moving outward toward the edge, to cover entire surface. Refrigerate, uncovered, until set, at least 4 hours (or up to 2 days, covered).
- Decorate the cake: Print snake stencil template. Place it under a sheet of calendar vinyl. Use a permanent marker to trace the outline and the snake design onto vinyl. Working on a cutting mat, use a craft knife to cut along the lines. Work slowly and carefully. The vinyl will dull the knife's blade; change the blade as necessary. Set snake stencil on cake. Sift green powdered food coloring over snake, avoiding the tongue. Sift red powdered food coloring over tongue. Carefully remove stencil. Serve immediately.
Tips:
- Use a variety of candy: This will give your cake a more interesting flavor and appearance. For example, some popular candy options include M&Ms, Skittles, gummy bears, and licorice.
- Be careful not to overcook the cake: Overcooked cake will be dry and crumbly. To test if the cake is done, insert a toothpick into the center. If it comes out clean, the cake is done.
- Let the cake cool completely before frosting it: This will help to prevent the frosting from melting.
- Use a piping bag to decorate the cake: This will give you more control over the design of the cake.
- Be creative! There are endless possibilities when it comes to decorating a Slinky the Snake Cake. Have fun with it and let your imagination run wild.
Conclusion:
The Slinky the Snake Cake is a fun and delicious cake that is perfect for any occasion. It is easy to make and can be decorated in a variety of ways. With its colorful candy and fun design, this cake is sure to be a hit with kids and adults alike. So next time you are looking for a fun and festive cake to make, give the Slinky the Snake Cake a try.
Are you curently on diet or you just want to control your food's nutritions, ingredients? We will help you find recipes by cooking method, nutrition, ingredients...
Check it out »
You'll also love