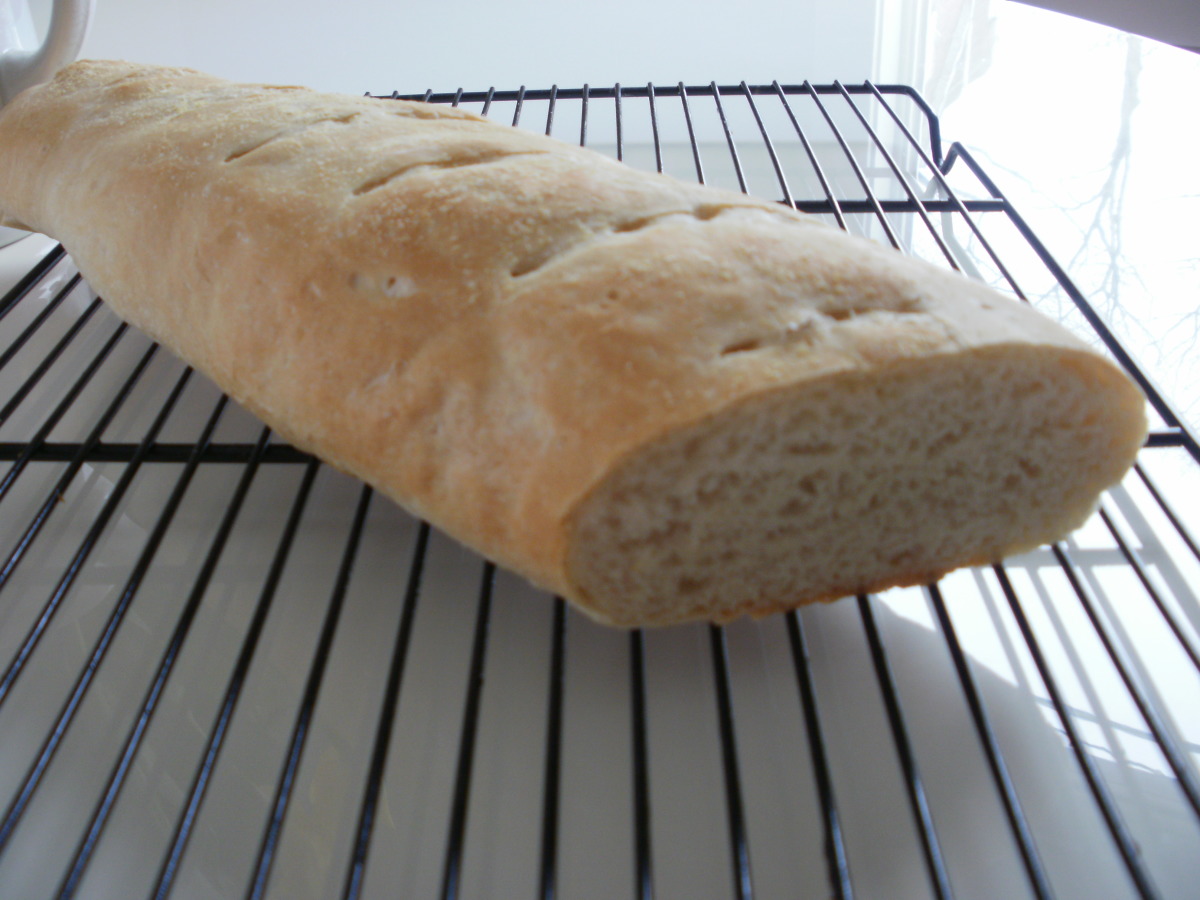
WHEAT SANDWICH BREAD FROM AMISH STARTER


I had an abundance of Amish friendship bread starter and wanted to try something different than the sickly-sweet quick bread recipes out there. I saw JanuaryBride's Sourdough French Bread - ABM (Amish Bread starter) at http://www.recipezaar.com/sourdough-french-bread-abm-amish-bread-starter-375789 and decided to adapt it a bit. I have a Cuisinart SM-70 stand mixer, so my directions reflect this. Refer to your mixer's manual for the speed and duration to use for bread dough. You can also use a bread machine on the French Bread setting. Follow your machine's instructions. Keep in mind that the bulk of that prep time is idle time when your dough is rising and you can do other things. :) NOTE: The starter ingredients at the beginning are here for nutritional info only. The system doesn't know the nutritional info for starter, so I gave approximate measurements of the starter's ingredients).
Provided by Gardenwife
Categories Sourdough Breads
Time 3h30m
Yield 1 loaf, 18 serving(s)
Number Of Ingredients 11
Steps:
- Put water, starter and olive oil in mixer's bowl. Add remaining ingredients. Using dough hook attachment, mix on speed 2 until dough begins to form a ball on the dough hook, about 2 minutes. You may need to add a little more water, especially since whole wheat flour really soaks up the moisture.
- Now, increase the mixer's speed to 3 and let the dough hook knead the dough for four minutes on speed 3. If the dough starts creeping up past the guard on the top of the hook, it's because the dough is a bit too dry. Just sprinkle in a little water.
- After the four-minute knead by the mixer, let the dough rest in the bowl for about 5 minutes. This will help further develop the strands of gluten.
- Do a window pane test: Break off a little piece of the dough and roll it into a ball. Gently flatten the ball with your fingers and tease/stretch the dough out as if you're making a tiny pizza, getting it as thin as you can. If the dough is elastic and you can stretch it into a "window pane" through which light shines, the gluten is well developed and you're ready to proof the dough.
- If the dough rips instead of stretches, it's not kneaded quite enough. Give it a quick one-minute knead on speed 3. This is why I left it in the mixer bowl while letting it rest. ;).
- When the dough's ready turn it out into an oiled bowl and cover the bowl loosely with plastic or a damp tea towel. Place bowl in a warm place. I put the bowl in the oven with its light on, along with a bowl of hot water.
- When the dough's about doubled in size (roughly 90 minutes, but this can vary a bit), punch down the dough. Then, it rise another 45 minutes or so to develop more flavor. The second rise helps it develop more flavor.
- Punch down the dough then turn dough out onto lightly floured counter. Gently roll it out into a rectangle about 9" long and 6" wide. With your fingers, roll the flattened dough into a log, retaining tension as you do so. It's important you create surface tension on the loaf as you roll it up. Pinch the resulting seam together and tuck the ends under a bit.
- Place loaf into a greased loaf pan seam-side-down, cover with a lightly floured tea towel, and let rise about an hour. In a standard 9x5" loaf pan, the dough should rise until it's domed a bit above the loaf pan's top.
- Preheat oven to 375°F With a sharp knife or a razor blade, gently slash the top of the loaf about 1/2" deep all along the top. Bake loaf for 30-35, rotating the pan in the oven once about half way through. The bread is done when you can can turn the loaf over in an oven mitt and a thermometer inserted in the bottom of the loaf registers between 190-195°F The loaf will sound hollow if you thump the bottom.
- Note that ovens vary, and you may need to tent the loaf with tinfoil if the top crust is getting too dark.
- Let loaf cool in pan for 5 minutes, then turn out onto a cooling rack. Let the loaf cool *completely* before you slice it.
Nutrition Facts : Calories 128.3, Fat 1.2, SaturatedFat 0.2, Cholesterol 0.1, Sodium 262.6, Carbohydrate 26.2, Fiber 2.2, Sugar 3.8, Protein 3.9
Are you curently on diet or you just want to control your food's nutritions, ingredients? We will help you find recipes by cooking method, nutrition, ingredients...
Check it out »
You'll also love


A To Z
a_z@yahoo.comI can't wait to try this recipe! I love Amish bread, and I'm sure this wheat sandwich bread will be just as delicious.
Free Fire Legend
freef85@gmail.comThis is the best wheat bread I've ever had. It's soft, fluffy, and has a delicious flavor. I will definitely be making this again and again.
Sisipho Giyose
g-s24@hotmail.co.ukI've made this bread several times, and it's always been a hit. I love the fact that it's so easy to make and that it always turns out perfect.
Charles Reott
r-charles@hotmail.comI'm not sure what went wrong, but my bread didn't rise properly. It was flat and dense.
Ester Shao
s_ester4@aol.comI followed the recipe exactly, but my bread didn't turn out right. It was too dry and crumbly.
Isaac Ofori
i@aol.comThis bread is a bit too dense for my taste. I prefer a lighter, fluffier bread.
Tushar Sarkar
t.s@gmail.comI'm not a huge fan of the Amish starter. I find that it gives the bread a slightly sour flavor.
Sasini Sashiksha
sasini.s@yahoo.comThis bread is a bit pricey to make, but it's worth every penny. It's so delicious and nutritious.
Rose B.
b@yahoo.comI love the crusty exterior and soft, fluffy interior of this bread. It's the perfect bread for any occasion.
Nadine Holman
holmann23@yahoo.comThis bread is a great way to use up leftover Amish starter. I always have a jar of starter in my fridge, so I can make this bread whenever I want.
Dylan Rey
r81@gmail.comI'm a beginner baker, and this recipe was easy to follow. I was so impressed with the results!
bizuuu Bizuuu
bizuuu-bizuuu@gmail.comThis bread is a bit time-consuming to make, but it's totally worth it. The end result is a delicious, homemade loaf of bread that you can feel good about eating.
Eva Bushi
eva.b67@yahoo.comI've tried other wheat bread recipes, but this one is by far the best. It's the perfect balance of sweetness and savoriness.
Khamari Neeson
neeson_khamari@hotmail.comThis bread is a bit more dense than other sandwich breads, but I actually prefer it that way. It's more filling and satisfying.
Alauddin Ahamed
a@yahoo.comI love the fact that this recipe uses an Amish starter. It gives the bread a unique flavor that you can't get from store-bought bread.
Abed Rohman
rohman@gmail.comThis bread is perfect for sandwiches, toast, or just eating plain. It's also great for freezing, so you can always have fresh bread on hand.
Sajid Nawaz
n-s70@hotmail.comI'm not a big fan of wheat bread, but this recipe changed my mind. It's so light and fluffy, and it has a great flavor.
Ramzan Saeed
s-ramzan@yahoo.comI've been making this bread for years, and it's always a hit. It's so easy to make, and it always turns out perfect.
Demon Princess
dprincess81@yahoo.comThis Amish Wheat Sandwich Bread is a winner! It's soft, fluffy, and has a slightly sweet flavor that pairs perfectly with any sandwich filling. I especially love it with ham and cheese or peanut butter and jelly.