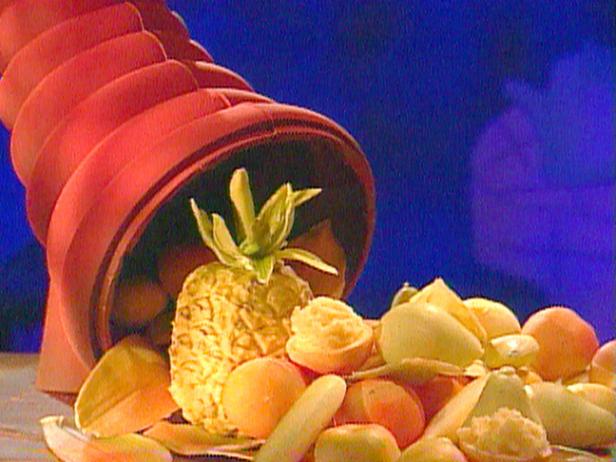
Steps:
- Make the chocolate fruits: Use a ladle to fill a fruit mold with white chocolate. When it is full, empty it into the bowl of chocolate. The inside of the mold should be evenly coated with chocolate. Wipe the edge of the mold clean on the side of the bowl and place it upside down on a wire rack placed over a baking sheet. Once the chocolate starts to harden, about 5 minutes, scrape the edge clean with a paring knife. Repeat to make as many fruits as you will need for your centerpiece. For my centerpiece, I used lemons, pears, oranges, bananas, pineapples and apples. When the chocolate has set, remove the fruits from the molds.
- Make the leaves: Use a pastry brush dipped in white chocolate to coat one side of the plastic leaf. Allow the chocolate to set and then peel off the plastic leaf. Repeat to make as many leaves as you would like. Use the same technique to make smaller leaves for the pineapple stem.
- Assemble the pineapple stem. I used a plastic dome mold to give my pineapple stem its final shape. You could also use a small glass bowl. Place a small dollop of white chocolate in the bottom of the mold. Add leaves resting the ends in the chocolate and the tops along the side of the bowl. Add another layer. Continue this process to make as big of a stem as you like. When the chocolate has set, pop the stem out of the mold.
- Paint the fruit and the leaves: If you use an airbrush, simply place a few drops of color in the receptacle of the airbrush and decorate as you are inspired. Use an airbrush to paint the pineapple stem and the leaves green. Use tempered chocolate to adhere the stem to the top of the pineapple. Paint each of the fruit, as you are inspired to do so.
- Make a base: Place metal rulers on a parchment paper lined surface so they form an open space that measures about 24½ by 16 inches. If you don¿t have metal rulers, you could also use modeling clay or wood rulers. Place a very large cake ring or a round of aluminum flashing that is 13½ inches in diameter inside the space. Pour tempered dark chocolate inside the ring and open space to form a 1/2-inch-thick layer. When the chocolate has set, remove the ring and the rulers and peel off the parchment paper. The ring is inside but separate from the rest of the base so you can move the finished cornucopia to any position.
- Make the base supports: Place metal rulers on a parchment paper lined surface so they form an open square that measures about 8 inches. Pour tempered chocolate inside the space to form a 1/2-inch-thick layer. When the chocolate begins to set but is not yet hard, use a knife to cut a line that resembles 3 half circles end to end. The curves in this piece match the curves in the mold of the cornucopia. When we are ready to set the cornucopia in place, it will rest on these triangles. When the chocolate has set, remove the rulers and peel off the parchment paper.
- Make the chocolate cornucopia: The mold I used was about 12 inches wide and 30 inches long. Use a ladle to pour some chocolate into 1 half of the mold. Use a pastry brush to distribute the chocolate over the entire mold. You may want to repeat this step so the finished piece is about 3/8-inch thick. Repeat with the other half of the mold. Clip the 2 halves of the mold together. Place the mold inside a box and pour chocolate inside of it. Rotate the mold so the chocolate evenly coats the inside. Pour the excess chocolate back into the mold and place the mold upside down on a wire rack placed over a baking sheet. When the chocolate is set, remove the mold.
- Stand the cornucopia on its open end. Use tempered chocolate to adhere the triangular base pieces to the cornucopia. Position them so they will support the cornucopia when it is standing in its final position.
- Prepare the paint sprayer: Place equal amounts of dark chocolate and cocoa butter over a double boiler and melt until smooth with no lumps. Place the cornucopia in the freezer for about 20 minutes. The surface of the chocolate must be chilled so the chocolate coating will harden upon contact, giving it the desired texture.
- Remove the cornucopia from the freezer and place on a flat surface. Place the chocolate mixture in a clean paint sprayer and use it to spray the dessert with the chocolate. Tip: Cleanup will be easier if you use a cardboard box as a backdrop to the mold when you spray it. Spray the chocolate with the sprayer to give it a chocolate velvet texture.
- Fill the fruits: Use a piping bag or offset spatula or spoon to fill each fruit mold with the appropriate sorbet flavor. Fill completely and place into the molded chocolate fruit back in the freezer until ready to use. You can also use tempered chocolate to close some of the fruit molds Tip: This process can be done 1 to 2 days in advance.
- Assembly: Tip: Anything that touches the cornucopia after it has been sprayed will leave a mark. If you have to move it, place your hand well inside the mold and move it by touching only the inside. Transfer the sprayed cornucopia onto the circle of the base. You can touch the base to rotate the presentation into any position.
- Arrange the frozen chocolate fruits and leaves within the cornucopia.
- SOURCES
- Cornucopia mold: Tomric Plastics
- Fruit molds: Tomric Plastics
- Plastic fruit: Industrial Plastics
- Plastic leaves: floral supply store
- R
Are you curently on diet or you just want to control your food's nutritions, ingredients? We will help you find recipes by cooking method, nutrition, ingredients...
Check it out »
You'll also love



Future Mh
[email protected]This chocolate cornucopia is a great dessert for any chocolate lover. It's easy to make and always a crowd-pleaser.
Small Proof
[email protected]I'm not a big fan of chocolate, but I really enjoyed this chocolate cornucopia. It's not too sweet and the chocolate ganache is amazing.
jovanni gaitan
[email protected]This chocolate cornucopia is a bit pricey to make, but it's worth it for a special occasion.
Parker Bruck
[email protected]I love how this chocolate cornucopia looks when it's finished. It's so elegant and perfect for a special occasion.
Rohat kabir Tahin
[email protected]This chocolate cornucopia is a great way to use up leftover chocolate. It's also a fun and easy dessert to make with kids.
Alfred Kipkurui
[email protected]I've never made a chocolate cornucopia before, but this recipe made it easy. It turned out perfectly and I'm so happy with the results.
Mohsan Kazmi
[email protected]This chocolate cornucopia is a bit time-consuming to make, but it's worth it. The end result is a beautiful and delicious dessert.
Manuel boss
[email protected]I made this chocolate cornucopia for my daughter's birthday party and it was a huge success. All the kids loved it.
The_Infamous_Chicken_ Man
[email protected]This chocolate cornucopia is the perfect dessert for a chocolate lover. It's rich and decadent, and the chocolate ganache is to die for.
murtaza solangi
[email protected]I love how this chocolate cornucopia looks. It's so festive and perfect for a party.
warren pete welsh jr
[email protected]This was my first time making a chocolate cornucopia and it turned out great! I followed the recipe exactly and it was easy to follow.
Joylekam Ibiang
[email protected]I've made this chocolate cornucopia several times now and it's always a crowd-pleaser. It's the perfect dessert for any occasion.
Andrew Boakye
[email protected]This recipe is a keeper! It's so easy to make and the results are always delicious.
Soliman jomaddar
[email protected]I made this for my family and they all loved it. It was a great way to use up some leftover chocolate.
Bikash ale Magar
[email protected]This chocolate cornucopia was a hit at my party! It was so easy to make and everyone loved it.