**Pullman bread**, also known as **pain de mie**, is a type of sandwich bread characterized by its soft, fluffy texture and slightly sweet flavor. It originated in the United States in the early 1900s and quickly became popular due to its consistent quality and ease of slicing. Pullman bread is made using a specific type of baking pan called a Pullman loaf pan, which is tall and narrow with straight sides. This unique shape helps to create the bread's signature square profile and even crumb.
There are two main types of Pullman bread recipes: **traditional** and **no-knead**. Traditional Pullman bread recipes require the use of a stand mixer or bread machine to knead the dough, while no-knead recipes can be made by hand. Both types of recipes typically include ingredients such as flour, water, yeast, sugar, salt, and butter. Some recipes may also include additional ingredients such as eggs, milk, or honey.
This article provides two detailed recipes for making Pullman bread:
1. **Traditional Pullman Bread Recipe:** This recipe uses a stand mixer to knead the dough and requires several hours of rising time. The result is a classic Pullman bread with a light and fluffy texture and a slightly sweet flavor.
2. **No-Knead Pullman Bread Recipe:** This recipe is perfect for busy bakers who don't have a lot of time. It uses a simple no-knead method and only requires a few hours of rising time. The resulting bread is just as delicious as the traditional version, with a soft and chewy texture and a mild flavor.
Whether you're a seasoned baker or a beginner, these recipes will help you create a perfect loaf of Pullman bread. So preheat your oven and let's get started!
WHITE PULLMAN LOAF (PAIN DE MIE)
You'll never buy supermarket bread again after trying this homemade white bread. Using "enriched dough" (one with milk and eggs) gives this loaf a delicious flavor and velvety soft crumb. (For baking, accurate metric measurements produce the best results, so we recommend using a digital scale for this recipe.)
Provided by Zachary Golper
Categories side-dish
Time 15h
Yield 12 servings
Number Of Ingredients 14
Steps:
- Starter: Also called pre-ferment, pâte fermentée (a mature pre-ferment, as in this starter), or poolish (which contains commercial yeast, as in this starter), this is the leavening or rising component of the bread baking process. Turn on a digital scale and weigh your empty container. Deduct the weight of the container by pressing the "tare" function, which resets the scale to zero. Add milk to the container, and tare to zero again. Then, continuing to weigh the ingredients, add salt, pinch of yeast, sugar, and flour. Use a chopstick to stir the starter until the dry and wet ingredients are just mixed. Cover with plastic wrap and let rest at room temperature, away from direct sunlight, 6-8 hours.
- Dough: Stir flour, sugar, yeast, and salt in a medium bowl, and set aside. Pour milk into the pre-ferment to loosen it. Whisk 2 eggs in a large bowl; then stir in the pre-ferment/milk mixture. Use a rubber spatula to break up the pre-ferment into the liquid. Add the flour mixture and the butter, and continue mixing until most of the dry ingredients have been combined with the starter mixture. Using a wooden spoon, and starting in the middle of the bowl, slowly stir to the edges until most of the flour has been mixed in and hydrated.
- Roll and Tuck: A technique to develop gluten in the dough so it becomes firmer and easier to work with. This is done one time, followed by a resting period. Combine 1 part fine semolina with 5 parts unbleached white flour to make dusting flour, and lightly dust a clean work surface. Using a plastic bowl scraper, push the dough and residual flour out of the bowl onto the work surface. Use the scraper to stretch and gently shape the dough into a rough rectangle (dough will still be sticky). Then, starting at one end, roll and tuck the dough like a tube, about 3-4 times. Flip the dough so it's seam-side up and flatten again to a rectangle in the opposite direction, so the seam stretches from left to right. Repeat rolling and tucking, always returning to a seam-up position. Continue until the dough feels stronger and begins to resist any further rolling, about 10 times. All of the flour will get absorbed into the dough during this process. Shape into a ball and place into a bowl coated with nonstick spray. Cover with plastic wrap and let rest at room temperature, 45 minutes.
- Stretch and Fold: This technique strengthens the dough by folding it over onto itself. This process is repeated 3 times, with a resting period after each stretch and fold. Lightly dust the work surface and your hands with dusting flour. Using the scraper, release the dough from the bowl and place it seam-side down on the work surface. Gently shape into a rectangle, then fold the dough into thirds, like a letter. Pat it down slightly, then repeat the same fold in the other direction. Place the dough back in the bowl, cover with plastic wrap and let rest at room temperature, 45 minutes. For the second stretch and fold, repeat the steps for the first stretch and fold, but this time stretch the dough by flipping back and forth (like pizza dough). Gently reshape it into a rough rectangular shape before folding. Cover with plastic wrap and rest at room temperature, 45 minutes. For the third and final stretch and fold, repeat the steps for the second stretch and fold, cover with plastic wrap and rest at room temperature, 45 minutes.
- Shaping/Fermentation (Proofing): Shape the dough to prepare it for baking, then ferment (proof) it for a period of time to expand the dough and develop flavor. Spray the bottom and sides of a pullman loaf pan with nonstick spray. Lightly dust the work surface and your hands with dusting flour. Press the dough down slightly to de-gas it, then stretch into a 16-inch square (or to whatever length of the pan you're using). Roll the square into a tube. Place the tube seam side down into the prepared pan. Gently tap the dough down with your fist to even it out in the pan, then cover with plastic wrap. Let rest at room temperature until the dough rises about 1½ -inches above the surface of the pan, 1½-3 hours.
- Baking: Preheat oven to 425 degrees F (preferably convection). Test dough for baking by gently pressing; it should bounce back, leaving a slight dimple. Make an egg wash by whisking the remaining egg with a pinch of salt; add about 1 tablespoon of milk to thin it out. Spray the outer edges of the pan with nonstick spray and use a pastry brush to gently brush egg wash across the top of the dough, twice. (The spray will ensure the egg wash doesn't seep into the corners of the pan.) Place in the oven and bake for 10 minutes. Lower temperature to 385 degrees F. Rotate the pan and bake an additional 12-15 minutes. Test for doneness by removing from oven and giving it a thump on top; it should sound hollow. Tap the pan on the counter to release the loaf; turn it over and carefully remove the bread from the pan. Return the loaf to the oven on its side, and bake directly on the rack to solidify the shape, 5 minutes.
- Cooling, Slicing, and Storing: Transfer bread to a cooling rack (and notice the caramel aroma!). Cool completely before slicing and eating, at least 2 hours. Store loosely in plastic for 7 days.
PULLMAN BREAD OR PAIN DE MIE

Pullman bread or Pain de mie is a sandwich bread with four square corners baked in a Pullman loaf pan. This pullman bread recipe will help you make soft and fluffy sandwich bread with soft crust in five simple steps.
Provided by Bincy Chris
Categories Breakfast
Time 3h20m
Number Of Ingredients 6
Steps:
- Into a bowl,add in all the ingredients and combine everything together to for a shaggy mass of dough.Add lukewarm water,sugar,salt,yeast,butter,and flour.Combine evrything together and transfer this onto a clean work surafce.Knead the dough until you get a smooth and elastic dough.Place in an oiled bowl and cover with plastic wrap.
- Leavethe dough to rise in a warm place for about an hour or until doubled in volume.
- When the dough is double in volume transfer this on to a lightly floured surface.Shape it into a rectangle and roll it like a jelly roll.Pinch the seams together.Place into a buttered Pullman loaf pan seam side down.
- Cover loaf pan with plastic wrap.Let rise in a warm place for about 45 -50 minutes until almost 1 inch from the top rim of the loaf pan.Once you see your dough is almost halfway up the sides - start preheating the oven.
- Cover the loaf pan with its lid.Place the loaf pan on the middle rack in the preheated oven.Bake @375 F for about 35 -40 minutes.The bread is done - when you tap the bottom of your loaf and you will hear a hollow sound.Open the lid and let it sit in the pan itself for 2-3 minutes and then let it finish cooling on a wire rack.Enjoy!Happy baking!
PULLMAN SANDWICH BREAD AKA PAIN DE MIE

Pain de mie is a French sandwich bread with four square corners baked in a Pullman loaf pan. This simple and easy recipe for Pullman sandwich bread makes a light and fluffy loaf of bread with perfect four square corners. And, it has a delicate soft texture, soft crumb, and delicious flavor.
Provided by Veena Azmanov
Categories Breakfast Dinner Lunch
Time 2h45m
Number Of Ingredients 21
Steps:
- Ensure milk is warm, not hot (about 110 F). In a small bowl add the yeast, sugar, and egg. Stir and set aside to foam for 5 mins.Pro tip - Instant yeast does not need to be activated but I like to ensure my yeast is good and working for me. You may choose to add all ingredients directly to the flour.
- In the large bowl of a stand mixer, with the dough hook attachment add the flour and salt. Then, add the yeast mixture. Combine with a wooden spoon or rubber spatulaPro tip - If you do not like kneading, I highly recommend using a stand mixer with the hook attachment.
- Knead on medium speed for about a minute scraping the sides of the bowl as necessary. Pro tip - Do not make haste to add additional water or flour at this point because the flour is still absorbing liquid.
- Once all the flour is incorporated, knead the dough for three minutes on medium speed until smooth. The dough will be soft and sticky.Pro tip - A soft and sticky dough is a light and airy bread so don't add more flour.
- Next, add the soft room temperature butter a little at a time. knead again for 2 minutes until smooth and elastic but still soft.Pro tip - When you add the butter it will seem like the dough is falling apart. Trust the process and keep kneading.
- Avoid the temptation to add more flour. We want soft, light, and fluffy brad, and this is only possible when the dough is soft, elastic, yet slightly sticky.Note - If using a stand mixer, you may need to add the reserved flour for kneading to prevent the dough from sticking to the bowl. If kneading by hand, use the reserved flour as required for kneading to prevent the dough from sticking to the work surface.
- Remove the dough from the mixer bowl onto a lightly floured surface. Shape into a ball.Pro tip - Using a flexible bread scraper does a good job of removing the sticky dough from the bowl.
- Place in an oiled bowl and cover with plastic wrap or clean kitchen cloth. Leave to rise in a warm place for about an hour until doubled in volume.Pro tip - In winter, you may need 90 minutes or more. But in summer, the dough may double in 45 minutes. If you can't attend to it at that moment, de-gas, reshape, and let double in volume again.
- When the dough is double in volume invert the risen dough onto a lightly floured surface. Divide into two - to make two loaves or one large 13-inch loaf.
- Start to roll like a jelly roll. Fold from top to the center then again once more towards the end. Pinch the seams together.
- Place into a buttered Pullman loaf pan seam side down.
- Cover loaf pan with plastic wrap or clean kitchen cloth. Let rise in a warm place for about 45 minutes until almost 2 inches from the top rim of the loaf pan.
- Once you see your dough is almost halfway up the sides preheat the oven to 380°F / 190°C / Gas Mark 5 for at least 10 minutes.
- Cover the loaf pan with its lid. Place the loaf pan on the center rack in the hot oven.Pro tip - You want to place the lid on before it rises to the top so you don't ruin the rise.
- Bake the 13-inch loaf for about 45 to 50 minutes, the 9-inch loaf for about 25 to 30 minutes, and the 7-inch loaf for about 20 to 25 minutes. Pro tip - The bread is done - when you tap the bottom of your loaf and you will hear a hollow sound (or the internal temperature registers between 160° to 180°F on an instant-read thermometer)
- Partially open the lid and let cool for 10 minutes - before you remove and let cool completely. Take it out of the pan and cover it with a clean kitchen cloth for at least 5 minutes.Pro tip - Wrapping the bread in kitchen cloth will let the steam cool in the bread keeping it soft.
- Always let bread rest for at least an hour before you cut - this is the hardest part!! But, it will prevent the steam from escaping and making the bread dry.
- Enjoy!
Nutrition Facts : Calories 240 kcal, Carbohydrate 40.2 g, Protein 7.7 g, Fat 4.9 g, SaturatedFat 2.6 g, Cholesterol 30 mg, Sodium 582 mg, Fiber 1.7 g, Sugar 2.9 g, UnsaturatedFat 2.3 g, ServingSize 1 serving
PAIN DE MIE - FRENCH PULLMAN BREAD (ABM)
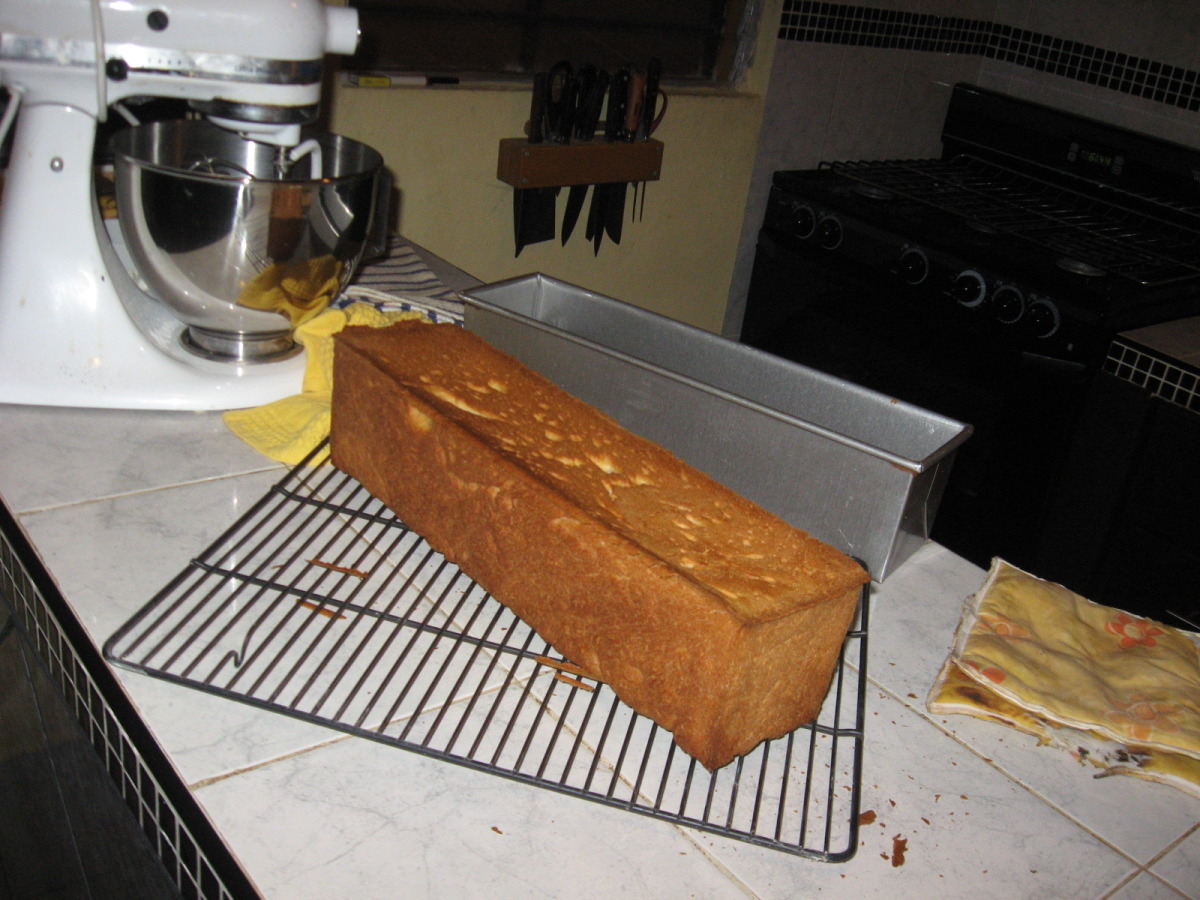
This recipe comes from King Arthur. I made minor changes to reflect more generic ingredients. According to them, the best bread for thin-slicing is called pain de mie, a butter- and milk-rich loaf baked in a special lidded 13" x 4" x 4" pan. The lid ensures that the baking bread won't expand too much, keeping it very close-grained-and thus totally non-crumbly, and easy to slice. You can use all all-purpose flour without the whole wheat.
Provided by Rinshinomori
Categories Yeast Breads
Time 40m
Yield 1 bread
Number Of Ingredients 10
Steps:
- Combine all of the ingredients, and mix and knead them-by hand, mixer, or bread machine-to form a smooth, supple dough.
- Transfer the dough to a lightly greased bowl or dough-rising bucket, cover the bowl or bucket, and allow the dough to rise till puffy though not necessarily doubled in bulk, about 1 1/2 hours.
- Lightly grease a standard (13 x 4 x 4-inch) lidded pain de mie pan.
- Transfer the risen dough to a lightly greased work surface, shape it into a log, and fit it into the pan. Flatten the top as much as possible. Cover the pan with lightly greased plastic wrap, and allow the dough to rise until it's about 1/2-inch below the lip of the pan, about 45 minutes.
- Carefully slip the cover onto the pan, and let it rest an additional 15 minutes while you preheat your oven to 350°F.
- Bake the bread for 25 minutes. Remove the pan from the oven, carefully remove the lid, and return the bread to the oven to bake for an additional 10 to 15 minutes, until it's golden-brown on top and tests done; an instant-read thermometer inserted into the center will register 190°F
- Remove the bread from the oven, and turn it out of the pan onto a rack to cool completely. For a soft, flavorful crust, brush the loaf with melted butter while warm. Yield: 1 loaf.
Nutrition Facts : Calories 3277.7, Fat 94.8, SaturatedFat 56.3, Cholesterol 250.2, Sodium 5444.6, Carbohydrate 527.2, Fiber 37.1, Sugar 57.8, Protein 88.5
PULLMAN LOAF (PAIN DE MIE)

Originally from Jacque Pepin's La Complet Techniques but dough handling is completely different and this will fit in the most common loafpan size available. I suggest you double wrap whatever weight you have in foil to protect your bakeware. This can also be made in a kitchenaid mixer if your arms aren't up for the exercise!
Provided by Heather Sullivan
Categories Breads
Time 4h20m
Yield 1 loaf
Number Of Ingredients 7
Steps:
- Weigh out flour and remove about a cup from the flour.
- Mix the milk with the hot water (should be around 95F) then mix in the dry yeast and sugar into the milk and add to the flour.
- Mix everything with a wooden spoon for 5 minutes.
- Add softened butter in chunks and beat this into the mix (yes this is extremely hard work but you'll love the bread!) then add the reserved flour and salt and mix together. Try to beat/mix this extremely soft dough for 2-3 minutes until very elastic.
- Heavily butter another bowl and scoop the soft dough into the bowl and cover in plastic wrap.
- Place in oven at 45C(85F) for 2 hours to rise. Heavily butter an 8inch by 4 inch loaf pan and the bottom of a heavy baking sheet. When batter/dough has risen, smush down and fold with a spoon gently then scrap into an 8inchx4inch loaf pan. Cover with plastic wrap or dry kitchen tea towel and let rise until it's just below the top of the pan NOT ABOVE THE LOAF PAN EDGE! Place buttered-bottom baking sheet on top of loaf pan and place brick/rock/heavy weight on top. Place carefully into 425F/210C oven for 20 minutes then remove weight and continue baking for 20 minutes longer or until the bread sounds hollow when thumped on the base (remove from oven, invert from pan, and thump). When done, remove from pan and let cool on rack.
Nutrition Facts : Calories 2457.7, Fat 82.6, SaturatedFat 50, Cholesterol 217, Sodium 3631.1, Carbohydrate 366.1, Fiber 13.3, Sugar 7.6, Protein 57.5
Tips:
- Use high-quality ingredients: Fresh yeast, strong bread flour, and a good quality butter will all contribute to a better final product.
- Follow the recipe carefully: Pullman bread is a precise bread to make, so it's important to follow the recipe carefully. Don't skip any steps or ingredients, and make sure to measure everything accurately.
- Create the right environment: Pullman bread dough needs a warm, humid environment to rise properly. If your kitchen is too cold or dry, you can create a warm, humid environment by placing the dough in a warm oven with a bowl of hot water.
- Be patient: Pullman bread takes time to make. Don't rush the process, or you'll end up with a dense, heavy bread. Give the dough plenty of time to rise, and don't overwork it.
- Use a Pullman loaf pan: A Pullman loaf pan is essential for making Pullman bread. This type of pan has a straight sides and a tight-fitting lid, which helps to create the characteristic square shape of Pullman bread.
Conclusion:
Pullman bread is a delicious and versatile bread that can be used for sandwiches, toast, or even French toast. It's a great bread for beginners, as it's relatively easy to make. With a little patience and care, you can create a beautiful and delicious loaf of Pullman bread that will impress your friends and family.
Are you curently on diet or you just want to control your food's nutritions, ingredients? We will help you find recipes by cooking method, nutrition, ingredients...
Check it out »
You'll also love


