Best 2 Peanut Butter Wafer Recipes


Peanut butter wafers are a classic American cookie that is loved by people of all ages. These cookies are made with a simple dough that is rolled out and cut into shapes, then baked until golden brown. The cookies are then filled with a creamy peanut butter filling and topped with a chocolate ganache.
This article provides recipes for three different types of peanut butter wafers:
* **Classic Peanut Butter Wafers:** These are the traditional peanut butter wafers that are made with a simple dough and filled with a creamy peanut butter filling.
* **Chocolate Peanut Butter Wafers:** These wafers are made with a chocolate dough and filled with a chocolate peanut butter filling.
* **Peanut Butter Cup Wafers:** These wafers are made with a peanut butter dough and filled with a peanut butter cup filling.
All three of these recipes are easy to follow and can be made with ingredients that you can find at your local grocery store. So what are you waiting for? Start baking today!
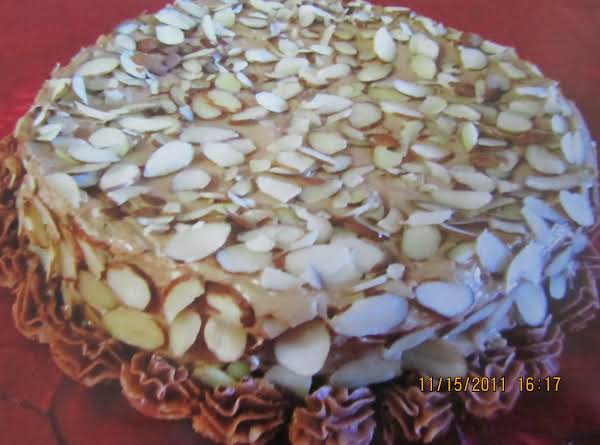
PEANUT-BUTTER WAFER CAKE
This towering trifecta of flavor and texture - crisp wafer, creamy peanut butter and glossy dark chocolate - comes together quickly and easily. The hidden star here is Katherine Yang's utterly delicious peanut butter cream, which binds the layers. It's savory and nutty, silken and not too sweet. Wafer sheets come in standard 8 1/2-inch rounds, so tempering the chocolate in a 10-inch-wide, shallow pan is the simple trick to easy dipping. You can use an offset spatula to spread the filling, or for a more impressive presentation, use a star tip, and pipe swirls, rosettes or scallops. The cake should be eaten soon after assembly, as the filling will eventually start to soften the wafer's crispness.
Provided by Gabrielle Hamilton
Categories cakes, dessert
Time 35m
Yield 8 to 12 servings
Number Of Ingredients 13
Steps:
- Bring milk and cream to simmer in a heavy 1-quart saucepan over medium heat.
- Whisk egg and yolk in a medium bowl. Add sugar, cornstarch and flour, and whisk until very well incorporated and almost fluffy.
- Whisk hot milk mixture into egg mixture. Return mixture to saucepan, and return heat to medium. Boil 1 minute, whisking constantly, or until thickened. Remove from heat. Whisk peanut butter into hot pastry cream.
- Strain the mixture through a fine-mesh sieve into a clean bowl, stir in salt, then cover with plastic wrap directly on cream to prevent skin from forming. Chill at least 3 hours, or overnight.
- Prepare the cake layers: Bring a wide pot of shallow water to a very gentle simmer over low heat.
- Place 2/3 of chocolate shards plus solid shortening in a clean 10-inch skillet set over the gently simmering water, and melt slowly. Bring the mixture to 110 degrees, and stir well to create a glossy, uniform consistency. Seed in remaining chocolate shards, and stir until completely melted and glossy, and chocolate tempers to 91 degrees. Remove from heat or turn off simmering water (or both).
- Pulse peanuts in food processor until they're a coarse meal. Remove, and stir in confectioners' sugar.
- Drop one wafer sheet into chocolate, giving it a tiny swirl to make sure the entire surface underneath is coated. Retrieve the wafer with tongs, tweezers or two forks, and hover it over the chocolate until dripping stops, then invert wafer, chocolate face down, on a baker's rack set over parchment to "drain." You want a film of chocolate to glaze the waffling, but you don't want to fill the holes enough to pave them over entirely. Repeat with remaining wafer sheets, tempering the chocolate if needed. While chocolate is still tacky, turn wafers chocolate-side up to finish cooling. (Use an offset spatula if needed to gently release wafer from rack.) Before chocolate sets fully, heavily ring edges of two of the chocolate-dipped wafer sheets by sprinkling the prepared peanut mixture in a 1-inch rim. Allow to cool and harden in a cool, dry place.
- To assemble: Pipe or spread 1/3 of the peanut-butter pastry cream uniformly among three of the wafer sheets (on the chocolate-filmed side to prevent sogginess later), reserving one of the peanut-edged sheets as the topper.
- Refrigerate until ready to serve.
- When ready to serve, stack the sheets chocolate-side up, using the peanut-crusted sheet on the bottom, the other two plain sheets in between, and top with the last peanut-crusted chocolate wafer sheet.
PEANUT BUTTER WAFER
Peanut butter is one of the dessert popular in our country Phillipnes
Provided by Lanie Wimbley
Categories Cakes
Time 40m
Number Of Ingredients 13
Steps:
- 1. Beat the eggwhites until stiff.Add the sugar little by little.Fold in the chopped nuts and the vanilla. Bake in well greased and floured pan until golden brown.
- 2. Make syrup with the sugar and the water until it spins a thread. Pour in the syrup to the beaten eggyolk little by little. Add the butter and beat it until thick. Add flour with baking power, beat until thick. Add rum and decorate cake.
Tips for Making Peanut Butter Wafers
- Use creamy peanut butter. This will result in a smoother, more consistent batter.
- Chill the peanut butter before using. This will make it easier to handle and prevent the wafers from spreading too much.
- Don't overmix the batter. Overmixing will make the wafers tough.
- Bake the wafers until they are just set. Overbaking will make them dry and crumbly.
- Let the wafers cool completely before serving. This will help them to firm up and crisp up.
Conclusion
Peanut butter wafers are a delicious and easy-to-make treat that can be enjoyed by people of all ages. They are perfect for parties, potlucks, or simply as a snack. With a few simple ingredients and a little bit of time, you can create a batch of peanut butter wafers that will be sure to please everyone. So what are you waiting for? Give this recipe a try today!
Are you curently on diet or you just want to control your food's nutritions, ingredients? We will help you find recipes by cooking method, nutrition, ingredients...
Check it out »
You'll also love