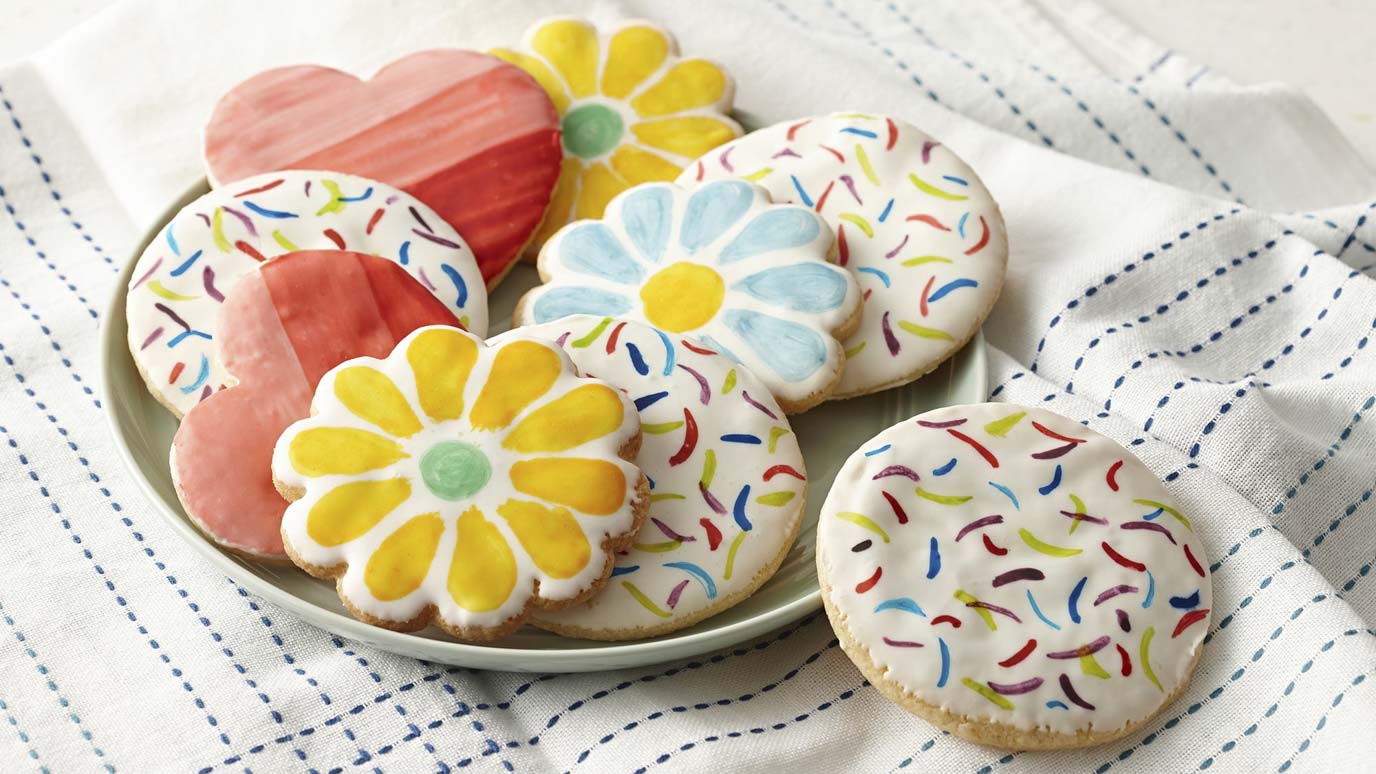
Best 5 Painted Sugar Cookies Recipes


Indulge in the delightful art of edible artistry with our painted sugar cookies, a culinary canvas that combines the joy of baking with the creativity of painting. Embark on a sweet journey where taste meets aesthetics, as you transform simple cookies into vibrant masterpieces. Our collection of recipes offers a range of designs, from whimsical animals and floral motifs to intricate geometric patterns, ensuring there's a design for every skill level and occasion. With our step-by-step instructions and expert tips, you'll discover the joy of painting with edible colors, creating cookies that are not only delicious but also visually stunning. Let your imagination run wild as you bring your edible artworks to life, turning ordinary cookies into extraordinary edible masterpieces.
Check out the recipes below so you can choose the best recipe for yourself!
PAINTED SUGAR COOKIES

Provided by Food Network
Categories dessert
Time 1h15m
Yield About 5 dozen cookies
Number Of Ingredients 11
Steps:
- In a large bowl, cream the butter, shortening and sugar with an electric mixer. Add the egg and vanilla and beat until light. In a small bowl, stir the soda, salt and flour together. Stir the dry ingredients into the creamed ingredients until well mixed. Wrap in plastic wrap and chill the dough for at least 30 minutes.
- Divide the dough in half. Wrap half in plastic wrap and return to the refrigerator. Roll out the dough to 1/8-inch thickness on a lightly floured surface. Cut cookies with a cookie cutter of any design and place on ungreased cookie sheets about 2 inches apart.
- Put 1 teaspoon corn syrup and 1/4 teaspoon water into each of 4 different custard cups. Tint each of the four mixtures with food coloring. Stir each well.
- Paint the unbaked cookies before baking using a small paintbrush. For more fun, press cookie dough through a garlic press to make "hair" for gingerbread figures.
- Preheat the oven to 375 degrees F. Bake for 9 to 10 minutes or until cookies are lightly browned. Remove the cookies with a spatula and cool on wire rack.
PAINTED SUGAR COOKIES

Adding a painted watercolor effect to cookies is an great way to make beautiful, decorated cookies without using more royal icing! These Painted Sugar Cookies are a unique and fun cookie decorating idea that is easy for beginners and everyone in between. Great as holiday cookies!
Provided by Liz at Owlbbaking.com
Categories Cookies
Number Of Ingredients 7
Steps:
- Start with cookies that have been flooded with royal icing and the royal icing is completely hard & dry.
- Add a few drops vodka to a small bowl or dish and then add a drop or two of gel food coloring.
- Mix with your brush and blot off the excess paint. You're ready to start painting!
- Allow the cookies to dry for an hour or so after painting, before packaging.
- Start by adding a few drops of the Moss Green food coloring into the dish and dilute it slightly with a few drops of vodka.
- Using a flat/wide brush, create several tree trunks. You want to try and make the color a bit deeper for the trunks to give the trees a sturdy center.
- Using the corners of the brush, lightly dab branches on either side of the center. If you repeat some dabs on top of the branches you already made, it gives the tree more depth. Be sure to blot your paintbrush on a paper towel along the way!
- With the darkest trees made, dilute the food coloring with a few more drops of vodka to lighten the color. Make a few more trees at different heights behind the darker ones.
- If you have other shades of green (the Silver Spruce color is gorgeous and works wonderfully for this design), add a drop to the green color you've already made or into a new bowl/cavity. It helps to mix up the shades/tones of greens to give the trees a more of a woodsy, forest look.
- Lastly, add a little dab of color to the bottom of the cookie and thin it out with a bit of pure vodka. Add a different shade of green and swirl it on top for contrast.
- Allow to dry before packaging (about 1 hour or so).
PAINTED SUGAR COOKIES
A simple recipe for painting on royally iced sugar cookies.
Provided by Kelly Anthony
Categories Dessert
Time 5m
Number Of Ingredients 5
Steps:
- In a small bowl mix together the gel food coloring and water until well combined. Set aside until ready to use.
- In a small bowl mix together the cocoa powder and water until mixture is smooth.
- Prepare your workstation by laying a large sheet of wax paper on the counter, and placing the cookies upon it. Have ready your cookie paint and brushes.
- Before making brush strokes on the cookies, dip the brush into the food coloring mixture and press the brush against the sides of the bowl to rid of any excess liquid.
- Gently make brush strokes on the cookies as desired. Set aside until completely dry, 4-5 hours.
Nutrition Facts : Carbohydrate 1 g, Protein 1 g, Fat 1 g, SaturatedFat 1 g, Cholesterol 1 mg, Sodium 1 mg, Fiber 1 g, Sugar 1 g, ServingSize 36 g, Calories 1 kcal
PAINTED SUGAR COOKIES
Make a quick and easy glaze for cookies by warming canned white frosting in the microwave. Then paint colorful designs on the cookie shapes using Flavor Paints - a fragrant mix of vanilla or lemon extract and food color.
Provided by McCormick
Categories Cookies and Brownies,
Yield 36
Number Of Ingredients 7
Steps:
- Preheat oven to 325°F. Mix flour and salt in medium bowl. Set aside. Beat butter and sugar in large bowl with electric mixer on medium speed until light and fluffy. Add egg and vanilla; mix well. Gradually beat in flour mixture on low speed until well mixed.
- Roll out dough on generously floured surface to 1/4-inch thickness. Cut out shapes, such as rounds or flowers, with 3-inch cookie cutters. Place on ungreased baking sheets.
- Bake 8 to 10 minutes or until edges start to brown. Cool on baking sheets 1 minute. Remove to wire racks; cool completely.
- Spoon frosting into medium microwavable bowl. Microwave on HIGH 20 to 30 seconds, stirring every 10 seconds. (Frosting should be a pourable consistency.) Dip tops of cookies into frosting. Place frosted cookies on wire rack set over foil-covered baking sheet. (The baking sheet will catch drips.) Let stand 10 minutes or until frosting is dried.
- Prepare desired colors of Flavor Paints (see below). Using small clean paint brushes, paint designs on cookies.
- Flavor Paints:Rosy Red: 1/2 teaspoon McCormick® Pure Vanilla Extract and 1/4 teaspoon McCormick® Red Food ColorDeep Ocean Blue: 1/2 teaspoon McCormick® Pure Vanilla Extract and 1/4 teaspoon McCormick® Blue Food ColorBlackest Night: 1/2 teaspoon McCormick® Pure Vanilla Extract and 1/4 teaspoon McCormick® Black Food ColorGrass Green: 1/2 teaspoon McCormick® Pure Lemon Extract and 1/4 teaspoon McCormick® Green Food ColorLemony Yellow: 1/2 teaspoon McCormick® Pure Lemon Extract and 1/4 teaspoon McCormick® Yellow Food ColorNeon Blue: 1/2 teaspoon McCormick® Pure Lemon Extract and 1/4 teaspoon McCormick® Neon Blue Food ColorNeon Green: 1/2 teaspoon McCormick® Pure Lemon Extract and 1/4 teaspoon McCormick® Neon Green Food ColorNeon Purple: 1/2 teaspoon McCormick® Pure Vanilla Extract and 1/4 teaspoon McCormick® Neon Purple Food ColorNeon Pink: 1/2 teaspoon McCormick® Pure Lemon Extract and 1/4 teaspoon McCormick® Neon Pink Food ColorDeep Pink: 1/2 teaspoon McCormick® Pure Vanilla Extract and 15 drops McCormick® Red Food ColorMedium Pink: 1/2 teaspoon McCormick® Pure Vanilla Extract and 5 drops McCormick® Red Food ColorLight Pink: 1/2 teaspoon McCormick® Pure Vanilla Extract and 2 drops McCormick® Red Food Color
- Instead of Flavor Paints, try decorating with Colorful Cookie Icing. Mix 1 cup confectioners' sugar, 3 to 4 teaspoons milk and 1/2 teaspoon McCormick Pure Vanilla Extract in small bowl. (Stir in additional milk as needed to thin icing or more confectioners' sugar to thicken, if needed.) Place small amount of icing into small shallow bowls, using one bowl for each color desired. Stir 3 to 4 drops McCormick Assorted Food Colors & Egg Dye into icing until desired shade is reached. To ice cookies, hold cookie by its edge and dip top of cookie into icing. (Or spoon the icing onto cookie using a teaspoon.) Place iced cookies on wire rack set over foil-covered baking sheet to dry. (The foil-covered baking sheet will catch drips.) To add decorative details to cookies, spoon tinted icing into resealable plastic bag. Snip off a tiny piece of the corner. Squeeze icing through hole in plastic bag to decorate cookies. If desired, Colored Sugar may be sprinkled onto freshly iced cookies.
Nutrition Facts : Calories 167 Calories
PAINTBRUSH COOKIES

Betty Crocker Baking for Today cookbook shares a recipe! Paint your way to colorful cookies. Using on-hand ingredients makes creating them extra easy.
Provided by Betty Crocker Kitchens
Categories Dessert
Time 3h30m
Yield 60
Number Of Ingredients 11
Steps:
- In large bowl, mix powdered sugar, butter, vanilla, almond extract and egg. Stir in flour, baking soda and cream of tartar. Cover and refrigerate 2 to 3 hours.
- Heat oven to 375°F. Lightly grease cookie sheet with shortening or spray with cooking spray. Divide dough in half. On lightly floured surface, roll each half 3/16 inch thick. Cut into desired shapes with cookie cutters. On cookie sheet, place cookies about 2 inches apart.
- In small bowl, mix egg yolk and water. Divide mixture among several small custard cups. Tint each with a different food color to make bright colors. (If paint thickens while standing, stir in a few drops of water.) Paint designs on cookies with small paintbrushes. Bake 7 to 8 minutes or until edges are light brown. Remove from cookie sheet to wire rack; cool.
Nutrition Facts : Calories 60, Carbohydrate 7 g, Cholesterol 15 mg, Fat 1/2, Fiber 0 g, Protein 0 g, SaturatedFat 1 1/2 g, ServingSize 1 Cookie, Sodium 45 mg, Sugar 3 g, TransFat 0 g
Tips:
- Use high-quality ingredients for the best flavor and texture.
- Make sure your butter is at room temperature before creaming it with the sugar. This will help the cookies spread properly.
- Chill the dough for at least 30 minutes before rolling it out. This will help prevent the cookies from spreading too much in the oven.
- Use a rolling pin with guides to help you roll the dough to an even thickness. This will help the cookies bake evenly.
- Cut out the cookies with a sharp cookie cutter. This will help prevent the edges from becoming ragged.
- Bake the cookies on a parchment paper-lined baking sheet. This will help prevent them from sticking to the pan.
- Let the cookies cool completely before decorating them. This will help the icing set properly.
- Use a variety of sprinkles, candies, and other decorations to make your cookies festive and fun.
Conclusion:
With a little planning and effort, you can create beautiful and delicious painted sugar cookies that will be the hit of any party or gathering. These cookies are a great way to show your creativity and love for baking. So get started today and see what you can create!
Are you curently on diet or you just want to control your food's nutritions, ingredients? We will help you find recipes by cooking method, nutrition, ingredients...
Check it out »
You'll also love