Unleash your inner witch and conjure up a delightful Halloween spread with our collection of "Witch's Hairy Finger Breadsticks" recipes. These spooky treats are perfect for a frightfully fun party or a cozy family gathering. From classic breadsticks adorned with eerie "hair" to more elaborate versions featuring spooky toppings and fillings, we have a recipe for every taste and skill level. Get ready to sink your teeth into these bewitching breadsticks that are sure to cast a spell on your taste buds.
Check out the recipes below so you can choose the best recipe for yourself!
WITCH'S FINGER BREAD STICKS WITH MAPLE MUSTARD DIP

Provided by Gina Marie Miraglia Eriquez
Categories Bread Mustard Bake Vegetarian Kid-Friendly Halloween Almond Fall Maple Syrup Gourmet
Yield Makes 4 dozen fingers and 1 1/4 cups dip
Number Of Ingredients 17
Steps:
- For dough:
- Stir together water, sugar, and yeast in the bowl of an electric mixer fitted with a paddle attachment until sugar is dissolved; let stand until yeast bubbles, about 5 minutes.
- Beat in 1 cup of flour on low speed until combined.
- Clean dough from paddle, then attach dough hook. Add 1 1/2 teaspoons salt and 2 1/2 cups flour to mixture and beat until dough pulls away from the side of the bowl, about 3 minutes. (If dough is too sticky, add enough of 1/2 cup remaining flour, 1 tablespoon at a time, until dough is no longer sticky.)
- Oil a large bowl and transfer dough to bowl, then turn dough over to coat it with oil. Cover bowl with a dry towel, then let dough rise in a draft-free place at warm room temperature until it is double in size, about 1 hour.
- For fingers:
- While dough is rising, place green food coloring in a small bowl, and using a paintbrush, paint one side of the almond slices or the rounded side of the peanut halves.
- Heat oven to 450°F with rack in middle. Line 2 large baking sheets with parchment paper.
- Divide dough into quarters. Work with 1 piece at a time, and keep remaining dough covered.
- Roll one quarter into a 12-inch log, then cut it into 12 (1-inch) pieces.
- Dust work surface with additional flour, if necessary, to facilitate rolling. Roll and stretch each piece into a craggy 5-inch "finger." Transfer fingers to baking sheets and let stand at warm room temperature, loosely covered with a smooth kitchen towel, until fingers are slightly puffed, 15 minutes.
- Pinch top of fingers to look like knuckles, then lightly score each knuckle with a sharp knife.
- Brush fingers with egg wash, then press on nails. With cleaned paintbrush, dab a little red color around the cuticles. Sprinkle fingers all over with pretzel or coarse sea salt.
- Bake fingers until deep golden, about 15 minutes (form more fingers while first batch is baking). Transfer to a rack to cool.
- Repeat forming and baking in batches with remaining dough.
- For dip:
- Whisk together mayonnaise, mustard, and maple syrup until combined. Refrigerate until ready to use.
HALLOWEEN WITCHES' FINGERS BREADSTICKS
Witch finger will you eat first? Here are two ways to make delightfully creepy witches' fingers breadsticks - use either sliced almonds for the gnarly fingernail or go for bell pepper for a nut-free version. Mani-pedi, anyone?
Provided by Kare for Kitchen Treaty
Time 25m
Number Of Ingredients 7
Steps:
- Preheat oven to 350 degrees Fahrenheit, or, if the temperature on your package of refrigerated breadstick dough indicates a different temperature, follow the temperature on the package. Line a large baking sheet with parchment paper or a Silpat.
- Unroll the breadsticks onto a large cutting board (or your counter or wherever you like to do doughy things).
- Using a pizza cutter, slice each breadstick in half vertically and again horizontally. Each breadstick should be about 3-4 inches long and 1/2-inch to 1 inch wide, but perfection is highly discouraged! The more rustic the more realistic. :)
- Roll the dough a bit to round it a bit/give it more of a finger shape. Lay it on the baking sheet.
- Using your thumb, press down on the narrowest tip of each breadstick. If using almonds, press a sliced almond onto each tip. If using bell peppers, you'll add them AFTER the breadsticks have baked.
- Now, you have a couple of options. You can grab the pizza cutter or a bread knife and press a three or four horizontal lines into the middle of the breadstick so it'll look a bit like a knuckle. And/or, if desired, brush lightly with egg. This will give them a slightly shinier and more golden appearance. Or skip those steps and just stick 'em in the oven already!
- Bake for 10-12 minutes, until puffy and starting to brown on the top. But again, if the label on your breadsticks indicates a different time, I recommend going by that time and just checking them often.
- Let cool for about 5 minutes on the baking sheet, then transfer to a wire rack to cool completely.
- If adding bell pepper for the fingernails, after they've cooled, dab the tip with a bit of cream cheese and stick the bell pepper on. You may want to dry the pepper off with a paper towel so it will adhere better.
- Arrange on a plate or in mini mason jars filled with marinara or pizza sauce. Bloooody!
- Almond-tipped fingers keep in an airtight container at room temperature for several days. Because of the cream cheese and cut pepper, I recommend storing that version in the refrigerator.
WITCH'S HAIRY FINGER BREADSTICKS
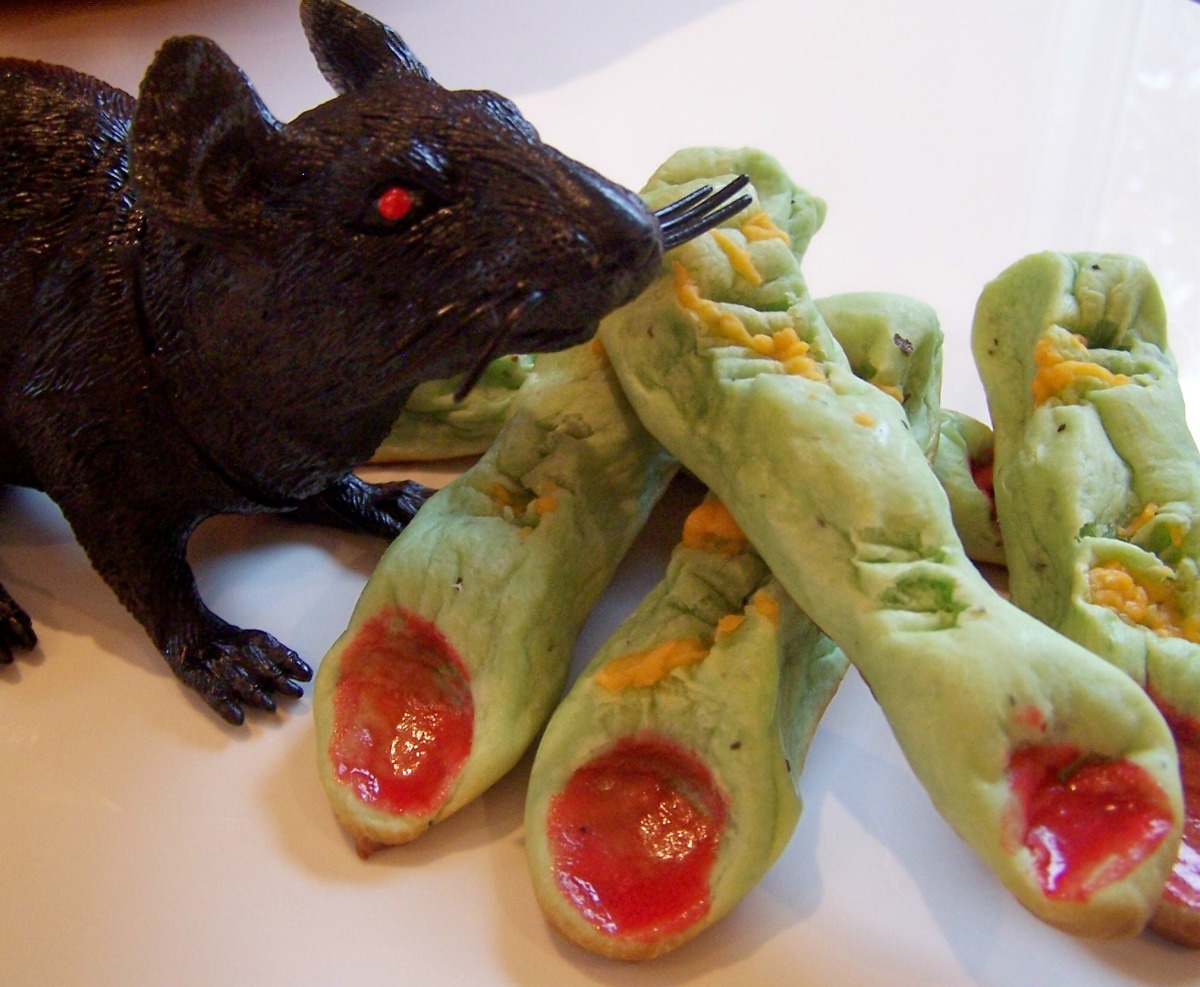
Green Halloween breadsticks from TOH-has a creepy picture! They're best when served right out of the oven because the cheese is still warm and soft. Serve with marinara dipping sauce.
Provided by WiGal
Categories Breads
Time 2h
Yield 32 breadsticks, 16 serving(s)
Number Of Ingredients 16
Steps:
- In a large bowl, dissolve the yeast in warm water.
- Add the milk, egg, grated Parmesan cheese, butter, sugar, salt, Italian seasoning, garlic powder, food coloring, and 1 cup flour.
- Beat on medium speed for 2 minutes.
- Stir in enough of the remaining flour to form a soft dough.
- Turn onto a floured surface; knead until smooth and elastic, about 6 to 8 minutes.
- Place in a greased bowl, turning once to grease top.
- Cover and let rise in a warm place until doubled, about 45 minutes.
- Punch dough down; let stand for 10 minutes.
- Preheat oven to 375 degrees.
- Turn dough onto a lightly floured surface.
- Divide into 16 pieces.
- Shape each piece into a 10 inch rope.
- Cut in half.
- Place 2 inches apart on greased baking sheets.
- Cover and let rise for 30 minutes.
- Brush egg white over breadsticks; sprinkle with shredded Parmesan cheese.
- Place an almond slice at the tip of each.
- Bake at 375 degrees for 8 to 10 minutes or until lightly browned.
- Serve warm with marinara sauce.
WITCH FINGER BREADSTICKS
These eerie breadsticks, made with store-bought pizza dough, get their flavor from Italian seasoning and sesame seeds. Turning each rope of dough in the middle forms a gnarly finger knuckle which, paired with a green olive "nail," helps to create a haunting and delicious appetizer!
Provided by Food Network Kitchen
Categories appetizer
Time 35m
Yield 4 to 6 servings
Number Of Ingredients 8
Steps:
- Preheat the oven to 400 degrees F. Line 2 baking sheets with parchment.
- Whisk the oil, Italian seasoning, 1/2 teaspoon salt and a few grinds of pepper in a small bowl.
- Lightly flour a work surface and divide the dough into 10 equal portions with a bench scraper or chef's knife. Roll each portion into a 10-inch rope. Twist each rope in the middle and arrange on the prepared baking sheets. (Each twist will look like a gnarly witch knuckle.)
- Brush the breadsticks with the seasoned oil and sprinkle with the sesame seeds. Firmly press an olive half on the end of each breadstick to stick to the dough. Bake until golden brown, 15 to 20 minutes. Serve with warm marinara sauce.
SPOOKY BREADSTICK FINGERS

Cut them just so and the red peppers in these Breadstick Fingers look a lot like witches' fingernails! These spooky Breadstick Fingers prove that there's more than candy to enjoy on Halloween.
Provided by My Food and Family
Categories Recipes
Time 30m
Yield Makes 12 servings.
Number Of Ingredients 4
Steps:
- Heat oven to 350°F.
- Pour butter and cheese into separate shallow dishes. Separate breadsticks; cut each lengthwise in half. Dip, 1 at a time, in butter then in cheese, turning to evenly coat each piece. Place, 2 inches apart, on baking sheet.
- Press 1 pepper triangle into end of each breadstick to resemble a fingernail. Score breadsticks in center using sharp knife to resemble knuckles.
- Bake 13 to 15 min. or until golden brown.
Nutrition Facts : Calories 110, Fat 5 g, SaturatedFat 3 g, TransFat 0 g, Cholesterol 15 mg, Sodium 230 mg, Carbohydrate 13 g, Fiber 0.5467 g, Sugar 2 g, Protein 4 g
Tips:
- For an authentic witch's hairy finger look, use thin strips of dough to create the "hair."
- To make the dough easier to work with, chill it for at least 30 minutes before shaping.
- If the dough is too sticky, add more flour until it reaches a smooth, pliable consistency.
- To create the "knuckles," use a knife or scissors to make small cuts in the dough.
- Bake the breadsticks until they are golden brown and the "hair" is crispy.
- Serve the breadsticks with your favorite dipping sauce.
Conclusion:
Witch's hairy finger breadsticks are easy to make and always a hit at parties. These spooky Halloween treats are sure to impress your friends and family. So get creative and have fun with your witch's hairy finger breadsticks!
Are you curently on diet or you just want to control your food's nutritions, ingredients? We will help you find recipes by cooking method, nutrition, ingredients...
Check it out »
You'll also love


