Best 2 Twinkling Christmas Tree Lights Cake Recipes


**Indulge in a Festive Delight: Twinkling Christmas Tree Lights Cake and Other Holiday Treats**
As the holiday season approaches, the aroma of freshly baked goods fills the air, and the Twinkling Christmas Tree Lights Cake takes center stage as a delightful centerpiece. This enchanting cake, adorned with shimmering lights and glistening ornaments, captures the magic of the season. But that's not all; this article offers a collection of delectable recipes that will transform your holiday table into a feast of flavors. From the classic Gingerbread Cookies to the rich and decadent Yule Log, each recipe is a culinary masterpiece that evokes the warmth and cheer of the festive season.
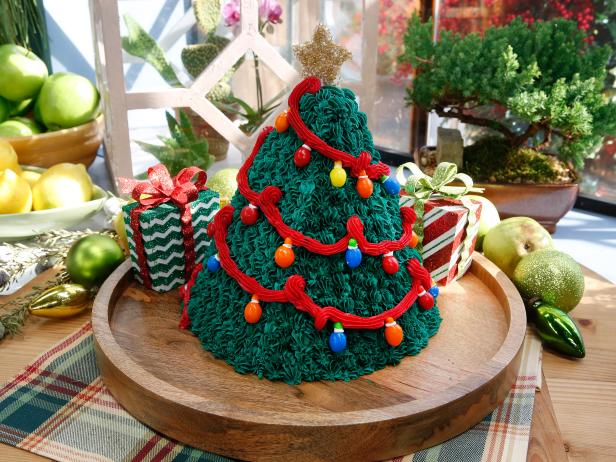
CHRISTMAS TREE SURPRISE CAKE
Provided by Food Network
Categories dessert
Time 4h50m
Yield 1 Christmas tree cake
Number Of Ingredients 24
Steps:
- Preheat the oven to 350 degrees F. Grease and flour a 9 x 13-inch pan. Line the bottom of the pan with parchment paper.
- You have to bake 3 cakes, but bake them one at a time, mixing up the batter only when you're ready to bake. For 2 of the cakes, tint the batter green. For the third cake, tint the batter red. Bake each cake until the center springs back when lightly touched, about 45 minutes.
- Let the cake cool in the pan for 15 minutes, then invert the cake onto a wire rack to cool. Chill in the fridge for 30 minutes so the cake becomes firm.
- Carve and level the cakes: Using plates, bowls, glasses or round cookie cutters to trace around, cut the following: From the two green cakes, cut out 4 rounds: 8 inch, 6 inch, 4 inch, and 2 inch. Then from the red cake, cut out 4 rounds: 7 inch, 5 inch, 3 inch, and 1 inch. Take the round cookie cutter and cut a hole through the centers of the 4 inch, 5 inch, 6 inch, and 7 inch layers. (Save all the scraps for making Christmas-colored cake pop dough!)
- Make the buttercream frosting. Measure out 1 cup and tint it red. Tint the rest dark green.
- Spread a little green frosting on the cake board, lay down the 8 inch green cake layer, and spread a layer of frosting on top. Add the 7 inch red layer and repeat, taking care not to frost the inside edges of the center hole. Continue stacking and frosting gradually smaller cake layers until you reach the 4 inch layer.
- Take the 3 cups of candy and fill the center core of the tree, pressing down a little to compact the candy. Frost the top of the 4 inch layer and continue stacking and frosting until all the layers are stacked.
- Once stacked, take a serrated knife and gently carve away the sharp edges of the layers to form a tall cone shape. Apply a very thin "crumb coat" of frosting all over the outside of the cake. Set in the fridge for 30 minutes.
- Meanwhile, make the Christmas lights. Melt the Candy Melts. Cut the colored Tic Tac candies in half crosswise. Use a toothpick dipped in the melted candy to attach a Tic Tac to the end of a peanut M and M of the same color (the M and M is the bulb and the Tic Tac is the base). You will need about 40 of these.
- To make the star for the top of the tree, trace around a star cookie cutter onto parchment. Pipe an outline of white melted candy, then fill in the shape. Place a lollipop stick in the center and cover with more melted candy. Sprinkle with sanding sugar and let set at room temperature.
- Place the green frosting into a piping bag fitted with a number 21 open star tip. Starting at the top of the cake, pipe 3/4 inch long strands of frosting in neat rows around the entire cake, like layers of pine branches on a Christmas tree.
- Once the cake is covered, place the red frosting into a piping bag fitted with a number 21 piping tip and pipe draping lines of "tinsel" around the cake. Attach the colored M and M lights directly to the red frosting. Work quickly here, as the frosting will start to form a crust, which can make attaching the decorations difficult.
- Take the star and flip it over. Coat the back with white melted candy and sprinkle with sanding sugar. Allow to set. Insert the lollipop stick into the center of the top of the tree.
- Preheat the oven to 350 degrees F. Grease and flour an 8 x 3 inch round cake pan. Line the bottom of the pan with a round of parchment paper.
- In a stand mixer, with the whisk or paddle attachment, beat the butter, sugar, and eggs on high speed until light and fluffy, about 2 minutes. Using the tip of a sharp knife, scrape the seeds from the vanilla bean into the mixer bowl. Add the oil to the creamed mixture and combine.
- In a small bowl, whisk together the flour and baking powder. Add the flour mixture and milk to the creamed mixture and beat on high speed until the flour is completely mixed, 30 seconds to 1 minute. Scrape the batter into the pan and use an offset spatula to smooth the top.
- Bake until a wooden skewer inserted into the center of the cake comes out clean, 55 to 60 minutes. Check after 45 minutes, and if the top is browning too much, tent with foil. Cool the cake in the pan for 15 minutes, then run a metal spatula around the edge of the cake and invert onto a wire rack to cool completely.
- In a stand mixer with the whisk or paddle attachment, beat the butter on high speed for at least 5 minutes, until the butter has lightened in color and is thoroughly whipped. Using the tip of a sharp knife, scrape the vanilla seeds into the butter and beat to incorporate.
- Add 1 cup of the sugar and begin mixing on low speed to combine, then beat on high speed for about 2 minutes. Repeat this process 1 cup at a time until all the sugar has been added. Add milk a dash at a time if the mixture becomes too thick or dry. Scrape down the sides as needed and make sure no sugar is visible.
- The frosting will last for 1 month in the freezer, 2 weeks in the fridge, and 3 days at room temperature.
LITTLE DEBBIE-INSPIRED CHRISTMAS TREE CAKES RECIPE BY TASTY
For this classic Little Debbie-copycat dessert, sandwich a creme filling between two layers of soft vanilla cake and stamp out with a Christmas tree-shaped cookie cutter. Coat each cake in white candy melts and decorate with green sugar sprinkles and a red icing garland. Consider these snack cakes Santa-approved!
Provided by Betsy Carter
Categories Desserts
Time 1h40m
Yield 8 cakes
Number Of Ingredients 21
Steps:
- Make the cake: Preheat the oven to 350°F (180°C). Spray 2 9 x 13-inch rimmed baking sheets with nonstick spray and line with parchment paper.
- in a large bowl, use an electric hand mixer on medium speed to cream together the butter, sugar, baking powder, salt, vanilla, and almond extract until light and fluffy, about 5 minutes.
- With the mixer running on medium speed, add the egg yolks, 1 at a time, beating between each addition until fully incorporated.
- Add a third of the flour and continue mixing until just incorporated. In a small bowl, combine the milk and rum, if using. Add half of the milk mixture to the batter and mix until nearly combined. Continue alternating additions of the flour and milk, using a rubber spatula to finish bringing the batter together.
- Divide the batter between the prepared baking sheets, spreading evenly all the way to the edges. Bake for 10 minutes, rotating the pans halfway through, until the cakes are pale golden brown and the edges begin to pull from the sides of the pans. Remove from the oven and let cool.
- Meanwhile, make the filling: Fill a large pot with 1 inch of water. Set a large heat-safe bowl over the pot, making sure the bottom is not touching the water. Add the egg whites, sugar, and salt to the bowl and whisk together until homogenous. Turn the heat to medium and continue whisking until the mixture thickens. When you lift the whisk, the mixture should fall into the bowl in ribbons that hold their shape for a moment before disappearing.
- Remove the bowl from the heat and place on a towel on a flat surface. With an electric hand mixer on medium-high speed, whip the egg white mixture until doubled in volume, about 5 minutes. Reduce the mixer speed to medium and, with the mixer running, add the butter, a cube at a time. As you add the last piece of butter, the mixture will look broken; don't worry! Continue mixing until the mixture smooths out again, about 1 minute. Add the vanilla and almond extract and mix until just incorporated.
- Assemble the cakes: Invert a cake onto a cutting board with a piece of parchment on top and peel away the parchment from the bottom of the cake. Carefully flip the cake over so the flat side is on the bottom again. Spread the filling evenly over the cake, then invert the remaining cake on top of the filling. Peel off the parchment from the top of the cake. Transfer the cutting board with the cake to the freezer and freeze until the cake is hardened, but not completely frozen, about 1 hour.
- Line a baking sheet with parchment paper.
- Remove the cake from the freezer. Use the Christmas tree-shaped cookie cutter to cut out 8 cakes and place on the prepared baking sheet. Discard (or snack on) the cake scraps. Chill the cakes in the refrigerator while you prepare the decorations.
- Add the candy melts to a microwave-safe bowl and microwave according to the package instructions until melted.
- Dip each cake in the melted candy, using a fork to flip until completely coated. Carefully lift the cake out of the candy and gently scrape the bottom across the side of the bowl to remove any excess. Return the coated cake to the baking sheet. Repeat with the remaining cakes.
- Sprinkle the cakes lightly with the green sanding sugar, and then decorate with the red cookie icing. Refrigerate until the candy shell hardens, about 5 minutes.
- Enjoy!
Nutrition Facts : Calories 499 calories, Carbohydrate 71 grams, Fat 17 grams, Fiber 0 grams, Protein 11 grams, Sugar 57 grams
Tips:
- Use a boxed cake mix to save time and ensure a consistent result.
- Chill the baked cake layers before assembling the cake to make it easier to handle and decorate.
- Use a serrated knife to cut the cake layers evenly.
- Apply a thin layer of frosting between the cake layers to help them adhere to each other.
- Use a piping bag fitted with a star tip to create the Christmas tree lights on the cake.
- Use different colors of frosting to create a variety of Christmas lights.
- Top the cake with sprinkles, nonpareils, or other festive decorations.
- Chill the decorated cake for at least 30 minutes before serving to allow the frosting to set.
Conclusion:
This twinkling Christmas tree lights cake is a festive and delicious dessert that is perfect for any holiday gathering. With its bright colors and cheerful design, this cake is sure to be a hit with kids and adults alike. Follow these tips to create a beautiful and delicious cake that will be the star of your holiday table.
Are you curently on diet or you just want to control your food's nutritions, ingredients? We will help you find recipes by cooking method, nutrition, ingredients...
Check it out »
You'll also love