Best 4 Skewered Eyeballs Recipes


Indulge your taste buds in a culinary adventure with our delectable Skewered Eyeballs! These visually stunning treats are not just for Halloween; they're perfect for any occasion when you want to add a touch of spooky fun to your menu. Made with juicy meatballs, soft cheese, and spooky garnishes, these skewers are sure to be the highlight of your next party or gathering. And to satisfy your sweet and savory cravings, we've included recipes for three dipping sauces: a tangy tomato sauce, a creamy cheese sauce, and a sweet and spicy chili sauce. So, get ready to impress your guests with this unique and flavorful dish that's as delicious as it is eerie.
Here are our top 4 tried and tested recipes!
DOUGHNUT HOLE MONSTER EYEBALLS

These Doughnut Hole Monster Eyeballs are exactly what your Halloween party needs! Made with a cherry filling and a white doughnut glaze, they taste delicious while still looking spooky.
Provided by Elizabeth LaBau
Categories Dessert
Time 2h5m
Number Of Ingredients 19
Steps:
- Warm the milk in a small saucepan on the stove just until it start to simmer. Place the shortening and butter in the bowl of a large stand mixer and pour the warm milk over them, letting the milk melt the shortening and butter.
- In a small bowl, combine the warm water (you're looking for 95-105 degrees F, so it should be warmer than body temperature) and the packet of yeast, and mix briefly. Let it set for about 5 minutes, so the yeast can bloom.
- Once the milk has cooled to lukewarm and the yeast has bloomed, add the yeast to the large mixing bowl that contains the milk and butter/shortening. Then add the beaten egg, the sugar, the salt, the cinnamon, and half of the flour. (This will be 5-3/4 ounces, or about 1-1/4 cup). Use the paddle attachment and beat the mixture on medium speed for five minutes, until it's very smooth.
- Now add the rest of the flour and, using the paddle again, beat for an additional 2 minutes until thick and smooth. Switch to the dough hook and beat the dough on medium speed for 5 minutes, until the dough forms a soft, smooth ball around the hook and pulls away from the sides of the bowl. If it seems a little sticky while it's mixing, add a touch more flour, but only another tablespoon or two. Let the mixing do most of the work and resist the temptation to add too much flour, or else you will have tough doughnuts. When the dough is smooth, supple, and pulling away from the sides of the bowl, turn off the mixer.
- Generously oil a large bowl and turn the doughnut dough into the oiled bowl. Cover with a cloth and set it in a warm place to rise for 1 hour, until doubled in size.
- After an hour, dust your work surface with flour, punch down the dough, and turn it out onto your work surface. Roll it into a thin layer about 1/2-inch thick. Use a small round cookie cutter, about 1 inch wide, to cut circles out of the dough. Space the holes 2 inches apart on several baking sheets covered with parchment and lightly dusted with flour. Once you have cut out all the shapes you can, re-roll the dough and cut out more.
- Cover the sheets of doughnuts with a light cloth and let them rise for 30 minutes, until doubled in size.
- Heat the oil in a heavy pot or a deep fryer until it reaches 265 degrees Fahrenheit. You will definitely want to use a deep fry thermometer to monitor the temperature and make sure that it stays within the range of 260-270 F, so your doughnuts don't cook too quickly or too slowly.
- Once the doughnuts have risen and the oil is the right temperature, gently place 6-7 doughnut holes at a time in the oil and fry them for 50-60 seconds per side, until they are puffed and golden brown. Once cooked, remove them from the oil using a slotted spoon or frying tool, and place them on a paper-towel lined baking sheet to cool. Repeat with the remaining doughnuts. If the oil gets too hot, turn the heat down, and if it gets too cool, pause your frying until it has a chance to heat up again. Let the doughnuts cool at room temperature for 30 minutes before filling them.
- Blend the cherry pie filling in a blender or food processor, pulsing briefly, until it's the texture of chunky jam.
- To fill the doughnuts, use a skewer or dowel to poke a hole in one end of the doughnuts, but don't poke all the way through to the other side! Instead, wiggle the dowel around the center of the doughnut to make space for the filling. (If you have a Bismarck tip, the kind used for filling cupcakes, you can forget the dowel entirely and use that instead.)
- Fit a piping bag with a 1/4-inch round tip and fill it with your cherry pie mixture. Stick the tip in the hole that you've made and squeeze to fill the doughnuts. Stop squeezing when you start to encounter resistance, and remove the tip. If some filling leaks out, clean off the outside of the doughnuts before glazing and decorating them.
- Prepare the gummies: this sounds crazy, but I cut them in half sideways, so they wouldn't be so tall and stick up obtrusively on the doughnuts. If you want to follow my insanity, use kitchen shears to cut the gummies in half.
- To make the glaze, whisk together the powdered sugar, milk, and white food coloring. (You may find it easiest to make several smaller batches instead of one big batch.) Whisk until no lumps of powdered sugar remain. It will be thicker than most doughnut glazes, but that's necessary to get a white coating on the doughnuts. Use a fork to push a doughnut into the glaze until it's submerged, then lift it from the glaze and let the excess drip back into the bowl. Set the dipped doughnut on a wide cooling rack set over waxed paper or parchment, to catch excess drips.
- Dip 4 or 5 more doughnuts, then, while the glaze is still wet, top each one with a gummy and push a miniature chocolate chip into the hole in the center of each gummy. Repeat this process until all of the doughnut holes are dipped and have eyeballs. Let set for at least 30 minutes to firm up the glaze. Cover remaining glaze with cling wrap pressed right on top to use later.
- When the glaze on the doughnuts has set to the touch, gently lift them from the rack and place them on a parchment or waxed paper-lined surface. Add red food coloring to the remaining glaze, and pour some of it into a paper cone or pastry bag fitted with a small #1 tip. (While you technically can use a plastic bag with a hole snipped in the corner, this is a job for precision and you will find it easier to pipe the red veins if you use a pastry bag or paper cone.) Pipe red blood veins on the sides of the eyeballs. Wait for the red to dry before moving and serving the eyeballs.
- Doughnut Eyeballs are best enjoyed fresh, the day they are made.
Nutrition Facts : Calories 388 kcal, Carbohydrate 13 g, Fat 38 g, SaturatedFat 31 g, Cholesterol 2 mg, Sodium 16 mg, Sugar 10 g, ServingSize 1 serving
EYEBALL CAKE POPS
Steps:
- For the cake pops: Line a baking sheet with parchment paper and set aside. Combine the cake crumbs and frosting in a large bowl. Work the frosting into the crumbs with your hands until it forms a thick paste and can be easily rolled into balls.
- Roll the mixture into 12 balls and place on the prepared baking sheet. Freeze until almost solid, 20 to 30 minutes.
- For the decoration: When ready to decorate, melt the white chocolate discs in a double boiler and keep warm. Melt the red and black chocolate discs in small bowls in the microwave. Remove the cake pop balls from the freezer and insert a plastic or metal fork into each. Dip the tines of another fork into the red chocolate and wave over the bowl of white chocolate to make flecks and drizzles. Insert cake pops into the white chocolate and swirl to coat completely. Let any excess drip off, then place a green chocolate disc in the center to form the iris of the eye. Set down on the prepared baking sheet and allow to set while you repeat with the remaining cake balls. Dip the back of a skewer into the black chocolate and make a large dot in the center of the green on each pop. Clean the skewer, dip into the white and make a small dot to the side of the black. Allow to set completely at cool room temperature or in the refrigerator until ready to serve.
- In the bowl of a stand mixer fitted with the whisk attachment, combine the confectioners' sugar, butter, milk, vanilla and salt, and whip on low speed until incorporated. Turn the speed up to high and whip until the buttercream is smooth, scraping down the sides of the bowl once or twice. If it's too wet, add a bit more confectioners' sugar. If it's too stiff, add a bit more butter.
- Use immediately, or store in an airtight container at room temperature for 24 hours or in the fridge for up to 2 weeks. Rewhip cold buttercream before using it.
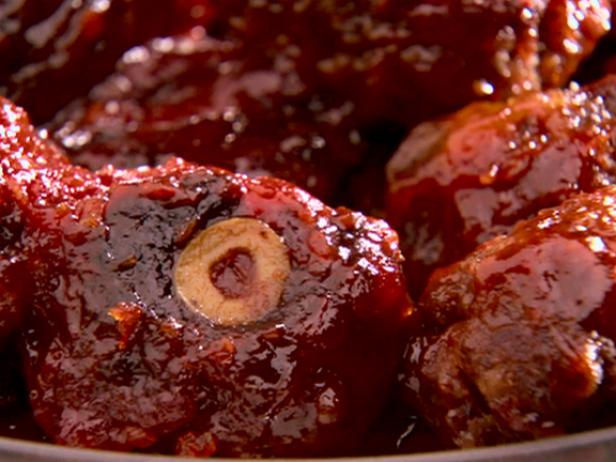
SWEET AND SOUR EYEBALLS
Steps:
- With a fork or clean hands, gently combine the meat, egg, bread crumbs, salt, and pepper. Shape into 1-inch balls. Press a green olive slice into the ball to make "eyes". Melt the butter in a large saute pan and brown the meatballs on all sides. Drain off the fat. In a bowl, stir together the jelly and chili sauce and pour over the meatballs. Simmer uncovered for 30 minutes over medium to low heat, turning the meatballs regularly.
GRILLED VEGETABLE SKEWERS
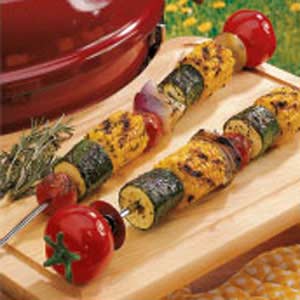
My mother and I love to eat vegetables the most flavorful way-grilled! Seasoned with fresh herbs, these colorful kabobs showcase the best of summer's bounty. -Susan Bourque of Danielson, Connecticut
Provided by Taste of Home
Categories Side Dishes
Time 20m
Yield 2 servings.
Number Of Ingredients 10
Steps:
- Place the corn on a microwave-safe plate. Cover with waxed paper. Microwave on high for 2 minutes. , On two metal or soaked wooden skewers, alternately thread the corn, zucchini, onion and tomatoes. Lightly coat vegetables with cooking spray. In a small bowl, combine the seasonings; sprinkle over vegetables. , Using long-handled tongs, moisten a paper towel with cooking oil and lightly coat the grill rack. Grill vegetables, covered, over medium heat or broil 4 in. from the heat for 6-12 minutes or until vegetables are tender, turning frequently.
Nutrition Facts : Calories 69 calories, Fat 1g fat (0 saturated fat), Cholesterol 0 cholesterol, Sodium 131mg sodium, Carbohydrate 16g carbohydrate, Fiber 3g fiber), Protein 3g protein. Diabetic Exchanges
Tips:
- To make the eyeballs look more realistic, use hard-boiled quail eggs. Their smaller size gives them a more eyeball-like appearance. - For best results, refrigerate the eggs for at least two hours before cooking. This will make them easier to peel. - When piercing the eggs with the skewers, be careful not to go all the way through. You want the yolks to remain intact. - If you're using food coloring to create different colored eyeballs, add it to the water before boiling the eggs. This will ensure that the color is evenly distributed. - For a fun and festive touch, serve the eyeballs with a side of fake blood (made from ketchup or tomato juice) and a pair of plastic vampire teeth.Conclusion:
Skewered eyeballs are a fun and easy way to add a spooky touch to your Halloween party. With just a few simple ingredients, you can create a delicious and creepy appetizer that will be sure to impress your guests. So get creative and have fun with it!
Are you curently on diet or you just want to control your food's nutritions, ingredients? We will help you find recipes by cooking method, nutrition, ingredients...
Check it out »
You'll also love