Best 6 Rustic Multi Grain Bread Recipes


Indulge in the hearty goodness of our rustic multi-grain bread, a symphony of flavors and textures that will elevate your everyday meals. This wholesome bread is crafted with a medley of grains, including wheat, rye, oats, and barley, resulting in a complex and nutty flavor profile. Its dense and chewy crumb is complemented by a crisp crust, making it the perfect accompaniment to your favorite soups, stews, or simply slathered with butter and jam. This versatile recipe includes instructions for baking the bread in a Dutch oven or a bread pan, ensuring perfect results every time. Elevate your bread-making skills with our detailed step-by-step guide and helpful tips, and enjoy the satisfaction of creating this wholesome and delicious bread from scratch.
Check out the recipes below so you can choose the best recipe for yourself!
HOMEMADE MULTIGRAIN BREAD

This is a super soft, delicious homemade multigrain bread recipe (with easy scratch-made multigrain flour), perfect for toast or sandwiches.
Provided by Judy
Categories Bread and Pizza
Time 5h5m
Number Of Ingredients 9
Steps:
- Add the multigrain flour to the bowl of a stand mixer or a large heat-proof mixing bowl. Pour in the boiling water, and carefully stir the flour and water with a rubber spatula until it forms a thick paste. Stir in the butter until well combined. Let the mixture cool for about 20 minutes.
- Once the multigrain mixture is warm to the touch and not hot, stir in the honey until thoroughly combined. Stir in the yeast (and vital wheat gluten if using, in that order). It's important to make sure the mixture truly is lukewarm before adding the yeast. Let stand for 10 minutes to activate the yeast.
- Add the all purpose flour, ¼ cup at a time, and knead until the dough ball is smooth. This will take about 10-15 minutes. The dough should be slightly sticky, but should not stick to a rubber spatula. Soft dough makes soft bread, so do not use more flour than necessary!
- Use the rubber spatula to clean the sides of the bowl, and form the dough into a smooth ball. Cover the bowl with a plate, and let it rise in a warm place for 45 minutes to 1 hour, or until the dough doubles in size.
- Once the first proofing is done, sprinkle 1 teaspoon salt over the dough and knead again for another 5 minutes to make sure the salt is evenly distributed.
- Shape the dough into a smooth dough ball, cover with a plate, and let it rise again in a warm place for 45 minutes to 1 hour, or until the dough doubles in size. If you are proofing the dough in the microwave like I do, you'll need another large mug of boiling water for the second proofing.
- While the dough is proofing, grease 2 loaf pans (9" x 5") with cold butter and set them aside. I use cold butter, as it's easier to handle and goes on in a thin layer. I simply take a cold stick of butter, peel back the wrapper, and rub it along the inside of the loaf pans to coat.
- After the second proofing is done, cut the dough into two equal portions. Knead and roll each piece into a loaf shape with a smooth top. On a clean work surface, spread the rolled oats in a thin layer.
- Very lightly brush the top of the loaves with water and gently flip the moistened top onto the thin layer of rolled oats. The oats will cling to the loaf. Then carefully place the loaves, oat-side up into the greased pans. Allow to rise for 1 more hour before baking, repeating the proofing protocol as in the first and second proofings.
- When you're halfway through the last proofing, preheat the oven to 375°F. When the third proofing is complete, bake the loaves in the middle of the oven for 35 minutes, until golden brown. If you tap the bread, and it sounds hollow, it's done.
- Cool for about 5 minutes, and carefully remove the hot bread from the pans. Transfer to a cooling rack to prevent the bread from steaming inside the loaf pan. Slice and serve!
Nutrition Facts : Calories 168 kcal, Carbohydrate 31 g, Protein 5 g, Fat 2 g, SaturatedFat 1 g, TransFat 1 g, Cholesterol 5 mg, Sodium 163 mg, Fiber 2 g, Sugar 5 g, UnsaturatedFat 2 g, ServingSize 1 serving
WHOLE GRAIN SOURDOUGH RUSTIC COUNTRY LOAF
This loaf of 100% whole grain, sourdough leavened bread is the perfect "daily driver" for me; it's exactly what I want to experience when I make some toast or a hearty sandwich. Sliced and buttered (un-toasted), it also makes a magnificent complement to a meal of soup or pasta.
Provided by homebreadbaker
Categories Recipes
Number Of Ingredients 5
Steps:
- Combine salt with flour in a mixing bowl, then add water and mix either by hand or with a dough whisk until fully incorporated into a "shaggy mass."
- Add starter and mix / squish by hand until fully incorporated. The process of incorporating the starter is a bit of primary kneading and should result in the dough smoothing out some, but don't go nuts. As soon as the starter is fully incorporated, you're done.
- Cover mixing bowl and let sit.
- First Bulk Fermentation Period
- The first (of three) bulk fermentation period is at room temperature which for me is 73 - 75 degrees F, and lasts about 10 hours.
- At about an hour in, do 5-10 minutes of hand kneading (see notes and video below) until the dough develops some strength and elasticity and becomes noticeably smoother. Cover and let sit.
- Every 1-2 hours (exact timing is not important - really!) do a short round of stretching and folding to re-develop the dough's elasticity (see notes and video below). Then re-cover and let sit.
- Second Bulk Fermentation Period
- After about 10 hours, or whenever the dough has risen to about 1.5 times its original volume, put the covered bowl of dough into a cold (~40 F) refrigerator and let sit (for me, this is overnight) for about 10 hours.
- Third Bulk Fermentation Period
- Remove dough from refrigerator and let sit at room temperature again.
- As the dough warms up, resume periodic stretch and folds. Dough should be feeling progressively more lively, developing a bit of sour aroma, and eventually starting to bubble some.
- This final bulk fermentation period is the hardest to put a time length on. Getting it right matters, and it will totally depend on how active your starter is, how warm your kitchen is, and a whole host of other mostly invisible things. You are shooting to finish this period when the dough has risen to 2 - 2.5 times its original volume and ideally is actively blowing a few bubbles. I've had this take anywhere from 4 - 8 hours depending on this and that. Your mileage may vary. Try not to overshoot this - you'll probably have a better result erring on the too soon side than the too late side.
- Shaping and Proofing
- (See notes and video below)
- Prepare a lined proofing basket by generously flouring the inside and set it aside.
- Lightly flour a large work surface and turn the dough out onto it.
- Wet your hands, punch down the dough and then stretch and flatten it into a large thin rectangle.
- Fold dough in half from top to bottom and press top into bottom, flattening again but not as big as the initial rectangle. At this point, you want the height of the dough rectangle to be right about the length of your proofing basket (no more than that).
- [Optional] Lightly flour the top of the dough (and your hands).
- Start at one end and roll the dough rectangle into a cylinder.
- Keep track of the seam and transfer the dough cylinder into the lined, floured proofing basket seam-side up.
- Cover and let sit for 1 - 1.5 hours.
- Baking
- From 30 - 60 minutes after transferring dough into proofing basket, pre-heat oven and clay baker to 450 degrees F ~ about 20 - 30 minutes.
- Uncover dough and transfer from proofing basket into base of clay baker, score top of dough, cover and bake at 450 F for 25 minutes.
- Uncover clay baker, reduce oven temperature to 400 F and bake uncovered for another 20-25 minutes (or until desired crust color develops).
- Remove bread and place on cooling rack for at least a couple hours before cutting.
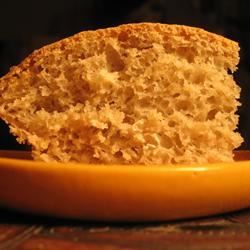
EFFORTLESS RUSTIC BREAD
This is the easiest recipe for rustic bread I've ever seen. Luckily it is also the yummiest. Feel free to halve the recipe if you only want one loaf, but beware: it's so addictive you may wish you'd just baked both loaves.
Provided by amyw
Categories 100+ Breakfast and Brunch Recipes Breakfast Bread Recipes
Time 6h15m
Yield 20
Number Of Ingredients 5
Steps:
- Mix water, yeast, and salt together in a large bowl until mixture becomes foamy, about 10 minutes. Stir flour into yeast mixture until well incorporated. The dough will be loose and look wet. Cover bowl loosely with a damp towel and let sit for about 5 hours.
- Shape dough into 2 loaves using damp hands. Place loaves on a cornmeal-dusted work surface and score the tops a few times with a sharp knife. Allow loaves to double in size, 30 to 60 minutes.
- Preheat oven to 425 degrees F (220 degrees C). Place loaves on a baking sheet.
- Bake in the preheated oven, spraying the surface of the dough occasionally with water, until golden brown, about 20 minutes.
Nutrition Facts : Calories 161.6 calories, Carbohydrate 33.7 g, Fat 0.5 g, Fiber 1.5 g, Protein 4.8 g, SaturatedFat 0.1 g, Sodium 526.6 mg, Sugar 0.1 g
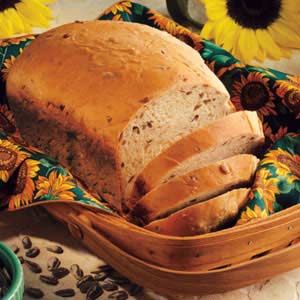
RUSTIC MULTI-GRAIN BREAD
Milk gives this bread a soft tender crust that appeals to all. All-purpose, whole wheat and rye flours blend beautifully in this family-favorite recipe.
Provided by Taste of Home
Time 50m
Yield 2 loaves (16 slices each).
Number Of Ingredients 10
Steps:
- In a large bowl, combine 2 cups all-purpose flour, whole wheat flour, rye flour, sugars, yeast and salt. In a small saucepan, heat the milk, water and oil to 120°-130°. Add to dry ingredients; beat until smooth. Stir in enough remaining all purpose flour to form a soft dough. , Turn onto a floured surface; knead until smooth and elastic, about 6-8 minutes. Place in a greased bowl, turning once to grease top. Cover and let rise in a warm place until doubled, about 1 hour. , Punch dough down. Turn onto a lightly floured surface; divide into four pieces. Roll each into a 15-in. rope. Twist two ropes together; pinch ends to seal. Repeat with remaining dough. Place in two greased 9x5-in. loaf pans. Cover and let rise until doubled, about 45 minutes. , Bake at 375° for 30-35 minutes or until golden brown. Remove from pans to wire racks to cool.
Nutrition Facts :
RUSTIC COUNTRY BREAD
A round loaf with a crisp crust--chewy, and great for sandwiches.
Provided by Chris
Categories Bread 100+ Bread Machine Recipes
Time 16h40m
Yield 12
Number Of Ingredients 8
Steps:
- The day before making bread, place 3/4 cup spring water, 1/4 teaspoon bread machine yeast and 1 3/4 cup bread flour into pan of a bread machine. Select dough cycle and let knead for 5 minutes. Stop machine and let rise overnight.
- The next day, pour starter from bread machine pan into a non-metallic container. Reserve 1/3 cup for this recipe and freeze remainder for later use.
- In a large bowl, mix together 1/3 cup reserved starter, 1 cup spring water, 1/2 teaspoon yeast, 2 cups bread flour, whole wheat flour and salt. Select Dough Cycle; press Start. After 10 minutes, remove dough from machine and place in a lightly oiled bowl. Cover with a damp towel and let rise until doubled, about 2 hours. Deflate dough and let rise again until doubled, about 1 hour.
- Turn dough out onto a lightly floured surface and form into a round loaf. Place loaf on a baking sheet that has been sprinkled with cornmeal. Cover and let rise until nearly doubled, about 40 minutes. Meanwhile, preheat oven to 400 degrees F (200 degrees C).
- Spray loaf with water and place in preheated oven. Spray loaf again every two minutes during the first 10 minutes of baking. Bake for 40 minutes, until bottom of loaf sounds hollow when tapped.
Nutrition Facts : Calories 84.2 calories, Carbohydrate 17 g, Fat 0.4 g, Fiber 0.9 g, Protein 2.9 g, SaturatedFat 0.1 g, Sodium 49.5 mg, Sugar 0.1 g
RUSTIC WHOLE WHEAT BREAD
Much quicker than the usual recipes, these loaves of whole wheat bread can be ready to eat in a little over an hour. Easy, quick and delicious.
Provided by Jan Mowbray
Categories Bread Yeast Bread Recipes Whole Grain Bread Recipes Wheat Bread
Time 1h5m
Yield 24
Number Of Ingredients 7
Steps:
- Stir all-purpose flour, whole wheat flour, brown sugar, instant yeast, and salt together in the bowl of an electric mixer fitted with a dough hook attachment. Whisk water and oil together in a cup; pour into flour mixture. Mix on low speed until dough pulls away from the sides of the bowl into a ball.
- Turn dough out onto a lightly floured surface; knead just until dough is smooth, about 1 minute. Divide and shape dough into 3 balls for small loaves or 2 balls for larger loaves. Dust loaves with flour and place onto a baking sheet; cover with a towel, and let rise until doubled in size, about 25 minutes.
- Preheat oven to 375 degrees F (190 degrees C). Slash an "X" about 1/4-inch deep in tops of loaves with a sharp knife.
- Bake in the preheated oven until loaves are golden brown and sound hollow when tapped, about 25 minutes. Remove from oven to cool completely on a wire rack.
Nutrition Facts : Calories 126.5 calories, Carbohydrate 24.7 g, Fat 1.6 g, Fiber 2.5 g, Protein 4.1 g, SaturatedFat 0.2 g, Sodium 148.4 mg, Sugar 1.6 g
Tips:
- Use a variety of grains for a more complex flavor and texture.
- Soak the grains overnight to reduce cooking time and make them more digestible.
- Use a Dutch oven or other heavy pot with a tight-fitting lid to create a steamy environment that will help the bread rise.
- Score the top of the bread before baking to allow steam to escape and create a crispy crust.
- Let the bread cool completely before slicing and serving.
Conclusion:
Rustic multi-grain bread is a delicious and nutritious bread that is perfect for any occasion. It is easy to make and can be tailored to your own taste preferences. With a little practice, you will be able to create a perfect loaf of rustic multi-grain bread that your family and friends will love.
Are you curently on diet or you just want to control your food's nutritions, ingredients? We will help you find recipes by cooking method, nutrition, ingredients...
Check it out »
You'll also love