Indulge in the festive spirit with our delightful Reindeer Cake, a captivating dessert perfect for Christmas celebrations. This enchanting cake is not only a visual masterpiece but also a symphony of flavors. Discover the magic of the Triple Chocolate Reindeer Cake, where layers of moist chocolate cake are adorned with rich chocolate ganache and delicate chocolate shavings, creating an irresistible treat. For those seeking a lighter option, the Vanilla Reindeer Cake offers a delightful combination of fluffy vanilla cake, creamy vanilla frosting, and a sprinkle of colorful sprinkles. And for a unique twist, the Red Velvet Reindeer Cake tantalizes with its vibrant red velvet layers, complemented by a luscious cream cheese frosting. Each recipe is carefully crafted with step-by-step instructions, ensuring that every baker, from novice to experienced, can create these reindeer cakes with ease.
Here are our top 5 tried and tested recipes!
CHOCOLATE REINDEER CAKE
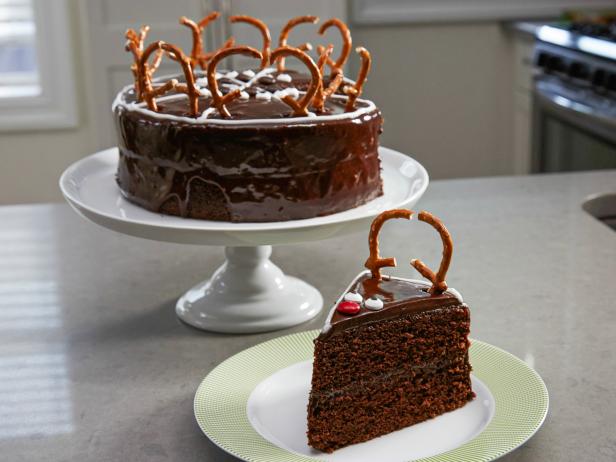
When cut, each slice of this adorable holiday cake resembles one of Santa's reindeer.
Provided by Food Network Kitchen
Categories dessert
Time 2h20m
Yield 8 servings
Number Of Ingredients 19
Steps:
- For the cake: Preheat the oven to 350 degrees F.
- Coat two 8-inch-round cake pans with cooking spray and line the bottoms with parchment paper. Whisk the cocoa powder and 1 1/2 cups boiling water in a medium bowl until smooth; set aside. Whisk the flour, sugar, baking powder, baking soda and salt in a large bowl until combined. Add the eggs, vegetable oil, sour cream and vanilla and beat with a mixer on medium speed until smooth, about 1 minute. Reduce the mixer speed to low; beat in the cocoa mixture in a steady stream until just combined, then finish mixing with a rubber spatula.
- Divide the batter between the prepared pans and tap the pans against the counter to help the batter settle. Bake until a toothpick inserted into the middle comes out clean, about 35 minutes. Transfer to racks and let cool 10 minutes, then run a knife around the edge of the pans and turn the cakes out onto the racks to cool completely. Remove the parchment. Trim the tops of the cakes with a long serrated knife to make them level.
- For the ganache: Put the chocolate in a medium bowl. Bring the heavy cream and corn syrup to a simmer in a small saucepan. Pour the hot cream over the chocolate and let stand 5 minutes, then stir until completely smooth. Let the ganache sit until it has cooled and thickened to a spreadable consistency, 20 to 30 minutes.
- Place 1 cake layer on a cardboard cake circle on a wire rack set over a baking sheet to catch any drips. Spread about 1/2 cup of the ganache on top and place the second cake layer cut-side down over the ganache. Dollop half of the remaining ganache on top and spread with a large offset spatula so the ganache covers the top of the cake and slowly runs down the sides. Repeat with the remaining ganache, using the offset spatula to make a smooth, even layer over the surface and around the sides of the cake. Refrigerate until set, 30 minutes to 1 hour.
- To decorate: Melt the white chocolate chips in a small microwave-safe bowl in the microwave in 15 second intervals on 50 percent power until melted, stirring after each interval. Let sit 5 minutes, then transfer to a pastry bag fitted with a medium plain tip. (Alternatively, transfer to a resealable plastic bag and snip off a corner.) Pipe a straight line through the center of the cake from top to bottom, then another line through the center from left to right, dividing the cake into quarters. Pipe 2 more lines to divide the cake into eighths. Pipe a circle of white chocolate around the edge of the cake. Pipe a small circle where the points intersect in the center of the cake. Place a candy-coated chocolate near the tip of each point for reindeer noses (one of them will be red). Add 2 reindeer eyes above each nose. Stick 2 pretzel twist pieces above each pair of eyes.
LIGHT-UP REINDEER CAKE

This showstopper dessert gives Rudolph his proper due. The moist yellow cake with cocoa frosting and chocolate antlers has an extra magical touch: a red nose that lights up! Rolling a small LED light into the fondant nose gives it a brightness - you would even say it glows.
Provided by Food Network Kitchen
Categories dessert
Time 3h20m
Yield 10 servings
Number Of Ingredients 22
Steps:
- For the cake: Preheat the oven to 350 degrees F. Spray three 6-inch cake pans with nonstick spray, dust each with flour and line with parchment paper (if you don't have 3 pans, you can bake in batches).
- Whisk together the flour, baking powder and salt in a medium bowl. Combine the sugar, oil, vanilla and eggs in the bowl of a stand mixer fitted with the paddle attachment. Mix on medium speed until combined. Alternate adding the dry mixture and buttermilk, mixing on low speed, until smooth.
- Divide the batter between the 3 prepared baking pans. Bake until the cakes spring back slightly when touched, 25 to 30 minutes. Let cool 10 minutes in the pans, then transfer to a wire rack to cool completely.
- For the frosting: Meanwhile, combine the butter, cocoa powder, vanilla and salt in a stand mixer fitted with the paddle attachment. Mix on low speed until combined, then start adding the confectioners' sugar 1 cup at a time, alternating with additions of the milk. Increase the speed to medium high and mix until smooth.
- Use a serrated knife to trim off the top from two of the cake layers (if the layers domed differently, trim the smaller domes), using the edge of the cake pan as a guide.
- Place 1 trimmed cake on a cake board or platter and spread 1/4 cup of the chocolate frosting over the top. Place the second trimmed cake on top, spread the top with frosting, then top with the third cake so that the top is domed. Refrigerate until firm, about 30 minutes.
- For the decorations: Meanwhile, line a baking sheet and plate with parchment paper. Combine the semisweet chocolate chips and 1/2 teaspoon of the coconut oil in a microwave-safe bowl; microwave, stirring every 10 seconds, until melted and smooth, about 40 seconds. Transfer to a piping bag and snip the tip.
- Onto the prepared baking sheet, use the semisweet chocolate to pipe 2 antlers (each 4 inches tall and 3/4 inch wide at the base), making sure the antlers are sturdy and thick enough to stand up on top of the cake later. Refrigerate until set, about 20 minutes.
- Meanwhile, onto the prepared plate, use the semisweet chocolate to pipe 2 arches for the pupils of the eyes (each 2/3 inch tall and 2/3 inch wide at the base), spacing them at least 2 inches apart; fill in the arches with the chocolate. Refrigerate until set, about 10 minutes.
- Combine the white chocolate chips and remaining 1/4 teaspoon coconut oil in a microwave-safe bowl and microwave, stirring every 10 seconds, until melted and smooth, 20 to 30 seconds. Transfer to a piping bag and snip the tip.
- Remove the plate with the pupils from the refrigerator. Use the white chocolate to pipe 2 bigger arches for the whites of the eyes (each 1 inch tall and 1 inch wide at the base), aligning the bases for each set of pupil and white; fill in the space around each pupil with white chocolate. Refrigerate until set, about 15 minutes.
- Pull off a tennis ball-size mound of fondant, knead in enough brown food coloring until dark brown, then roll into a ball. Repeat the process with 3 golf ball-size mounds of fondant and tint one light brown (1 drop of brown food coloring), one black (3 drops of black food coloring) and one red (3 drops of red food coloring). Keep each piece of fondant wrapped in plastic wrap while not in use.
- Roll out a quarter of the dark brown fondant on a cornstarch-dusted cutting board until very thin. Use a sharp paring knife to cut out two 2 1/2- inch-tall oval ears with a pointed tip. Roll out half of the light brown fondant and cut into slightly smaller pointed ovals. Dab the light brown fondant with a small amount of water to adhere each piece to a dark brown ear, creating a lighter interior. Set aside to dry.
- Use the remaining dark fondant to form the legs: Divide the dough into thirds. Use two-thirds of the dough to shape the hind legs by rolling two logs, each 2 1/2 inches long and 3/4 inch in diameter; taper one end of each. Shape the front legs the same way with the remaining dough, each 1 1/2 inches long. Roll 4 tiny balls of black fondant, then flatten them slightly between two fingers. Dab with a little water to adhere the black discs to the wide end of each brown leg, to form hooves.
- Form the nose by rolling the red fondant into a ball. Set aside the eyes and nose.
- Cover the chilled cake with frosting, reserving 1/3 cup for decorations. Place the hind legs on either side of the cake, so that the hooves face forward, shaping the legs around the cake. Place the two front legs in front, near the hooves of the back legs, upright but at a slight angle towards the back.
- Remove the antlers from the refrigerator. Place them on top of the cake, towards the center. Set the ears just to the back and sides of the antlers, using toothpicks behind the ears to prop them up, if needed.
- Transfer the reserved frosting to a piping bag fitted with a fluted tip. Pipe a few swirls in front of the antlers. Top the swirls with holiday sprinkles. Press a red flashing battery-operated LED balloon light into the red fondant ball, pushing it towards the front of the nose; reform the ball around the light, leaving the power tab exposed to turn the light on. Insert a toothpick halfway in the front middle of the cake. Press the nose on it until flush against the cake but held up by the toothpick. Remove the eyes from the refrigerator and carefully peel them off the parchment to reveal pupils set in the whites of the eyes. Pipe a small dollop of frosting on the back of each eye then arrange the eyes over the nose.
- Remove the light from the cake before serving.
REINDEER CAKE

Steps:
- Separate the buttercream into 4 separate bowls (2 larger bowls and 2 smaller bowls). In one of the smaller bowls, use leaf green, chocolate brown, yellow and black gel colors to make a dark, evergreen color. In one of the larger bowls, use a few drops of yellow and chocolate brown gel colors to make a mocha color (lighter than the shade of brown fondant you have). In the other larger bowl, use chocolate brown and black gel colors to make a dark brown (darker than the shade of brown fondant you have). In the other smaller bowl, use red gel color to make a Christmas red color.
- Sprinkle your clean table with cornstarch. Knead your light brown/mocha fondant (similar to bread dough) until it is smooth. Using a rolling pin, roll the fondant so that it is approximately a 14-inch circle that's 1/4-to-1/2-inch thick. Sprinkle with cornstarch and roll onto the rolling pin. Unroll onto the top of the cake and smooth out the top and sides with a fondant smoother so that there are no air bubbles.
- Roll a thin snake of light brown/mocha fondant for the border of the cake.
- Make antlers: Roll modeling chocolate out to about 1 1/2 inches thick. Freehand cut 2 antler shapes. Slide a wooden skewer into each antler as far as it will go. Paint with edible gold paint.
- Make ears: Roll the leftover light brown/mocha fondant into 2 teardrop shapes. Use your thumb to indent the centers of each to create the ear shape. Place a toothpick or wooden skewer in the bottom of each one. Paint the center of each ear with edible gold paint.
- Take a small amount of black fondant and roll out a snake for each eye. Use smaller pieces to create the eyelashes. Accent eyelashes with edible gold paint.
- Create the mane by piping alternating rosettes down the center of the cake with the mocha and dark brown buttercream. Add smaller green shells and top each of those with a red holly berry bunch.
- Pipe a red nose below the eyes using a large plain tip.
- Add the antlers and the ears to the top of the cake.
MAGICAL REINDEER CAKE
Bake a Christmas cake that looks like Rudolph! Kids will love it and everyone will enjoy the rich chocolate sponge with buttercream and biscuit antlers
Provided by Juliet Sear
Categories Dessert, Treat
Number Of Ingredients 24
Steps:
- Butter and line 3 x 15 or 16cm round tins (alternatively do the baking in batches if you only have one tin). Heat the oven to 170C/150C fan/gas 3.
- Gently melt the chocolate, butter and sugar together in a large microwave-safe bowl on medium heat for a minute at a time, stirring until melted or, set a bowl over a pan of simmering water. Leave to cool a little.
- Beat together the eggs with the vanilla and soured cream in a bowl. Sift the flour, cocoa and baking powder into another bowl and whisk to distribute. Stir the egg mix into the cooled melted chocolate, then fold in the flour mix and fold through until all the powder has disappeared.
- Spoon a third of the mixture into each tin (if you weigh the tins, you can get it perfectly even and your cakes will cook at the same rate and to the same height). Level off each thin layer with the back of a spoon.
- Bake until just cooked, so when a skewer poked into the centre of the sponge layer comes out with a few crumbs and the cakes are shrinking away from the tin a bit. This will take about 25-30 mins, but check after 20 to be safe as all ovens vary. Remove and cool in the tins on a wire rack, or on top of cold oven hob rings.
- Meanwhile, to make the ganache, microwave all the ingredients together in 30 sec bursts until they have all melted, stirring at each interval. Or melt everything together in a bowl set over a pan of simmering water. Cool to room temperature before adding to the buttercream.
- To make the buttercream, beat the butter and vanilla paste until pale and creamy. Gradually add the icing sugar, beating well between each addition. (Using unrefined sugar will give the buttercream a natural caramel flavour.) Beat in the cooled ganache.
- To make the antlers, combine the sugar and butter with the vanilla paste until amalgamated but not creamed. Add the egg and combine. Mix the flour with the spices then tip that in and mix to form a dough. Wrap in cling film and chill in the fridge to firm up for 20 minutes. Roll out on a floured surface to a 5/6mm thickness. Lay the template on the dough and cut around it using a small sharp knife - make two sets in case of breakages (any additional dough can be saved). Push the lolly sticks up into the bottom of the antlers and bake for around 15-20 mins until cooked through and golden. Allow to cool.
- Make the ears by pulling a little of the brown fondant icing off the block and kneading it with white fondant icing to make a pale brown. Roll the rest of the dark brown icing out thickly on a surface dusted with icing sugar. Roll the paler icing out thinly. Cut large teardrop shapes from the lighter icing to form the ears (about 6cm in size) and stick the lighter shape on top of the darker icing with a little water. Cut a larger teardrop around the lighter shape. Fold and pinch together at the base, push a cocktail stick into the bottom of each one and set aside to firm up.
- Trim the cakes flat if they have a little hump where they have been baked. Put the first layer onto a 16cm cake board and use a little of the chocolate frosting to secure it to the board. Spread frosting over the first layer then add layer two. Sandwich together by pressing gently and add another layer of frosting to this layer. For the last layer, take the sponge and invert it on top of the other two cakes, so that the smooth part of the cake - that was on the bottom of the tin -becomes the top. This will make it nice and neat. Spread a very thin layer of icing over the whole cake to crumb coat it and chill to set for about 30 mins.
- Add more buttercream to the cake to make a clean top coat - use a palette knife or side scraper to get a smooth finish (but do save a little of the buttercream for the final flourish). Mark out the eyes with a cutter so you can see where to add them. Roll little strips of black fondant icing for the eyes and lashes, then stick these onto the cake. Mould the nose with red fondant icing and stick it on with a cocktail stick, pushing one end into the nose and the other into the cake.
- For the little collar, roll out about 100g of green fondant icing on a surface dusted with icing sugar and cut a thin strip for the bow that will fit around the base of the cake. Stick the ends together with a little water, then make a bow by folding another thin strip and stick this onto the collar with another dab of water. Scoop the leftover buttercream into a bag with a large star nozzle. Pipe some fluffy reindeer hair on top of the cake, then add the ears and biscuit antlers, pushing them in gently but firmly.
Nutrition Facts : Calories 677 calories, Fat 37 grams fat, SaturatedFat 23 grams saturated fat, Carbohydrate 77 grams carbohydrates, Sugar 55 grams sugar, Fiber 4 grams fiber, Protein 6 grams protein, Sodium 0.44 milligram of sodium
REINDEER CAKE POPS
These chocolate cake lollipops are decorated in true festive fashion - have fun making them with the kids this Christmas.
Provided by Valerie Barrett
Categories Treat
Time 45m
Yield Makes 8
Number Of Ingredients 10
Steps:
- Crumble the cake into fine crumbs using your hands or in a food processor. Put into a bowl. In another bowl, beat together the butter and icing sugar until creamy.
- Melt the plain chocolate in the microwave or in a bowl over a pan of barely simmering water. Add the melted chocolate to the butter mixture and combine well. Add this to the cake crumbs and mix thoroughly using your hands, until it sticks together. Divide the mixture into eight and shape each one into a smooth ball. Insert a cake pop stick, place on a tray lined with baking parchment and chill for at least 2 hours.
- Melt the milk chocolate in the microwave or in a bowl over a pan of barely simmering water. Take a cake pop and dip in the chocolate. Shake gently until the excess has drained off. Push into a polystyrene block.
- Make two holes in the top of the head and insert a pretzel 'antler' in each one. Press a sweetie nose onto the front and hold for a few seconds until attached. Repeat with all the other cake pops. Leave to set for about 20 mins and then using black icing, pipe on eyes and a mouth.
Nutrition Facts : Calories 248 calories, Fat 13 grams fat, SaturatedFat 6 grams saturated fat, Carbohydrate 31 grams carbohydrates, Sugar 25 grams sugar, Fiber 0.7 grams fiber, Protein 3 grams protein, Sodium 0.4 milligram of sodium
Tips:
- Choose the Right Cake Base: For a sturdy and moist cake, opt for a pound cake or chocolate cake as the base. These denser cakes hold up well to the weight of the decorations and stay moist even after refrigeration.
- Prepare the Ganache in Advance: Making the ganache ahead of time allows it to set properly and gives you time to whip it to the desired consistency.
- Chill the Cake Before Decorating: Chilling the cake firms it up, making it easier to handle and decorate. This also helps prevent the decorations from sliding off.
- Use Quality Candy Melts: High-quality candy melts ensure a smooth and even coating on the cake. Avoid using chocolate chips, as they contain stabilizers that can cause the chocolate to seize.
- Temper the Chocolate: Tempering the chocolate ensures a shiny and smooth finish on the reindeer's antlers and other chocolate decorations.
- Use Piping Bags for Details: Piping bags provide precise control when adding details like the reindeer's eyes, nose, and mouth.
- Add Finishing Touches: Edible glitter, sprinkles, and candy canes add a festive touch to the cake and bring the reindeer theme to life.
Conclusion:
Creating a reindeer cake is a fun and rewarding experience, perfect for Christmas celebrations or winter-themed parties. With careful planning, attention to detail, and the tips and techniques mentioned above, you can achieve a stunning and delicious cake that will impress your guests and make your holiday season even sweeter. Remember to let your creativity shine through and have fun with the decorating process, as this is where the magic truly happens.
Are you curently on diet or you just want to control your food's nutritions, ingredients? We will help you find recipes by cooking method, nutrition, ingredients...
Check it out »
You'll also love


