Provided by Foodiewife
Number Of Ingredients 21
Steps:
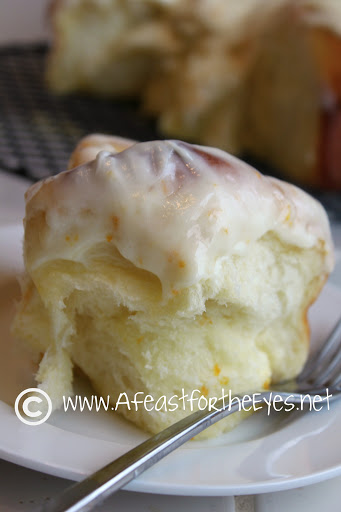
- Note: I warm the buttermilk in the microwave, on low power in 15 second bursts. You want it to be warm, but not boiling hot (about 100°F) Dough: Whisk the warmed buttermilk and butter together in a large liquid measuring cup. Combine 4 cups of flour*, sugar, yeast and salt together in a standing mixer fitted with dough hook (or you can use a large bowl and mix with a wooden spoon or electric handheld mixer). *I only use King Arthur Flour unbleached flour. I use the bread flour, because it has more gluten. With the mixer on low speed, add the buttermilk mixture and eggs and Buttery Sweet Dough Emulsion* (if using)and mix until the dough comes together, about 2 minutes. Increase the mixer to medium speed and knead the dough until it is smooth and elastic, about 10 minutes (knead for 15 to18 minutes by hand). If after 5 minutes of kneading, the dough is still overly sticky, add 1/4 cup flour 1 tablespoon at a time until the dough clears the sides of the bowl but has a slight tacky feel when pressed between your fingertips. Place the dough in a large, lightly greased bowl and cover the top tightly with plastic wrap. Let the dough rise in a warm place until doubled, around 2 to 2 1/2 hours, depending on the warmth of your kitchen. Tip: I turn my oven to WARM for 2 minutes. then turn it off. This creates a warm environment and speeds up the process of the proofing of the dough by half! Filling: For the filling, combine all the filling ingredients (reserving 1/2 teaspoon orange zest for the frosting) in a small bowl and mix well. Set aside. Note: I found that if the filling is too soft, the butter leaks out a lot, while baking. It's not a bad thing, but next time I will slightly chill the filling and keep it just soft enough to spread with ease. Shape the dough: When the dough is ready, turn it out onto a lightly floured counter and press it (I use a rolling pin) into about a 16 by 12-inch rectangle (if you have doubled the recipe, split the dough in half and roll out one half at a time). Gently brush the filling mixture over the rectangle, using an offset spatula or rubber spatula. Lift the longest edge closest to you and begin rolling the dough into a tight log. Pinch the seam closed and roll the log so it is seam side down. Using a serrated knife**, slice the log into 12 evenly sized rolls,more or less. You can slice them thinner or thicker as you like. I find that using dental floss is a fool-proof way to slice the rolls. Obviously, you want to use fresh and unscented floss! I use a 9-inch cake pan, prepared with nonstick spray and with parchment paper on the bottom. Place each slice, cut side down, with one slice right in the center and the rest all around. Note: I made 2-inch thick slices, and the rolls rose up super high! Next time, I'll slice them 1-inch thick. Cover the rolls with lightly greased plastic wrap. Let the rolls rise in a warm place until doubled, 1 to 1 1/2 hours. Note: Using my WARM method in the oven, these rose super high in less than 30 minutes. Bake the rolls at 350°F for 22 to 25 minutes, until the rolls are lightly golden on top and cooked through. Remove rolls to a cooling rack and place waxed paper underneath. Frost immediately. Frosting: In a stand mixer, with the whisk attachment, cream the butter and cream cheese until smooth. Add the orange zest, orange juice and, if using, the orange oil. Add confectioner's sugar in 1/2 cup increments until the frosting is smooth and spreadable.
Are you curently on diet or you just want to control your food's nutritions, ingredients? We will help you find recipes by cooking method, nutrition, ingredients...
Check it out »
You'll also love


MD obayed Ullah
[email protected]I've never made sweet rolls before, but these were so easy to follow. They turned out great!
Shree Jana
[email protected]These rolls are so good, I could eat them every day.
Bengali
[email protected]I made these rolls for a party and they were a huge hit. Everyone loved them!
Johnny Fitzgerald
[email protected]These rolls are the perfect way to start your day.
Lilian Anosike
[email protected]I'm not a big fan of orange, but these rolls were surprisingly good. I'll definitely be making them again.
Sufian Malik
[email protected]These rolls were a bit dry, but the frosting helped to make up for it.
Ellens Indongo
[email protected]I love the orange flavor in these rolls. They're perfect for a special occasion.
Sarfaraz Khan
[email protected]These rolls are so easy to make, and they're always a crowd-pleaser.
Bhawana Nepali
[email protected]I had some trouble getting the rolls to rise properly, but they still tasted good.
Demtreal Laneair
[email protected]These rolls were a bit too sweet for my taste, but my kids loved them.
Iduwara Wishmitha
[email protected]I've made these rolls several times now, and they always turn out perfect. They're a great addition to any breakfast or brunch.
Alisheraz Ali
[email protected]The orange zest in these rolls really shines through. I love the combination of sweet and tangy.
Sharon Respass
[email protected]These orange sweet rolls were a hit with my family! The rolls were fluffy and light, and the orange cream cheese frosting was the perfect finishing touch. I will definitely be making these again.