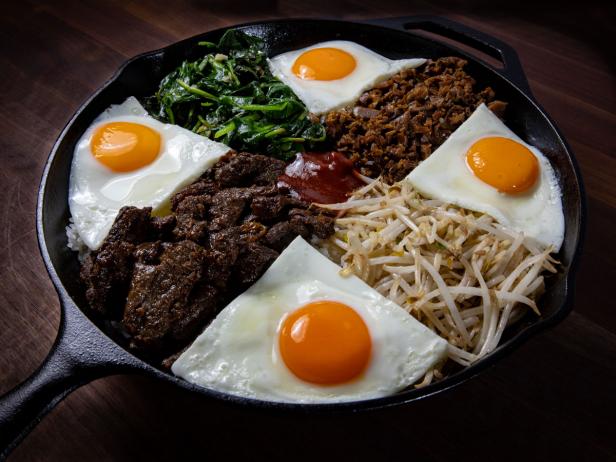
Dear cook, I know there's a lot going on here, but with the exception of the final assembly, everything can be done and refrigerated a couple of days ahead.
Provided by Alton Brown
Categories main-dish
Time 3h30m
Yield 4 servings
Number Of Ingredients 20
Steps:
- The meat: In a medium bowl, whisk together the soy sauce, doenjang, two of the scallions, 1 tablespoon of the garlic, 1 tablespoon of the ginger, and the brown sugar. Transfer 1/2 cup of this mixture to a gallon-size zip-top bag and add the short ribs. Seal, removing as much air as possible, then massage the bag to thoroughly coat the meat. Transfer to the fridge for at least 4 hours, or up to overnight.
- The mushrooms: Place the remaining soy sauce mixture in a small saucepan along with 1/2 cup of the water and the dried mushrooms. Bring to a simmer over medium heat, then reduce the heat to low and continue to simmer, stirring occasionally, until the mushrooms are tender and hydrated, 20 to 25 minutes. Strain, pressing on the mushrooms to remove their liquid. Reserve both the mushrooms and their cooking liquid. Roughly chop or thinly slice the mushrooms, if desired, and set aside near the stovetop. Rinse out the saucepan.
- The sauce: Combine the gochujang and 2 teaspoons of the rice vinegar with 2 tablespoons of the mushroom cooking liquid in a small bowl. Stir well and season with additional rice vinegar to taste. Set aside for serving.
- The flavor base: In a small bowl, combine the remaining garlic, remaining ginger, and the 2 remaining scallions. Scoop 1 scant tablespoon of this mixture into the now-clean saucepan. Set the remainder aside as you'll need it for the final assembly.
- The pickles: To the saucepan, add 1/4 cup of the water, the remaining 2 tablespoons vinegar, the granulated sugar, and 1/2 teaspoon of the salt. Bring the mixture to a boil over medium-high heat. Meanwhile, place the cucumber slices in a pint-size glass canning jar. When the pickling liquid boils, immediately pour over the cucumbers. Cool to room temperature, cover tightly, and refrigerate.
- The rice: Place a fine-mesh sieve in a medium bowl. Place the rice in the sieve, then fill the bowl with cold water. Swirl the rice around in the water using your fingers, then remove the sieve from the bowl to drain the rice. Dump the water and repeat until the water is mostly clear, 3 to 5 times. Drain the rice well and transfer to a medium heavy-bottomed saucepan. Add the remaining 2 cups of water and season with 1 teaspoon of the salt. Place over high heat and bring to a boil. Give the rice a single stir, reduce the heat to the lowest setting, cover, and cook for 15 minutes. Remove from the heat and rest 10 minutes, still covered. Finally, remove the lid and fluff the rice with a fork to release excess steam and to help the outer starch to solidify. Transfer to a bowl or, if making ahead, cool completely and transfer to a zip-top bag for refrigeration.
- The vegetables: Place a well-seasoned 12-inch cast-iron skillet over medium heat for 3 minutes. When the skillet just starts to smoke, add 1 teaspoon of the sesame oil, followed by the bean sprouts, 1/2 teaspoon of the flavor base, and 1/8 teaspoon of the salt. Cook, stirring constantly, until the sprouts start to soften, about 1 minute. Transfer to a small bowl and wipe out the skillet. Add another teaspoon of the sesame oil, followed by the spinach, 1 teaspoon flavor base, and 1/4 teaspoon salt. Cook, stirring frequently, until wilted, 1 to 2 minutes. Transfer to a second small bowl, wipe out the skillet, and add another teaspoon of the sesame oil, followed by the rehydrated mushrooms. Cook, stirring frequently, until browned, 2 to 3 minutes. Transfer to a third small bowl, then wipe out the skillet yet again.
- Cook the meat: Place the skillet over medium-high heat, and when it just begins to smoke, add 1 tablespoon of the sesame oil. Add the beef as well as the marinade and cook, stirring often, until the meat is cooked through and the sauce reduces to a sticky glaze, 3 to 5 minutes. Transfer meat to yet another bowl, remove the skillet from the heat, and wipe it out.
- Assemble the bibimbap: Off the heat, coat the skillet (and its sides) with the remaining 2 tablespoons sesame oil. Add the rice and press into an even layer. Position the meat over a quarter of the rice, then mound the vegetables, each in their own separate piles, leaving open space between them for the eggs and the center for sauce. Cover the skillet, place over medium heat, and cook until the bottom of the rice is browned and crisp, 7 to 8 minutes. Remove from the heat.
- The eggs: While the rice is crisping, drizzle the neutral oil across a 12-inch nonstick skillet. Evenly space the eggs in the skillet. (I find transferring the eggs in a small bowl helps here.) Leave at room temperature for 10 minutes. Season the egg whites with a few pinches of salt, and place over medium heat. (If you're using an electric cooktop, begin heating the burner before adding the skillet.) Cook, uncovered, for 4 minutes. If the whites start to balloon up, just poke with a wooden chopstick to deflate. While the eggs cook, lightly lube a platter with oil or nonstick cooking spray. When the 4 minutes are up, slide the eggs onto the platter and rest for 1 minute. Cut into 4 individual egg wedges.
- Uncover the skillet with the bibimbap. Place a dollop of sauce in the middle of the skillet and place the eggs between the vegetables. Sprinkle with the additional scallions and drizzle with an additional tablespoon of sesame oil, if desired. After the diners all view the lovely order of the dish, I like to stir everything together in front of them just to remind them how mixed up and crazy the world is. Serve with the cucumber pickles and additional sauce on the side.
Are you curently on diet or you just want to control your food's nutritions, ingredients? We will help you find recipes by cooking method, nutrition, ingredients...
Check it out »
You'll also love


Iro Kara
irok28@yahoo.comThis was my first time making dolsot bibimbap, and it turned out great! The recipe was easy to follow, and the dish was absolutely delicious. I especially loved the combination of flavors and textures. I will definitely be making this again.
Obidulla Obidulla
obidulla_o3@aol.comI was really impressed with this dolsot bibimbap. The flavors were amazing, and the rice was cooked to perfection. I especially loved the crispy texture of the rice at the bottom of the bowl. I would definitely recommend this recipe to anyone who lov
Md. Nur Alam islam
islam.m32@yahoo.comThe dolsot bibimbap was a bit too spicy for my taste, but I still enjoyed it. The vegetables were fresh and crunchy, and the rice was cooked perfectly. I think next time I'll use less gochujang sauce.
inzmam Khan
i_k@hotmail.comI've made this dolsot bibimbap several times now, and it's always a hit with my family and friends. The gochujang sauce is especially delicious, and I love how it brings all the flavors together. I also appreciate that this recipe is relatively easy
Md Ashraful Islam tutul
m.t11@gmail.comThis dolsot bibimbap was amazing! The flavors were incredible, and the rice was cooked to perfection. I especially loved the crispy texture of the rice at the bottom of the bowl. It was the perfect complement to the soft, fluffy rice on top. I would
Jardel Santos
sjardel@aol.comOverall, I thought this dolsot bibimbap was pretty good. The flavors were nice, and the rice was cooked well. However, I found the vegetables to be a bit too crunchy for my liking. I would have preferred them to be cooked a little bit more.
Kazuha Kaedahara
k@gmail.comThis dolsot bibimbap was a bit bland for my taste. I think I would have liked it more if I had used more gochujang sauce. The vegetables were also a bit overcooked. I would recommend cooking them for a shorter amount of time next time.
Charlotte Appiah - Kubi
c.k@hotmail.co.ukI've tried many dolsot bibimbap recipes, but this one is by far the best. The gochujang sauce is perfectly balanced, and the vegetables are cooked to perfection. I also love the addition of the fried egg. It really brings the dish together.
Young Bliss
bliss-young@gmail.comThis was my first time making dolsot bibimbap, and it turned out great! The recipe was easy to follow, and the dish was absolutely delicious. I especially loved the combination of flavors and textures. I will definitely be making this again.
Didzis Rye
didzis.rye@gmail.comI was really impressed with this dolsot bibimbap. The flavors were amazing, and the rice was cooked to perfection. I especially loved the crispy texture of the rice at the bottom of the bowl. I would definitely recommend this recipe to anyone who lov
Shobuj Ahamed
shobuj@yahoo.comThe dolsot bibimbap was a bit too spicy for my taste, but I still enjoyed it. The vegetables were fresh and crunchy, and the rice was cooked perfectly. I think next time I'll use less gochujang sauce.
TOTON SHAH
toton_shah79@yahoo.comI've made this dolsot bibimbap several times now, and it's always a hit with my family and friends. The gochujang sauce is especially delicious, and I love how it brings all the flavors together. I also appreciate that this recipe is relatively easy
Shikdare Telicom
s_telicom@gmail.comThis dolsot bibimbap was an absolute delight! The flavors were incredibly balanced, and the rice was cooked to perfection. I especially loved the crispy texture of the rice at the bottom of the bowl. It was the perfect complement to the soft, fluffy