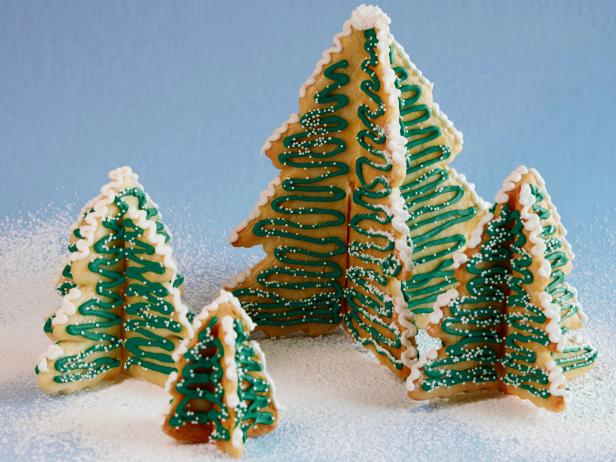
This recipe is sponsored by Truist Financial. Make your cookie platter vertical (and extra-impressive!) with this 3D Christmas tree forest. Chilling the dough after it has been cut helps the shapes stay sharp during baking.
Provided by Food Network Kitchen
Categories dessert
Time 10h
Yield 6 tree cookies
Number Of Ingredients 13
Steps:
- For the dough: Whisk together the flour, baking soda and salt in a medium bowl. Beat together the vanilla and 2 eggs in a small bowl.
- Beat the butter, granulated sugar and confectioners' sugar in a large bowl with an electric mixer on low speed. Once they are incorporated, increase the speed to medium and, scraping down the sides of the bowl as needed, beat until slightly creamy, about 3 minutes.
- Reduce the speed to low, slowly pour in the egg mixture and beat until combined. Add the flour mixture in 3 additions, increasing the speed as the dough gets thicker to keep the beaters spinning and scraping down the sides of the bowl and the beaters as needed. Once all the flour is just incorporated, increase the speed to medium-high and beat until the dough is very smooth, about 5 minutes.
- Turn the dough out of the bowl and bring it together on a clean surface. Divide into 2 pieces. Shape each piece into a flat square and wrap in plastic. Refrigerate for at least 3 hours or up to overnight.
- To cut and bake the forest: Position racks in the upper and lower thirds of the oven and preheat to 350 degrees F. Line 3 baking sheets with parchment.
- Dust your work surface with flour and roll out a piece of dough until about 1/4-inch thick. Keep the other piece refrigerated while you work. Punch out shapes in the dough with tree cookie cutters of various sizes and cut off the dough trunks; for every 3D tree you will need 2 tree cutouts of the same size so punch out the shapes in pairs. For our forest we used 4-inch, 6-inch and 8-inch cutters. Put the trees on the prepared baking sheets and chill while you roll and cut trees from the remaining dough. Combine the scraps of the 2 squares. Chill again, reroll and cut out more trees You should have 8 to 10 pairs of trees, depending on the size of your cutters. Freeze the cutout cookies for at least 30 minutes.
- Rearrange the cookies on the baking sheets so that the pairs are next to each other. For the first cookie of each pair, use a sharp paring knife to cut a 1/2-inch-wide slot from the bottom to a little more than halfway up the cookie. For the second cookie of each pair, cut a similar slot but from the top of the tree down to a little past the middle. You will fit the cookies together with these slots after they are baked. Return the cookies to the freezer for 30 minutes more.
- Whisk together the remaining egg with 2 tablespoons water in a small bowl. Brush a thin layer of egg wash on the cookies right before baking.
- Bake the cookies, rotating the baking sheets front to back and bottom to top about halfway through, until golden brown and dry on top, 15 to 18 minutes. Let cool completely on the baking sheets set on a cooling rack, about 30 minutes.
- Meanwhile, make the royal icing: Combine the confectioners' sugar, meringue powder and vanilla in a large bowl. Add 5 tablespoons water and beat with an electric mixer on medium-high speed until the icing forms thick and glossy peaks, about 2 minutes, adding up to 1 tablespoon more water, if needed.
- Remove a third of the royal icing and place it in a pastry bag fitted with a small no. 4 round tip. Color the remaining icing with the green food coloring, one drop at a time, until it's a shade you like. If the frosting is still very stiff, add 1 to 2 teaspoons of water. Fill a second pastry bag fitted with another small no. 4 round tip with the green frosting.
- Use a sharp paring knife to shave the cookie edges so they are smooth and flat: Pay attention to the tree bottoms (so the trees will stand straight) and the inner edges of the slots. Assemble the trees by sliding the top-slot trees into the bottom-slot trees. Shave the cookies as needed for a smooth fit, then disassemble them and place the pieces on a flat surface. Don't worry if a tree breaks; glue the pieces together with green royal icing.
- To decorate the forest: Decorate each cookie with the green icing, leaving a blank strip up the center without icing; this is where the pieces will fit together. We used a zigzag line of green on each side. Sprinkle with white sprinkles while the icing is still wet. Let set
- until firm, 30 to 45 minutes. Turn the cookies over and decorate the backs in the same fashion. Let set until firm, 30 to 45 minutes.
- Assemble the trees. Pipe a thin line of white icing on the outer edges of the trees for snow. Let set before serving, 30 to 45 minutes. Arrange the trees on a serving platter to create a forest. Sprinkle with confectioners' sugar for snow.
Are you curently on diet or you just want to control your food's nutritions, ingredients? We will help you find recipes by cooking method, nutrition, ingredients...
Check it out »
You'll also love


Nompilo Dhlamini
[email protected]I was disappointed with these cookies. They were dry and crumbly.
zara Pari
[email protected]These cookies were easy to make and they looked beautiful! I will definitely be making them again.
Naila usman
[email protected]I followed the recipe exactly and the cookies turned out perfect! I'm so glad I found this recipe.
Dhananjoy kumar biswas
[email protected]These cookies were a little dry, but they were still tasty.
Zamin Shar
[email protected]I'm not a big fan of sugar cookies, but these were really good! The frosting was especially yummy.
Laquita Murray
[email protected]These cookies are a little too sweet for me, but they are still very good.
Rj Bangladesh72
[email protected]I love these cookies! They are so easy to make and they always turn out perfect.
Stacy Hazelwood
[email protected]These cookies are the perfect Christmas treat! They are so cute and festive.
Chico Perez
[email protected]I made these cookies for my family and they were a huge success! They are so delicious and easy to make.
Imran Ahamad
[email protected]These cookies were a big hit at my holiday party! Everyone loved them.
Md HiLaL
[email protected]These cookies are so festive and perfect for Christmas! I love the way they look and taste.
Percy Drew
[email protected]I'm not sure what I did wrong, but my cookies didn't turn out like the picture. They were still tasty, though.
New information
[email protected]I was disappointed with these cookies. They were dry and crumbly.
Abdul Rasool
[email protected]These cookies were easy to make and they looked beautiful! I will definitely be making them again.
Victor George
[email protected]I followed the recipe exactly and the cookies turned out perfect! I'm so glad I found this recipe.
diganto 2842
[email protected]These cookies were a little too sweet for me, but they were still good.
Mubeen Amir
[email protected]I'm not a big fan of sugar cookies, but these were really good! The frosting was especially yummy.
illohminati
[email protected]These cookies are delicious! The frosting is the perfect sweetness and the cookies are soft and chewy.
Joella Zijena
[email protected]I made these cookies with my kids and we had a blast! They were easy to make and turned out so pretty.
Kunal Khatri
[email protected]These cookies are so cute and festive! They were a hit at my Christmas party.