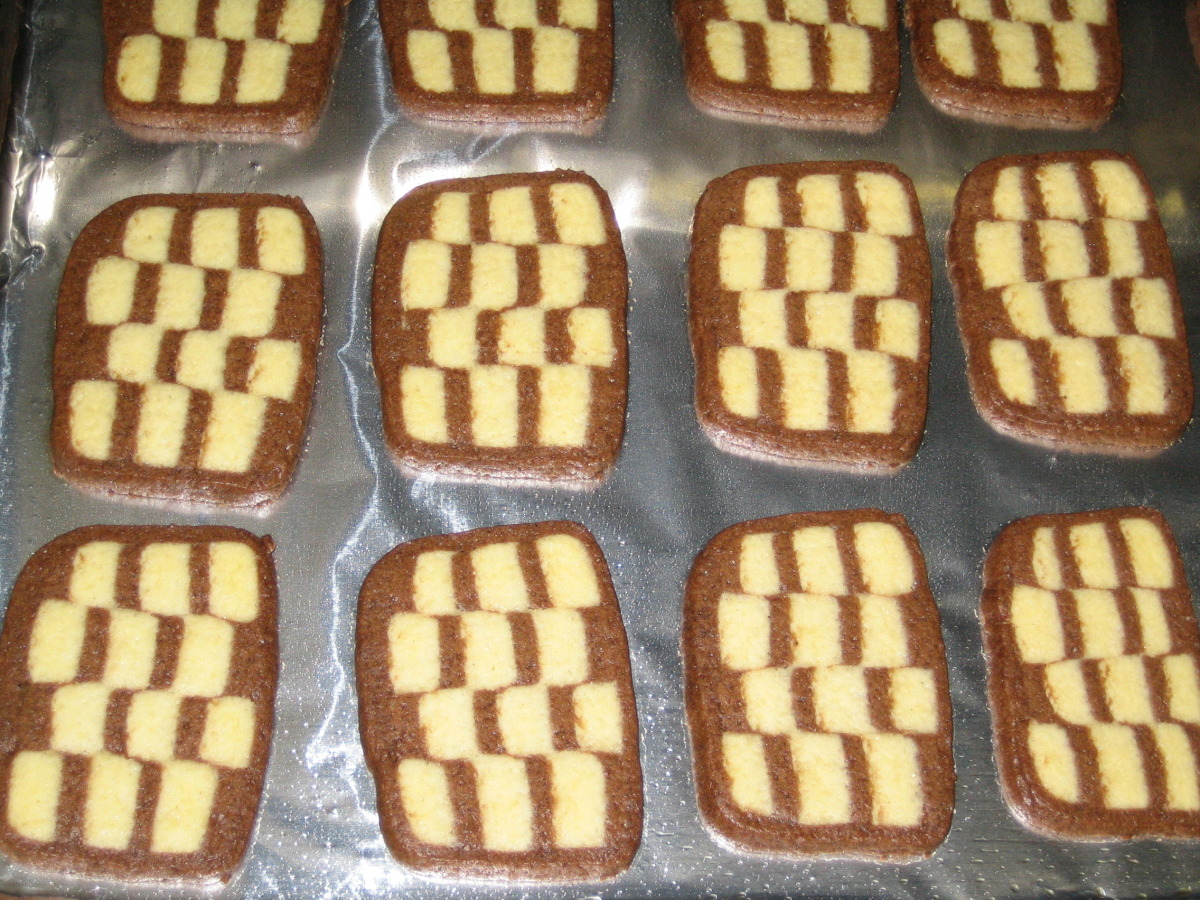
I adopted this recipe from the RecipeZaar account. I have not had a chance to make this myself. Original Chef's notes: "Although this recipe is long, it is really not difficult and produces a stunning cookie. They can be frozen, sliced and baked when needed."
Provided by Saturn
Categories Dessert
Time 1h37m
Yield 36 cookies
Number Of Ingredients 9
Steps:
- Preheat oven to 350° F (177° C) and place rack in center of oven.
- Bake hazelnuts for 15 minutes or until skins start to blister. Remove from oven and wrap in a clean towel so the nuts can steam for 5 minutes. Rub the towel briskly in a back and forth motion to remove the skins from the hazelnuts. Set aside to cool.
- When cool, place the hazelnuts in a food processor along with the cocoa powder and process until the hazelnuts are finely ground. Set aside.
- In a small bowl whisk together the flour and salt. Set aside.
- In bowl of electric mixer, beat the butter and sugar until light and fluffy (about 2 to 3 minutes). Add the egg, vanilla extract and orange zest and beat until well blended. Add the flour mixture and beat just until incorporated.
- Divide the dough in half and place one half of the dough back into the bowl of electric mixer. Add the cocoa and hazelnut mixture to the dough and beat until incorporated. Set aside.
- Lay out two large sheets of parchment paper (about 10 x 12 inch) (25 x 30 cm) and on one sheet of parchment roll out the white dough into a 6 1/2 inch by 10 1/2 inch (22.5 x 26.25 cm) rectangle, making sure both sides of the dough are smooth.
- Wrap dough and place on a baking sheet in the freezer for about 15 minutes or until dough is firm.
- Meanwhile, take the chocolate dough and remove 1/2 cup (used later for wrapping the checkerboard log) and cover with plastic wrap. Set aside.
- On the second sheet of parchment roll out the chocolate dough into a 6 1/2 inch by 10 1/2 inch (22.5 x 26.25 cm) rectangle, making sure both sides of the dough are smooth.
- Wrap dough and place on a baking sheet in the freezer for about 15 minutes or until dough is firm.
- When both the white and chocolate doughs are firm, remove from freezer and lay the white dough on a cutting board, removing the parchment paper.
- Lightly brush the top of the dough with a little water or lightly beaten egg white (this helps the layers to stick together).
- Remove the parchment paper from the chocolate dough and place it evenly on top of the white dough.
- Trim the edges of the two doughs so the rectangle now measures 6 inches by 10 inches (21.25 x 25 cm).
- (Take the chocolate dough trimmings and add to the 1/2 cup of reserved chocolate dough.) Lengthwise cut the rectangle into thirds (3- 2 inch by 10 inch stripes) (5 x 25 cm).
- Place one strip on a piece of plastic wrap.
- Brush the top of the dough with water and place the second strip on top of the first (alternate colors so you have white, black, white, black).
- Brush the top of the second layer with water and stack the third layer.
- Press down lightly on the top of the dough and then wrap and freeze for 15 minutes, or until firm.
- When firm, remove from freezer and unwrap, placing the dough on a cutting board.
- Using a sharp long knife, cut the layers lengthwise into 1/4 inch (0.6 cm) wide and 10 inch (25 cm) long strips (You will end up with 8 strips).
- Stack the layers, turning every other strip so top faces down and bottom faces up, to produce the checkerboard effect.
- Re-wrap stack and place in freezer again to firm up.
- Meanwhile, take the reserved chocolate trimmings and 1/2 cup of chocolate dough and roll out on a piece of parchment paper into approximately 9 1/2 x 10 1/2 inch (24 x 26.25 cm) rectangle, making sure the dough is smooth - Cover and refrigerate until slightly firm.
- Remove stack of checkerboard dough from freezer and place in center of chocolate dough.
- Wrap the chocolate dough around the checkerboard layers until you have a smooth surface that encloses the checkerboard design. Wrap in plastic and freeze until firm.
- Can freeze dough for up to 2 weeks.
- Preheat oven to 350° F (177° C) and place rack in center of oven.
- Line a baking sheet with parchment paper.
- Remove dough from freezer and place on a cutting board.
- With a sharp knife cut the block of dough into 1/8 to 1/4 inch (0.5 cm) thick slices.
- Place on prepared baking sheet about 1 inch (2.54 cm) apart.
- Bake for about 5-7 minutes or until cookies just start to brown around the edges.
- Remove from oven and place on wire rack to cool.
- Baked cookies can be stored in an airtight container up to one week.
Are you curently on diet or you just want to control your food's nutritions, ingredients? We will help you find recipes by cooking method, nutrition, ingredients...
Check it out »
#weeknight #time-to-make #course #preparation #desserts #cookies-and-brownies #dietary #low-sodium #low-in-something #number-of-servings #4-hours-or-less
You'll also love


Mavia 40
[email protected]These cookies are so easy to make, and they always turn out perfect. I love that I can make them ahead of time and freeze them for later.
Broken Angel CORONA
[email protected]I'm so glad I found this recipe. These cookies are now my go-to dessert for any occasion.
Kafy Hasan
[email protected]These cookies are so festive and fun! They're perfect for any holiday party or gathering.
Joseph Cheney
[email protected]I love the way these cookies look! They're so unique and eye-catching. I can't wait to try them.
Chilling Time
[email protected]These cookies are the perfect holiday treat. They're festive, delicious, and easy to make. I highly recommend this recipe.
MD. ROMJAN ALI 72
[email protected]I'm so impressed with how these cookies turned out. They're so beautiful and delicious, and they were surprisingly easy to make.
Basnnet Sandesh
[email protected]These cookies are so delicious! I love the way the chocolate and vanilla doughs melt together in my mouth.
Adriana Clark
[email protected]I've made these cookies several times now, and they're always a hit. They're the perfect combination of chewy and crispy.
Velmah Quin
[email protected]These cookies are so easy to make, and they always turn out perfect. I love that I can make them ahead of time and freeze them for later.
Uttam Magaru
[email protected]I'm so glad I found this recipe. These cookies are now my go-to dessert for any occasion.
im ZEOX
[email protected]These cookies are so festive and fun! They're perfect for any holiday party or gathering.
Doris Nyang
[email protected]I love the combination of chocolate and vanilla in these cookies. They're the perfect balance of sweet and savory.
Tshengisiwe Makhosazane
[email protected]These cookies are a little time-consuming to make, but they're definitely worth the effort. They're so beautiful and delicious, and they're sure to impress your friends and family.
Sebastian Guardado
[email protected]I'm not much of a baker, but I was able to make these cookies without any problems. They turned out great, and my family loved them.
Jonah Digiovanni
[email protected]These cookies are so delicious! The chocolate and vanilla doughs complement each other perfectly, and the checkerboard pattern is really fun. I highly recommend this recipe.
Kamal Ola
[email protected]I've made these cookies several times now, and they're always a crowd-pleaser. They're perfect for any occasion, and they always disappear quickly!
live banda
[email protected]I love the way these cookies look! They're so unique and eye-catching. I can't wait to try them.
Ron Tuckey
[email protected]These checkerboard cookies were a hit at my holiday party! They're so festive and delicious, and they were surprisingly easy to make. I'll definitely be making them again next year.