Best 6 Pizza Essentials Personal Pizza Galette Recipes


Elevate your pizza night with irresistibly delicious personal pizza galettes, a delightful twist on the classic Italian dish. These individual-sized pizzas offer a fun and creative way to enjoy your favorite toppings, all wrapped in a golden, flaky crust. Our collection of recipes caters to diverse tastes, from the classic Margherita to the adventurous Pulled Pork BBQ Pizza. With easy-to-follow instructions and helpful tips, you'll be a pizza-making pro in no time. Get ready to impress your family and friends with these mouthwatering personal pizza galettes that are perfect for any occasion!
Let's cook with our recipes!
PERSONALIZED INDIVIDUAL PIZZAS

Enjoy a variety of pizzas made using Pillsbury™ refrigerated classic pizza crust - a perfect Italian treat that's ready in just 35 minutes.
Provided by Pillsbury Kitchens
Categories Entree
Time 35m
Yield 4
Number Of Ingredients 13
Steps:
- Heat oven to 425°F. Spray cookie sheet with cooking spray; sprinkle with cornmeal. Do not unroll dough. Cut roll of dough into 4 equal pieces; shape each piece into a ball. Roll or press each ball of dough into a 5-inch round making edges slightly thicker to form a rim. Place the rounds on the prepared cookie sheet; brush each with oil.
- Bake 6 to 8 minutes. Top each round with 1 of the variations below. Bake 10 to 13 minutes longer or until crust is deep golden brown and cheese is melted and bubbly.
Nutrition Facts : Calories 600, Carbohydrate 58 g, Cholesterol 65 mg, Fat 3, Fiber 1 g, Protein 30 g, SaturatedFat 13 g, ServingSize 1 Serving, Sodium 1660 mg, Sugar 13 g, TransFat 0 g
GALETTE PIZZA

Yield 3
Number Of Ingredients 8
Steps:
- First heat your oven to 400 degrees. Then take about 1/4 of the butter and generously butter a baking sheet. Butter the baking sheet prevents the dough from sticking, while also making the crust extra crispy.
- Next, stretch out the dough into a big thin circle, and place it on the baking sheet. Then spread the sauce over the dough, leaving an inch around the edge. Add ricotta around the edge of the crust and then fold the edge over.
- Slice or tear the mozzarella and add it over the sauce.
- Finally, crust the garlic and add it to a bowl with the remaining butter. Place it in the microwave until the butter has melted, and then use a pastry brush to brush the butter and garlic mixture over the exposed pizza crust.
- Bake the galette pizza for 25 minutes, or until the crust is golden brown and the cheese is bubbly. Serve immediately, topped with fresh basil.
PIZZA ESSENTIALS: PERSONAL PIZZA GALETTE
Why does a pizza have to be thin and flat... why not make one in a galette, and while we're at it, let's stuff it with all kinds of goodies. The fillings can be anything thing that you enjoy on a normal pizza. So, you ready... Let's get into the kitchen
Provided by Andy Anderson !
Categories Pizza
Time 30m
Number Of Ingredients 10
Steps:
- 1. PREP/PREPARE
- 2. Gather your Ingredients (mise en place).
- 3. Add the Italian sausage to a sauté pan over medium heat.
- 4. Sauté until cooked through, about 6 - 8 minutes.
- 5. Chef's Note: Use a wooden spoon to break the sausage into small bits.
- 6. Remove and drain on paper towels.
- 7. Place a rack in the middle position, and preheat the oven to 425f (220c).
- 8. Place your pizza dough on a clean, flat surface and roll out into an 8-inch circle.
- 9. Spread the tomato sauce in a 6-inch circle.
- 10. Add the sausage.
- 11. Add the provolone cheese.
- 12. Add the Canadian bacon.
- 13. Add the parmesan cheese
- 14. Add the mozzarella cheese.
- 15. Add the pepperoni.
- 16. Slice the excess pizza dough about every two inches.
- 17. Fold the dough over the filling.
- 18. Brush with a bit of olive oil, and sprinkle with some oregano.
- 19. Place into the preheated oven, and bake until the crust browns, and the cheese is nice and bubbly, about 12 - 18 minutes.
- 20. PLATE/PRESENT
- 21. Slice and serve while still nice and warm. Enjoy.
- 22. Keep the faith, and keep cooking.
PERSONAL PIZZA
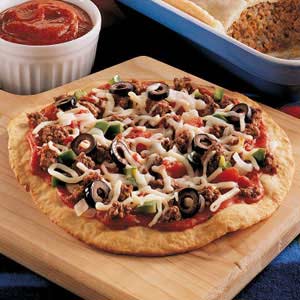
I practically lived on these mini pizzas when I was in college. Packaged pizza crust mixes make it easy recipe to prepare anytime.-Julie Beth Lamb, Visalia, California
Provided by Taste of Home
Categories Dinner
Time 40m
Yield 6 servings.
Number Of Ingredients 7
Steps:
- Prepare both packages of pizza dough according to directions. On a floured surface, knead dough several times; divide into six portions. Roll each into an 8-in. circle. Place on greased baking sheets. Bake at 425° for 10 minutes. , Spread pizza sauce over crusts to within 1/2 in. of edge. Top with beef, onion, green pepper, olives and cheese. Return to the oven for 10-15 minutes or until crust is golden brown and cheese is melted.
Nutrition Facts : Calories 379 calories, Fat 16g fat (7g saturated fat), Cholesterol 59mg cholesterol, Sodium 746mg sodium, Carbohydrate 31g carbohydrate (8g sugars, Fiber 3g fiber), Protein 27g protein.
PIZZA ESSENTIALS: THE ULTIMATE DEEP DISH CRUST

My quest for a buttery/crispy crust began, while I was working at Mergellina's, in Naples, Italy. In the evening, after closing, some us would go to the Vincenzo Pizzeria for a late-night pizza. It was a small place, known mostly to the locals. The good news was that the other cooks at the restaurant I worked at were all...
Provided by Andy Anderson !
Categories Pizza
Time 25m
Number Of Ingredients 13
Steps:
- 1. PREP/PREPARE
- 2. For this recipe, I find the best thing to bake it in is a spring form pan with tall sides.
- 3. You can work this dough entirely by hand; however, for this recipe, I will be using my stand mixer, fitted with a dough hook. If you are doing this by hand, you will need a large bowl... something you can get your hands into and work the dough.
- 4. Gather your Ingredients (mise en place).
- 5. Add the flour, salt, basil, oregano, and parsley to the bowl of your stand mixer.
- 6. In a measuring cup or bowl add the water, melted butter, olive oil, and yeast.
- 7. Give it a quick whisk, to combine the ingredients, and let it stand for about 5 minutes.
- 8. What we are doing is "proofing" the yeast. If the top begins to get foamy, you have good yeast; if it does not foam, your yeast is dead, give it a good burial, and buy some better yeast.
- 9. Turn the mixer on low, and slowly add the liquid (occasionally stopping to scrape down the sides with a rubber spatula).
- 10. Chef's Tip: I usually reserve a bit of the liquid, just to see if I will need it. Working with flour can be a bit tricky, and things like humidity and other factors can determine how much liquid to use.
- 11. When the dough begins climbing up the hook, stop mixing, about 3 - 4 minutes.
- 12. Add the dough to a large bowl. Sprinkle on a bit of olive oil then roll the dough until coated in the oil. Cover, and allow to rest in a non-drafty corner of your kitchen for about 30 - 40 minutes.
- 13. Remove it from the bowl, dust with a bit of flour, and knead it until smooth and elastic.
- 14. Chef's Note: The dough will be a bit sticky; however, if you keep your hands floured, you should not have a problem.
- 15. Place back into the bowl, cover, and allow to rise for about 4 - 5 hours.
- 16. Then place the bowl, still covered into the refrigerator for 12 - 24 hours, before using.
- 17. On the day that you are going to use it, remove from the fridge, roll out and cut in half.
- 18. If you are only making one pie, then wrap the second dough ball up, and stick into the freezer until needed.
- 19. Place the dough into a baking pan, coated with some olive oil (spring form is the best).
- 20. Slightly flatten it out, and then cover for about 3 - 4 hours.
- 21. Chef's Note: The dough will be about double in size.
- 22. Use your fingers, dipped in a bit of oil, to stretch the dough on the bottom, and up the sides of the pan.
- 23. Chef's Tip: If the dough keeps springing back, let it rest for 5 minutes, and continue stretching it until you fill the pan (bottom and sides).
- 24. Cover and allow to rest for 2 - 3 hours.
- 25. TIME TO BUILD A PIE
- 26. To me, the ingredients placed onto your pie are a personal thing, and not to be trifled with.
- 27. Place a rack in the middle position, and preheat the oven to 450f (235c).
- 28. Chef's Note: If you have a pizza stone, place that on the rack, and allow it to heat up.
- 29. How about lining the pie with some provolone cheese...
- 30. Then lay down some nice yummy sauce...
- 31. Some Italian sausage would be nice...
- 32. Then some grated parmesan cheese...
- 33. I think that I will throw on some thinly-sliced prosciutto...
- 34. Then some more cheese and some slices of pepperoni...
- 35. Stick it in the oven, until the cheese is bubbling and the crust is a golden brown, about 20 - 25 minutes.
- 36. Let is rest for about 10 minutes, before removing it from the pan.
- 37. PLATE/PRESENT
- 38. Cut up into slices and serve while nice and hot. Enjoy.
- 39. Keep the faith, and keep cooking.
PERSONAL PIZZAS
Personal pizzas are a fun, customizable, and kid-sized twist on the typical larger version. An easy-to-make crust that's simple to divide into four, means no arguing because everyone gets their favorite toppings!
Provided by Tiffany
Categories Main Course
Time 35m
Number Of Ingredients 9
Steps:
- Preheat oven 425 degrees.
- In a large bowl whisk together 1 cup flour, yeast, sugar, and salt.
- Add water and oil and mix well until blended.
- Gradually add more flour, 1/4 cup at a time, until dough forms into a ball. (Dough will be quite sticky but with you should be able to handle it with floured hands)
- Turn dough out onto a floured surface and knead for 4-6 minutes until smooth and elastic.
- Place dough in a bowl, cover tightly and allow to rise in a warm place for 10 minutes.
- Divide dough into four equal-size pieces and roll or pat each into a 10-inch circle.
- Spread pizza sauce on top of each pizza, followed by cheese, and desired toppings. (See notes for ideas)
- Bake in preheated oven on the lowest rack for 12-15 minutes until crust is golden brown and cheese is melted. Serve warm.
Nutrition Facts : Calories 735 kcal, Carbohydrate 93 g, Protein 33 g, Fat 25 g, SaturatedFat 10 g, Cholesterol 54 mg, Sodium 1282 mg, Fiber 4 g, Sugar 5 g, ServingSize 1 serving
Tips for Making the Best Personal Pizza Galette:
- Choose High-Quality Ingredients: Use fresh, flavorful ingredients to ensure the best taste. Opt for quality cheese, fresh vegetables, and aromatic herbs.
- Make Your Dough from Scratch or Use a Quality Store-Bought Option: If making your dough, use a simple recipe with a few ingredients. If buying pre-made dough, choose a brand that uses quality ingredients and has a good texture.
- Work with Cold Dough: Keep your dough chilled until you're ready to use it. This will make it easier to work with and prevent it from becoming too sticky.
- Generously Flour Your Work Surface: This will help prevent the dough from sticking and make it easier to roll out.
- Roll Out the Dough Thinly: The thinner the dough, the crispier it will be. Aim for a thickness of about 1/8 inch.
- Don't Overcrowd the Galette: Leave enough space between the toppings to allow them to cook evenly and prevent the galette from becoming soggy.
- Bake the Galette in a Hot Oven: This will help create a crispy crust and prevent the dough from becoming tough.
- Let the Galette Cool Slightly Before Slicing: This will allow the juices to redistribute and prevent the toppings from falling off.
Conclusion:
With its endless topping possibilities and customizable crust, the personal pizza galette is a versatile and delicious meal that can be enjoyed by people of all ages. Whether you're looking for a quick and easy weeknight dinner or a fun and interactive party appetizer, this recipe is sure to satisfy. Follow these tips and techniques to create a perfect personal pizza galette that will impress your taste buds and leave you craving more. Happy baking!
Are you curently on diet or you just want to control your food's nutritions, ingredients? We will help you find recipes by cooking method, nutrition, ingredients...
Check it out »
You'll also love