Best 5 Petits Pains Au Chocolat Recipes


Indulge in the delectable world of French pastries with our exquisite collection of pain au chocolat recipes. These iconic treats, also known as chocolate croissants, are a symphony of flaky, buttery pastry enveloping rich, decadent chocolate. Our carefully curated selection offers a range of recipes to suit every skill level, from classic pain au chocolat to innovative variations that add a touch of creativity to this timeless delicacy.
These recipes provide step-by-step instructions, ensuring that even novice bakers can achieve perfect results. Discover the secrets of creating the perfect pastry dough, from choosing the right ingredients to mastering the art of laminating. Learn how to achieve the ideal balance of crispy and tender textures, resulting in a pain au chocolat that melts in your mouth.
Explore variations that elevate the classic pain au chocolat to new heights. Try fillings like hazelnut praline or salted caramel, adding layers of flavor and texture. Unleash your creativity with unique twists, such as pain au chocolat with matcha or orange zest, creating pastries that are both visually stunning and utterly delicious.
Our collection includes recipes for both traditional and modern pain au chocolat, ensuring that there's something for everyone. Whether you're a seasoned baker looking to refine your skills or a home cook seeking a delightful new baking project, our recipes will guide you towards pain au chocolat perfection.
PETITE PAIN AU CHOCOLAT
Steps:
- Heat the oven to 350 degrees F. Unfold the pastry sheets on a lightly floured surface. Roll each into a 10-inch square. Cut each into 4 (5-inch) squares, making 8 in all.
- Place 2 tablespoons chocolate chips in the center of each pastry square. Brush the edges of the pastry with the egg. Fold each pastry over the chocolate chips and press to seal. Place the filled pastries onto baking sheets. Brush the pastries with the egg.
- Bake for 15 minutes or until the pastries are golden brown. Let the pastries cool on the baking sheets for 10 minutes. Remove the pastries from the baking sheets and let cool completely on wire racks. Cook and stir the remaining chocolate chips and the butter in a heavy 1-quart saucepan over low heat until the mixture is melted and smooth. Stir in the confectioners' sugar. Stir in the water, adding additional water, if necessary, until desired consistency. Drizzle the icing over the pastries
CROISSANTS AND PAIN AU CHOCOLAT
I never use a hand-held electric mixer for this recipe because the motor will not hold up to the strength of this dough. This recipe involves six quick steps and a lot of waiting time. When I want croissants for Sunday brunch, I do the first three steps on Saturday afternoon. On Sunday morning, I get up three hours before I want to serve them and complete the last three steps. You can make both croissants and pain au chocolat with this dough.
Provided by Food Network
Categories dessert
Time 9h10m
Yield 20 croissants or 16 pains au chocolat
Number Of Ingredients 22
Steps:
- Prepare the dough: Melt the 3 tablespoons butter in a small saucepan over low heat. Allow the butter to cool to room temperature. It should appear milky and should be pourable and warm to the touch. In a small bowl, dissolve the yeast in the cold water. Place the flour, salt, sugar, milk, and melted butter in the bowl of a stand mixer fitted with the paddle attachment. Set the mixer on medium speed and mix just until the ingredients are dispersed, about 5 seconds. Add the dissolved yeast and beat on medium-high speed until the dough is well combined and no longer sticks to the sides of the bowl, about 1 minute.
- If the dough is too soft, add more flour, one tablespoon at a time until it is firmer. (The dough is too soft when it cannot hold its shape.) If the dough is too hard, add cold water one tablespoon at a time until it has softened. (The dough is too hard when it is difficult to mix in the mixer.)
- Remove the dough from the mixing bowl. If the dough is slightly sticky and ropy, knead it with your hands for about 30 seconds, until it is smooth. Pat it into a ball. Place the dough on a lightly floured baking sheet, cover with plastic wrap, and let it proof at room temperature for about 30 minutes. (This will start the fermentation process).
- Place the dough on a lightly floured work surface and roll it out to an 8 by 15-inch rectangle about 1/4 inch thick. Wrap the rectangle in plastic wrap and refrigerate for 2 hours. The cold retards the rising process, which allows for a slow fermentation. A slow fermentation helps develop the flavor of the dough.
- Remove the dough from the refrigerator, unwrap the rectangle, and place it with a long side facing you on a lightly floured work surface. Spread the softened butter evenly over the right two thirds of the dough. I like to use a large offset spatula to do this. Incorporate the butter by folding the (butterless) left third of the dough over the center, then fold the right third of the dough to the left. Now it should resemble a folded letter.
- Roll this out into another 10 by 30-inch rectangle about 1/8-inch thick. Give the dough a book fold, or double fold, by folding each short end to the middle so they meet but do not overlap. Then fold one half over the other half and, if necessary, rotate the dough so that the seam is on your right. (This process is called a book fold because the folded dough resembles a book and a double fold because the dough is folded onto itself two times.)
- Wrap the folded dough in plastic wrap and let it rest in the refrigerator for a minimum of 2 hours. (At this stage I usually let the dough rest overnight and finish it in the morning.)
- The following procedure is the final step before you form the croissants or pain au chocolat. Remove the dough from the refrigerator, unwrap it, and place on a lightly floured work surface. Roll it into a 10 x 30-inch rectangle and turn it so a long side faces you. Give the dough a single fold by folding the left third of the dough over the center. Then fold the right third of the dough to the left. Now the dough should resemble a folded letter.
- Wrap in plastic wrap and let it rest in the refrigerator for 30 minutes. Remove the dough from the refrigerator and place it on a lightly floured work surface. Roll out the dough into a 10 by 36-inch rectangle about 1/4-inch thick. Keep the thickness even and the edges straight. This will make it easier to cut the croissants or pain au chocolat.
- These puff pastry items are best eaten the day they are made.
- Follow instructions for basic dough, above.
- With a sharp chef's knife, cut the dough into 3 1/2 by 4 1/2-inch rectangles. Lay each rectangle on a lightly floured work surface, with a long side facing you, and place about 1/2 tablespoon of the chopped chocolate in the upper third of each one. Fold that third of the dough over the chocolate.
- Place about another 1/2 tablespoon of the chocolate along one seam of the folded dough. Fold the bottom third of the dough over the chocolate. (At this stage, they can be frozen for up to one week if well wrapped in plastic wrap. Thaw on a parchment paper-covered baking sheet overnight in the refrigerator before proceeding.)
- Turn over the pain au chocolat so the seams face down. This will keep them from opening as they bake. Place them on a parchment paper-covered baking sheet; they will get bigger as they proof and bake, so space them about 2 inches apart. Loosely cover the baking sheet with plastic wrap and allow the pain au chocolat to proof at room temperature until they have doubled in size and appear light and full of air, 1 1/2 to 3 hours depending on the temperature of the room and of the dough.
- Preheat the oven to 400 degrees. Make an egg wash by whisking together the egg yolks, whole egg, and milk in a small bowl until well combined. With a pastry brush, very gently coat the croissants or pain au chocolat completely with egg wash. Bake until golden brown, about 10 minutes. I love to eat both of them fresh out of the oven. If you have any leftovers, they can be stored in the freezer if well wrapped in plastic wrap for up to 2 weeks. Thaw at room temperature and warm in the oven before serving.
- Follow instructions for basic dough, above.
- Use a sharp chef's knife to cut out triangles with a 2 1/2-inch base and 10-inch sides. Lay each triangle on a lightly floured work surface with the tip facing you. Gently pull the tip toward you; this light stretch adds layers to the finished croissant without adding density. Use the palms of your hands to roll each triangle up from the base to the tip. (At this stage, they can be frozen for up to one week if well wrapped in plastic wrap. Thaw on a parchment paper-covered baking sheet overnight in the refrigerator before proceeding.)
- Place the rolled croissants on a parchment paper-covered baking sheet. The croissants will get bigger as they proof and bake, so space them about 2 inches apart. Loosely cover the baking sheet with plastic wrap. This keeps the croissants from developing a skin while proofing and traps the heat released during fermentation, which helps them to rise. Allow the croissants to proof at room temperature until they have doubled in size and appear light and full of air; this can take anywhere from 1 1/2 to 3 hours depending on the temperature of the room and of the dough.
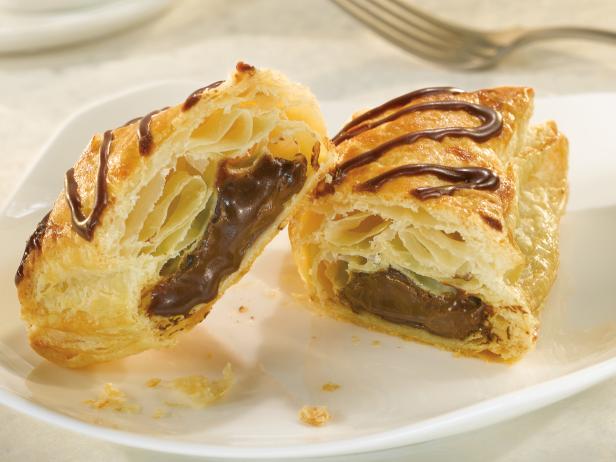
PAIN AU CHOCOLAT

Chocolate sticks called "batons" are made especially for rolling easily into pain au chocolat. Here, two batons are spiraled into the dough so you get rich pockets of chocolate in each bite of flaky croissant. You can order batons online, but regular chocolate bars, cut crosswise into thin sticks, work just as well. Either way, use a good-quality chocolate. (Make sure your first attempt at croissants is a successful one, with these tips, and Claire Saffitz's step-by-step video on YouTube.)
Provided by Claire Saffitz
Categories breakfast, brunch, pastries, project
Time 4h
Yield 10 pains au chocolat
Number Of Ingredients 5
Steps:
- Arrange racks in the upper third and lower thirds of the oven. Bring a skillet of water to a simmer over medium-high heat. Transfer the skillet to the floor of the oven and close the door. (The steam released inside the oven will create an ideal proofing environment for the pains au chocolat.) Line two rimmed baking sheets with parchment paper and set aside.
- Remove the slab of dough from the refrigerator and let sit for 5 minutes at room temperature. Unwrap (save the plastic for proofing) and place on a very lightly floured surface. If the dough has shrunk during chilling, roll it out again to a slab that's 16 inches long and 15 inches wide. Dust off any excess flour with a pastry brush.
- Use a wheel cutter to trim 1/2 inch of dough from all four sides, straightening and squaring them off, creating a slab that's 15 inches long by 14 inches wide. Using a ruler, cut the slab lengthwise into 5 equal strips each measuring 3 inches wide. Cut each strip in half crosswise, creating 10 rectangles.
- Working one rectangle at a time, place a stick of chocolate along one of the shorter sides, leaving about a 1-inch border. Fold the pastry over the chocolate until it's wrapped around one time, then tuck another bar of chocolate into the fold. Wrap the pastry around the second bar of chocolate and continue to roll until you have a snug spiral. Transfer the pain au chocolat to a prepared baking sheet, resting it on the seam. Repeat with the remaining dough and chocolate, dividing between the baking sheets and spacing evenly. Very loosely cover with plastic wrap so the pastries have some room to expand.
- Open the oven and stick your hand inside - it should be humid but not hot, as the water in the skillet will have cooled. You want the pains au chocolat to proof at 70 to 75 degrees. (Any hotter and the butter will melt, leading to a denser pastry.) Gently place the baking sheets inside the oven and let the pastries proof until they're doubled in size, extremely puffy, and jiggle delicately on the baking sheet, 2 to 2 1/2 hours.
- Remove the baking sheets from the oven and carefully uncover them. Transfer to the refrigerator and chill for 20 minutes while you heat the oven. Remove the skillet from the oven and heat to 375 degrees.
- In a small bowl, stir the yolk and heavy cream until streak-free. Remove the baking sheets from the refrigerator and use a pastry brush to gently brush each pain au chocolat with the yolk mixture. Transfer the sheets to the oven and bake for 20 minutes. Rotate the baking sheets and switch racks, and continue to bake until the pains au chocolat are deeply browned, another 10 to 15 minutes. Remove from the oven and let cool completely on the baking sheets.
PETITS POTS AU CHOCOLAT

These are just heavenly,I havent included the chilling time of 4 hours in the baking time so please be aware that you will have to wait a little longer to taste these scrummy puds
Provided by razra
Categories Dessert
Time 40m
Yield 6 serving(s)
Number Of Ingredients 8
Steps:
- Preheat the oven to 170C/Fan 150F/Gas Mark 3. Heat the cream, vanilla and chocolate together in a small pan, stirring until the chocolate has melted and the mixture is smooth.
- Beat the eggs and sugar together, then pour over the chocolate cream. Strain the mixture; divide between six 150ml/1/4pt ramekin dishes. Place in a roasting tin; pour boiling water from the kettle to come halfway up the outside of the dishes. Bake for 30 mins or until just set but still a little wobbly in the centre. Cool. Chill for at least 4 hours. Serve decorated with crème fraiche and chocolate curls.
Nutrition Facts : Calories 345.4, Fat 32, SaturatedFat 18.8, Cholesterol 219.6, Sodium 57.6, Carbohydrate 16.4, Fiber 4.8, Sugar 4.6, Protein 8.8
PETIT PAIN AU CHOCOLAT

Found this one at the Nestle website. I order these whenever I find them out. Now I can make my own easily.
Provided by SkinnyMinnie
Categories Breads
Time 35m
Yield 8 pastries
Number Of Ingredients 7
Steps:
- Preheat oven to 350ºF. Grease 2 baking sheets.
- Unfold 1 pastry sheet on a lightly floured surface. Roll out to make a 10" square.
- Cut into 4 squares. Place 2 Tbs. of chocolate chips in center of each square.
- Brush edges lightly with beaten egg and fold to form a triangle. Press the edges to seal.
- Place on prepared baking sheets about 2 inches apart. Repeat with remaining pastry sheet.
- Brush tops of each pastry with beaten egg.
- Bake for 15-17 minute or until puffed and golden. Cool on baking sheets for 2 min; remove to wire racks to cool completely.
- Melt the semisweet chocolate and butter in small, microwave safe bowl on HIGH for 30 seconds; stir. If necessary, microwave an additional 10-15 seconds, stirring just until melted.
- Stir in powdered sugar. Add water, stirring until icing is smooth, adding additional water if necessary.
- Drizzle icing over pastries.
Tips:
- To achieve the perfect flaky texture, it's crucial to use cold butter. This prevents the butter from melting too quickly and ensures that it remains in small pieces throughout the baking process, creating those coveted layers.
- Laminating the dough is a technique that involves folding and rolling the dough several times with butter in between. This creates layers in the dough, which results in a light and airy texture.
- Chilling the dough between folds is essential to allow the gluten to relax and prevent the dough from becoming too elastic. This makes it easier to work with and helps develop the dough's flavor.
- To create a shiny glaze for the pains au chocolat, brush the tops with a mixture of egg wash and milk before baking. This will give them a golden-brown color and a delicious crunch.
- Once baked, allow the pains au chocolat to cool slightly before enjoying them. This will help prevent the chocolate from oozing out and making a mess.
Conclusion:
Petits pains au chocolat are a delectable pastry that combines the irresistible flavors of chocolate and flaky dough. With careful attention to technique and the use of high-quality ingredients, you can create these delicious treats at home that are sure to impress your friends and family. Whether you're a seasoned baker or just starting, give this recipe a try and experience the joy of baking these classic French pastries.
Are you curently on diet or you just want to control your food's nutritions, ingredients? We will help you find recipes by cooking method, nutrition, ingredients...
Check it out »
#60-minutes-or-less #time-to-make #course #main-ingredient #cuisine #preparation #5-ingredients-or-less #breads #breakfast #french #easy #european #chocolate
You'll also love