Indulge in the delightful world of sponge cake crusts, a culinary masterpiece that combines the delicate texture of a sponge cake with the versatility of a pie crust. These ethereal creations serve as the perfect base for an array of delectable fillings, transforming simple ingredients into extraordinary desserts. From the classic lemon meringue pie, a harmonious blend of tangy lemon curd and fluffy meringue, to the timeless chocolate cream pie, a rich and indulgent symphony of chocolate and cream, sponge cake crusts elevate the ordinary to the extraordinary. Whether you prefer the fruity symphony of a strawberry pie, adorned with fresh, juicy berries, or the nostalgic charm of a classic apple pie, brimming with sweet, tender apples, sponge cake crusts provide the perfect canvas for your culinary artistry. Embrace the versatility of this culinary gem and embark on a journey of taste and texture, as we unlock the secrets of crafting the perfect sponge cake crust and unveil a treasure trove of delectable recipes that will tantalize your taste buds and leave you craving more.
Here are our top 2 tried and tested recipes!
JUNIOR'S FAMOUS CHEESECAKE
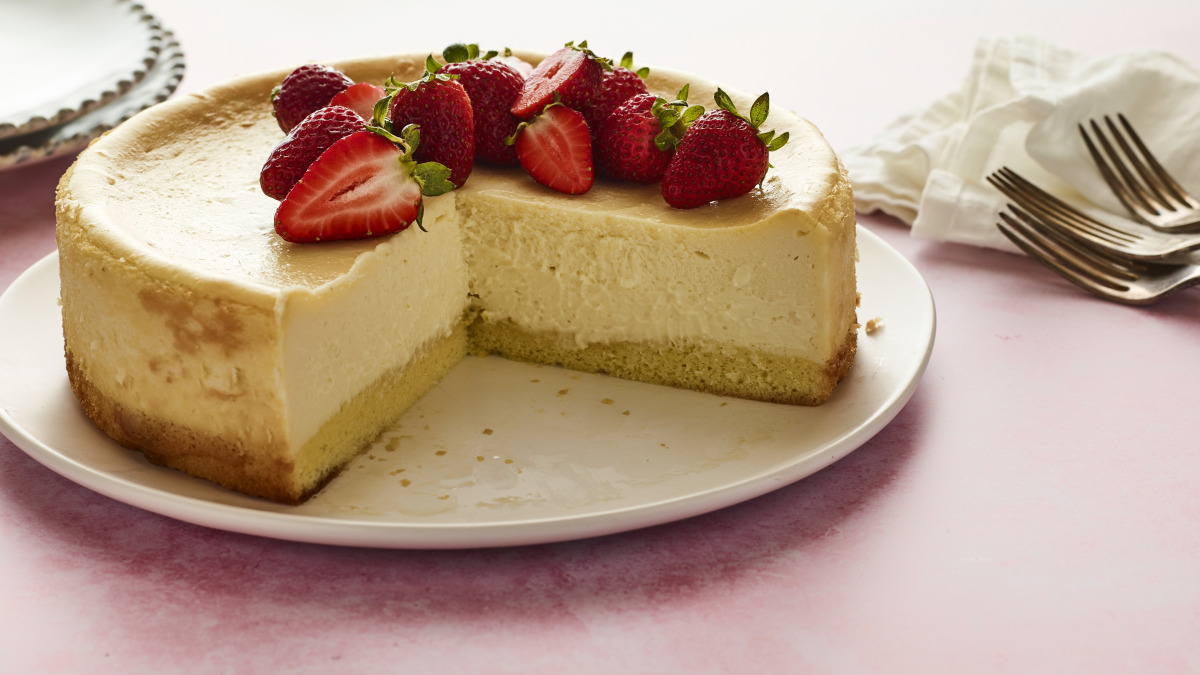
When I orignally posted this back in Jan 2002, I said I had not tried this recipe because it looked like a lot of work. Flash forward to Easter 2007..I finally broke down and made this, and I was right, it is indeed, a lot of work. But it is so worth it. This tastes just like the Junior's cheesecake I ordered off of QVC. I made it again last night for a co-workers birthday and brought it in...everyone was swooning and begging for the recipe! Next time I make this I will make the sponge cake layer a day ahead and just cover it tightly with tin foil and leave it out overnight. You do want to make this a day ahead before you plan to serve it as it's best chilled for at least 8 hours. Enjoy!!!
Provided by yooper
Categories Cheesecake
Time 2h10m
Yield 12 serving(s)
Number Of Ingredients 16
Steps:
- Sponge cake: Preheat the oven to 350 F and generously butter a 9-inch springform pan.
- Sift the cake flour, baking powder, and salt together ina medium sized bowl and set aside.
- Beat the egg yolks together in a large bowl with an electric mixer on high for 3 minutes.
- Then, with the mixer still running, gradually add the 1/3 cup of sugar and continue beating until thick light-yellow ribbons form in the bowl, about 5 minutes more.
- Beat in the vanilla and lemon extracts.
- Sift the flour mixture over the batter and stir it in by hand until mo more white flecks appear.
- Then blend in the butter.
- In a clean bowl, using clean dry beaters, beat the egg whites and cream of tartar together on high until frothy.
- Gradually add the remaining 2 tablespoons sugar and continue beating until stiff peaks form (the whites should stand up in stiff peaks, but not be dry).
- Stir about 1/3 cup of the whites into the batter, then gently fold in the remaining whites (don't worry if a few white specks remain).
- Gently spoon the batter into the pan.
- Bake the cake just until the center of the cake springs back when lightly touched, only about 10 minutes (watch carefully!) Let the cake cool in the pan on a wire rack while you continue making the cheesecake filling.
- Do not remove the cake from the pan.
- Cream Cheese Filling---------------.
- Place one 8-ounce package of the cream cheese, 1/3 cup of the sugar, and the cornstarch in a large bowl.
- Beat with an electric mixer on low until creamy, about 3 minutes, then beat in the remaining 3 packages of the cream cheese.
- Increase the mixer speed to high and beat in the remaining 1 1/3 cups of the sugar, then beat in the vanilla.
- Blend in the eggs, one at a time, beating the batter well after each one.
- Blend in heavy cream.
- At this point mix the filling only until completely blended (just like they do at Junior's) Be careful not to overmix the batter.
- Gently spoon the cheese filling on top of the baked sponge cake layer.
- Place the springform pan in a large shallow pan containing hot water that comes about 1 inch up the side of the pan.
- Bake the cheesecake until the center barely jiggles when you shake the pan, about 1 hour.
- Cool the cake on a wire rack for 1 hour.
- Then cover the cake with plastic wrap and refrigerate until it's completely cold, at least 4 hours or overnight.
- Remove the sides of the springform pan.
- Slide the cake off of the bottom of the pan onto a serving plate.
- Or, if you wish, simply leave the cake on the removable bottom of the pan and place it on a serving plate.
- Store any leftover cheesecake in the refrigerator.
ORIGINAL NEW YORK CHEESECAKE
There will never be a better cheesecake than Junior's famous original. Here's the recipe for the New York-style cheesecake.
Provided by Alan Rosen
Categories Cake Dessert Bake Cream Cheese Party Advance Prep Required Vegetarian Pescatarian Peanut Free Tree Nut Free Soy Free Kosher
Yield Makes one 9-inch or 8-inch cheesecake, about 2 1/2 inches high
Number Of Ingredients 16
Steps:
- The day before you plan to serve the cheesecake:
- 1. Preheat the oven to 350°F. Make and bake the cake crust as directed and leave it in the pan. Keep the oven on.
- 2. In a large bowl, using an electric mixer fitted with the paddle attachment if your mixer has one, beat 1 package of the cream cheese, 1/3 cup of the sugar, and the cornstarch together on low until creamy, about 3 minutes, scraping down the bowl several times. Blend in the remaining cream cheese, one package at a time, beating well and scraping down the bowl after each.
- 3. Increase the mixer speed to medium and beat in the remaining sugar, then the vanilla. Blend in the eggs, one at a time, beating well after each. Beat in the cream just until completely blended. The filling will look light, creamy, airy, and almost like billowy clouds. Be careful not to overmix! Gently spoon the batter over the crust.
- 4. Place the cake pan in a large shallow pan containing hot water that comes halfway (about 1 inch) up the side of the springform. Bake until the edge is light golden brown, the top is light gold, and the center barely jiggles, about 1 1/4 hours. If the cake still feels soft around the edge, let it bake for 10 minutes more (the cooking time will be about the same for both the 8- and 9-inch cheesecakes). Remove the cheesecake from the water bath, transfer to a wire rack, and let cool for 2 hours (just walk away-don't move it). Then, leave the cake in the pan, cover loosely with plastic wrap, and refrigerate until completely cold before serving, preferably overnight or for at least 6 hours.
- On serving day:
- 5. Release and remove the side of the springform, leaving the cake on the bottom of the pan. Place on a cake plate. Refrigerate until ready to serve. Slice with a sharp straight-edge knife, not a serrated one, rinsing the knife with warm water between slices. Refrigerate any leftover cake, tightly covered, and enjoy within 2 days, or wrap and freeze for up to 1 month.
Tips:
- Use fresh eggs at room temperature: This will help the cake rise properly and give it a light and fluffy texture.
- Cream the butter and sugar together until light and fluffy: This will incorporate air into the mixture, which will help the cake rise.
- Add the eggs one at a time, beating well after each addition: This will help prevent the mixture from curdling.
- Gradually add the flour and baking powder, mixing until just combined: Over-mixing will make the cake tough.
- Bake the cake in a preheated oven: This will help ensure that the cake rises evenly.
- Test the cake for doneness by inserting a toothpick into the center: If it comes out clean, the cake is done.
- Let the cake cool completely before frosting: This will help prevent the frosting from melting.
Conclusion:
The Junior's sponge cake crust is a delicious and versatile dessert that can be used for a variety of occasions. It is light and fluffy, with a delicate flavor that pairs well with a variety of toppings. Whether you are making a simple strawberry shortcake or a decadent chocolate cake, the Junior's sponge cake crust is a great place to start. With just a few simple ingredients and a little bit of time, you can create a delicious and impressive dessert that everyone will love.
Are you curently on diet or you just want to control your food's nutritions, ingredients? We will help you find recipes by cooking method, nutrition, ingredients...
Check it out »
You'll also love


