Best 5 Hi Hat Cupcakes Recipes


Indulge in delectable flavors with our Hi-Hat Cupcakes, a delightful journey through textures and tastes. These cupcakes are topped with a rich and creamy frosting, creating a perfect balance of sweetness and tang. The moist and fluffy vanilla sponge cake base provides the perfect backdrop for the luscious frosting, while the optional addition of crushed Oreos adds a delightful crunch. Whether you prefer a classic vanilla cupcake or a decadent Oreo-infused treat, our Hi-Hat Cupcakes have something for everyone. So, put on your apron, gather your ingredients, and embark on a baking adventure that will leave your taste buds dancing with joy.
Check out the recipes below so you can choose the best recipe for yourself!
CANDY CORN HI-HAT CUPCAKES
Hi-hat cupcakes are one of the most beautiful and decadent ways to enjoy a cupcake; while they can seem intimidating, they are actually very easy to make. I am a big fan of surprise-inside treats and my cupcakes are no exception. These hat cupcakes hide a sweet fall-inspired surprise that replicates the colors of candy corn.
Provided by Amanda Rettke
Categories dessert
Time 2h45m
Yield 24 cupcakes
Number Of Ingredients 5
Steps:
- Prepare and bake the cupcakes according to the recipe directions. Allow to cool.
- Prepare the buttercream and equally divide into two bowls. Add the yellow food coloring to one bowl and mix until fully combined; set aside. Take the other bowl and equally divide again (into two bowls of frosting). One bowl should be tinted orange; the other should remain white.
- When ready to assemble, place the frostings into plastic disposable pastry bags (or resealable plastic bags). Starting with the yellow frosting, cut about 2 inches from the tip of the bag and pipe out a circle on top of a cupcake. Fill in any holes so that the frosting is even and level. Do this to all of the cupcakes.
- Next, grab your orange frosting and cut off approximately 2 inches from the tip of the bag. Pipe out a smaller circle on top of the yellow frosting. Repeat on all cupcakes. You should now have the yellow and orange layers done.
- Finally, grab your white frosting and cut off approximately 2 inches from the tip of the bag. Pipe a dollop of frosting and then pull your hand up quickly and release pressure. This should create a nice pointed tip at the top of your cupcake. Repeat this on the remaining cupcakes. Put the cupcakes in the fridge for about an hour, or until they have had a chance to set.
- After the cupcakes have chilled, prepare your chocolate coating: Place the chocolate and shortening in a microwave-safe bowl and set in the microwave for one minute, then remove and stir. If the chocolate is not completely melted, place back in the microwave for 15 seconds. Remove and stir until melted and smooth. Pour the chocolate into a drinking glass, one with a mouth wide enough for you to invert the cupcakes into. Let cool about 15 minutes.
- Remove the cupcakes from the fridge. Pick up one cupcake and dip it frosting-side down into the chocolate, going all the way to the top of the cupcake liner. Lift up and let the excess drip off, then set the cupcake on a cookie sheet. Repeat this with the remaining cupcakes. Allow the chocolate to harden, which only takes a few minutes. Serve and enjoy the excited faces of the lucky recipients.
RASPBERRY AND CHOCOLATE HI-HAT CUPCAKES
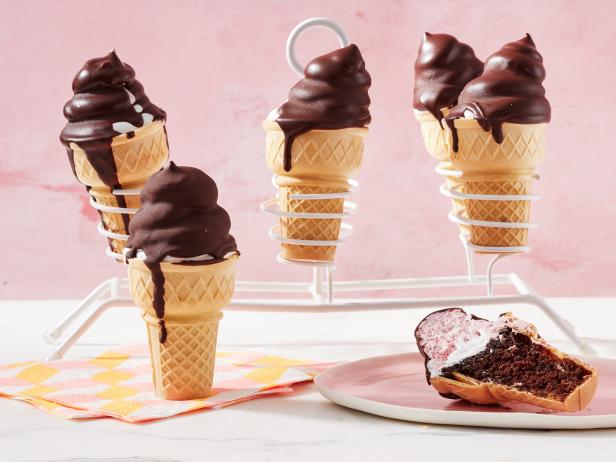
Chocolate-dipped soft-serve ice cream cones for a crowd? Think again! These adorable frosted and dipped cupcakes-in-a-cone will surprise and delight all of your guests.
Provided by Food Network Kitchen
Categories dessert
Time 2h45m
Yield 20 servings
Number Of Ingredients 18
Steps:
- For the cupcakes: Preheat the oven to 350 degrees F.
- Whisk together the flour, baking soda and salt in a medium bowl; set aside.
- Heat the milk in a saucepan until hot but not boiling. Pour over the cocoa powder in a large bowl and whisk until smooth. Cool slightly, about 5 minutes. Whisk the sugar, vegetable oil, vanilla and egg into the cocoa mixture. Whisk in the dry ingredients until smooth.
- Place the cones upright so they fit snugly in 2 large loaf pans. Divide the batter evenly among the cones, filling them about halfway. Bake until a toothpick inserted in the middle comes out clean and the tops spring back when pressed lightly, 20 to 25 minutes. Transfer to a cooling rack and let cool completely.
- For the frosting: Put the freeze-dried raspberries in a blender or food processor and grind to a fine dust; set aside.
- Combine the sugar, cream of tartar, salt and egg whites in a large metal bowl and whisk until smooth. Place over a pan of simmering water (do not let the bottom of the bowl touch the water) and heat, stirring, until the mixture is warm and the sugar is dissolved, 2 to 3 minutes. Off heat, beat with an electric mixer on medium-high speed until the frosting is cool and forms stiff, glossy peaks, 4 to 6 minutes. Beat in the vanilla.
- Transfer one-third of the frosting to a large piping bag fitted with a 3/4-inch plain tip. Stir in 2 tablespoons of the raspberry powder to the remaining frosting and then put half of that into the piping bag on top of the white frosting. Stir in 2 more tablespoons raspberry powder into the remaining frosting and put into the piping bag.
- Start by piping a spiral of white frosting onto each cupcake. Once you get to the pinker frosting, pipe a second spiral on each cupcake. When you get to the darker pink frosting, pipe a third spiral on each cupcake, ending with a bit of a peak of the dark frosting on top (The frosting on each cupcake should go from white on the bottom to dark pink on the top and look a bit like soft-serve ice cream.) Refrigerate until the frosting is well chilled, about 1 hour.
- For the chocolate dip: Meanwhile, combine the chocolate and coconut oil in a microwave-safe bowl. Microwave in 30-second intervals, stirring in between each, until just melted, about 2 minutes. Transfer to medium narrow container (such as a pint-size deli container). Dip the frosting of each cupcake into the melted chocolate, leaving a little of the white frosting visible. Let the excess drip back off, then turn the cone right-side up and let the chocolate set until dry, about 5 minutes.
PEANUT BUTTER HI-HAT CUPCAKES

Surprise your guests with these light and fluffy cupcakes layered with peanut butter frosting and coated with chocolate - a delicious dessert.
Provided by Betty Crocker Kitchens
Categories Dessert
Time 1h50m
Yield 28
Number Of Ingredients 15
Steps:
- Heat oven to 350°F. Place paper baking cups in 28 regular-size muffin cups. In medium bowl, stir together flour, baking powder and salt; set aside.
- In large bowl, beat 1 cup butter and the granulated sugar with electric mixer on medium speed about 5 minutes or until light and fluffy. Add eggs, one at a time, beating well after each addition. Beat in 2 teaspoons vanilla. On low speed, alternately add flour mixture, about 1/3 of mixture at a time, and milk, about 1/2 at a time, beating just until blended. Divide batter evenly among muffin cups.
- Bake 20 to 24 minutes or until toothpick inserted in center of cupcake comes out clean. Cool 5 minutes. Remove cupcakes from pans; place on cooling racks. Cool completely, about 30 minutes.
- In large bowl, beat 1 1/2 cups butter and the peanut butter with electric mixer on medium speed until smooth. Beat in marshmallow creme. On low speed, gradually add powdered sugar until blended. Add 2 teaspoons vanilla; beat 3 minutes longer.
- Spoon frosting into decorating bag fitted with large round tip. On top of each cupcake, pipe frosting in circles making cone shape with peak in center. Refrigerate cupcakes at least 45 minutes to harden frosting before dipping in chocolate coating.
- In 1 1/2-quart saucepan, heat chocolate chips and oil over low heat, stirring occasionally, until smooth. Dip cone-shaped frosting on each cupcake into chocolate coating to coat frosting completely, letting excess chocolate drip off. Refrigerate to set coating, about 5 minutes.
Nutrition Facts : Calories 560, Carbohydrate 58 g, Cholesterol 80 mg, Fat 5 1/2, Fiber 1 g, Protein 7 g, SaturatedFat 16 g, ServingSize 1 Cupcake, Sodium 310 mg, Sugar 43 g, TransFat 1/2 g
HI-HAT CUPCAKES
These adorable little Hi-Hat cupcake are topped with a white cloud of frosting encased in chocolate. It's a fun and delicious dessert everyone will love.
Provided by Martha Stewart
Categories Food & Cooking Dessert & Treats Recipes Cupcake Recipes
Number Of Ingredients 8
Steps:
- Bake the Devil's Food Cake, following instructions for cupcakes. Let cool.
- Make the frosting: In the bowl of an electric mixer, combine sugar, egg whites, water, and cream of tartar. Whisk until foamy. Set bowl over a pan of barely simmering water and whisk until sugar is dissolved and mixture is warm to the touch, about 3 to 5 minutes. Transfer bowl to stand mixer fitted with a whisk attachment. Beat on high speed until frosting forms stiff peaks, about 12 to 16 minutes. Add vanilla and beat until combined.
- Transfer frosting to two large pastry bags fitted with 1/2-inch round tips. Leaving a 1/8-inch border on each cupcake, pipe a spiral of frosting into a 2-inch-high cone shape, using about 1/3 to 1/2 cup frosting per cupcake. Transfer cupcakes to a baking sheet, and refrigerate while preparing the chocolate coating.
- Make the chocolate coating: Combine chocolate and oil in a medium heat-proof bowl set over a saucepan of barely simmering water; stir until melted and smooth. Transfer to a small (deep) bowl, and let cool about 15 minutes.
- Holding each cupcake by its bottom, dip cupcake in the chocolate to coat frosting, allowing excess to drip off. Transfer to a baking sheet filled with a wire rack. Spoon more coating around edge of cupcake and any exposed frosting; none of the frosting should show. Let cupcakes stand at room temperature 15 minutes.
- Place cupcakes on a serving platter, and refrigerate for 30 minutes to let coating set. Cover, and refrigerate 2 hours more. Serve cold. Cupcakes can be refrigerated up to 3 days.
STRAWBERRY HI-HAT CUPCAKES

Take your cupcakes to new heights with this recipe filled with strawberry jam and topped in a chocolate-dipped strawberry buttercream.
Provided by Molly Yeh
Categories Dessert
Time 1h30m
Yield 12
Number Of Ingredients 10
Steps:
- Make, bake and cool 12 cupcakes as directed on box.
- Use apple corer to create a well in each cupcake going about halfway down into center. Fill each well with about 1 teaspoon of the jam.
- To make frosting, in large bowl, beat remaining 1/2 cup of the jam and the butter with electric mixer on medium-high speed until well blended. On low speed, beat in powdered sugar, vanilla and salt until well incorporated. If desired, taste and add more powdered sugar.
- Pipe a tall mound of frosting onto each cupcake. Freeze cupcakes about 30 minutes or until frosting is very firm.
- In microwavable bowl, microwave chocolate chips and coconut oil on High in 2 or 3 (30-second) incre-ments, stirring after each, until chocolate is melted. Cool chocolate until room temperature.
- Dip frosting part of cupcakes into chocolate. Decorate with sprinkles. Refrigerate a few minutes until chocolate firms up. Serve immediately, or store in refrigerator until ready to serve.
Nutrition Facts : ServingSize 1 Serving
Tips:
- Use room temperature ingredients. This will help your cupcakes bake evenly and prevent them from becoming dry.
- Cream the butter and sugar together until light and fluffy. This will incorporate air into the batter, making your cupcakes light and airy.
- Add the eggs one at a time, beating well after each addition. This will help prevent the batter from curdling.
- Sift the dry ingredients together before adding them to the wet ingredients. This will help to ensure that the ingredients are evenly distributed.
- Mix the batter only until it is just combined. Overmixing can make your cupcakes tough.
- Fill the cupcake liners about 2/3 full. This will prevent them from overflowing in the oven.
- Bake the cupcakes at the temperature and for the amount of time specified in the recipe. Overbaking can make your cupcakes dry.
- Let the cupcakes cool completely before frosting them. This will help the frosting to set properly.
Conclusion:
Hi-hat cupcakes are a fun and delicious treat that are perfect for any occasion. They are easy to make and can be customized to your liking. With a few simple tips, you can make perfect hi-hat cupcakes every time. So what are you waiting for? Start baking!
Are you curently on diet or you just want to control your food's nutritions, ingredients? We will help you find recipes by cooking method, nutrition, ingredients...
Check it out »
You'll also love