Best 6 Good Eats Dill Pickles From Alton Brown Recipes


**Dill pickles**, a classic American pickle, are made with cucumbers that are brined in a vinegar solution flavored with dill, garlic, and spices. The result is a tangy, flavorful pickle that is perfect for snacking, adding to sandwiches, or using as a condiment. This article offers three variations on the classic dill pickle recipe, each with its own unique flavor profile. The first recipe is for a basic dill pickle, made with a simple brine solution and a variety of spices. The second recipe is for a spicy dill pickle, made with the addition of red pepper flakes and cayenne pepper. The third recipe is for a sweet dill pickle, made with the addition of sugar and honey. All three recipes are easy to follow and can be made with ingredients that are readily available. Whether you are a fan of classic dill pickles or are looking to try something new, this article has a recipe for you.
Check out the recipes below so you can choose the best recipe for yourself!
GOOD EATS DILL PICKLES (FROM ALTON BROWN 2007)
Make and share this Good Eats Dill Pickles (From Alton Brown 2007) recipe from Food.com.
Provided by 2Bleu
Categories Vegetable
Time P10DT30m
Yield 3 pounds, 12 serving(s)
Number Of Ingredients 8
Steps:
- Rinse the cucumbers thoroughly and snip off the blossom end stem. Set aside. Combine the salt and water in a pitcher and stir until the salt has dissolved.
- Place the peppercorns, pepper flakes, garlic, dill seed and fresh dill into a 1-gallon crock. Add the cucumbers to the crock on top of the aromatics.
- Pour the brine mixture over the cucumbers in order to completely cover. Pour the remaining water into a 1-gallon ziptop plastic bag and seal.
- Place the bag on top of the pickles making sure that all of them are completely submerged in the brine. Set in a cool, dry place.
- Check the crock after 3 days. Fermentation has begun if you see bubbles rising to the top of the crock. After this, check the crock daily and skim off any scum that forms. If scum forms on the plastic bag, rinse it off and return to the top of the crock.
- The fermentation is complete when the pickles taste sour and the bubbles have stopped rising; this should take approximately 6 to 7 days. Once this happens, cover the crock loosely and place in the refrigerator for 3 days, skimming daily or as needed. Store for up to 2 months in the refrigerator, skimming as needed. NOTE: If the pickles should become soft or begin to take on an off odor, this is a sign of spoilage and they should be discarded.
FIRECRACKERS
Provided by Alton Brown
Yield 4 servings
Number Of Ingredients 9
Steps:
- Place carrots in a spring-top glass jar. Bring the water, sugar, cider vinegar, onion powder, mustard seeds, salt, and chili flakes to a boil in a non-reactive saucepan. Boil for 4 minutes.
- Slowly pour the hot pickling liquid over the carrots, filling the jar to the top. Place the chilies in the jar. Allow the carrots to cool before sealing. Refrigerate for 2 days up to 1 week.
PICKLED OKRA
Steps:
- Wash the okra and trim the stem to 1/2-inch. Place 1 chile, 1/2 teaspoon mustard seeds, 3 sprigs of dill, 1 clove of garlic and 1/4 teaspoon peppercorns in the bottom of each of 4 sterilized pint canning jars. Divide the okra evenly among the 4 jars, standing them up vertically, alternating stems up and down.
- In a medium saucepan over medium heat, bring the salt, vinegar and water to a boil. Once boiling, pour this mixture over the okra in the jars, leaving space between the top of the liquid and the lid. Seal the lids. Set in a cool dry place for 2 weeks.
- *Tips on Sterilizing Jars
- Properly-handled sterilized equipment will keep canned foods in good condition for years. Sterilizing jars is the first step of preserving foods.
- Sterilizing Tips:
- Jars should be made from glass and free of any chips or cracks. Preserving or canning jars are topped with a glass, plastic, or metal lid, which has a rubber seal. Two piece lids are best for canning, as they vacuum seal when processed.
- To sterilize jars, before filling with jams, pickles, or preserves, wash jars and lids with hot, soapy water. Rinse well and arrange jars and lids open sides up, without touching, on a tray. Boil the jars and lids in a large saucepan, covered with water, for 15 minutes.
- Use tongs when handling the hot sterilized jars, to move them from boiling water. Be sure the tongs are sterilized too, by dipping the ends in boiling water for a few minutes.
- As a rule, hot preserves go into hot jars and cold preserves go into cold jars. All items used in the process of making jams, jellies, and preserves must be clean. This includes any towels used, and especially your hands.
- After the jars are sterilized, you can preserve the food. It is important to follow any canning and processing instructions included in the recipe and refer to USDA guidelines about the sterilization of canned products.
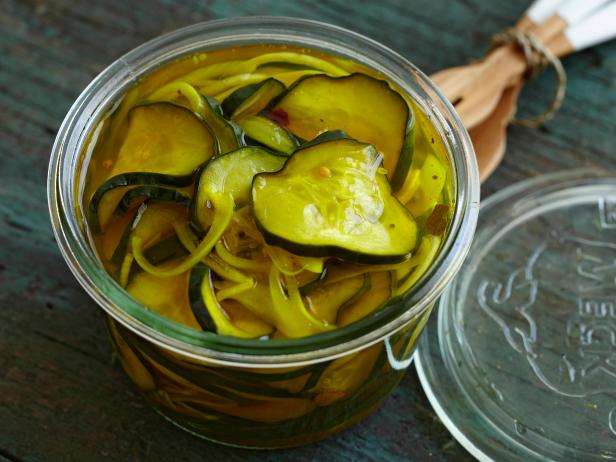
AB'S B AND B'S
Provided by Alton Brown
Yield 4 servings
Number Of Ingredients 10
Steps:
- Combine onion and cucumber slices in a clean spring-top jar.
- Combine the remaining ingredients in a non-reactive saucepan and bring to a boil. Simmer for 4 full minutes to wake up the flavors of the spices.
- Slowly pour the hot pickling liquid over the onion and cucumber slice, completely filling the jar. Allow the pickles to cool to room temperature before topping off with any remaining pickling liquid. Refrigerate.
- Refrigerate the pickles for a week to ripen. They will keep for about 2 months in the refrigerator.
DEEP-FRIED PICKLES
Provided by Alton Brown
Categories appetizer
Time 37m
Yield approximately 32 pickle spears
Number Of Ingredients 5
Steps:
- Place enough peanut oil in a 4 to 5-quart cast iron Dutch oven to come halfway up the side of the pot. Place over medium-high heat and bring to 390 to 400 degrees F.
- Remove the pickles from their brine and cut lengthwise into quarters, like spears. Lay the spears on a sheet pan lined with paper towels and pat them dry.
- Place the buttermilk in 1 shallow dish and mix together the cornmeal and salt in a separate dish. Dip each pickle, 1 at a time, first into the buttermilk, then into the cornmeal and then repeat. Carefully place each spear into the hot oil and cook until golden brown, approximately 2 minutes. You can fry 3 to 4 pickles in the pot at a time. Adjust the heat, if necessary, in order to maintain a constant temperature of 390 to 400 degrees F. Transfer the pickles to a cooling rack set in a half sheet pan and allow to cool for 5 minutes before eating. Season with additional salt, if desired.
GOOD EATS DEEP FRIED PICKLES (ALTON BROWN 2007)
Make and share this Good Eats Deep Fried Pickles (Alton Brown 2007) recipe from Food.com.
Provided by 2Bleu
Categories Low Cholesterol
Time 37m
Yield 32 spears, 16 serving(s)
Number Of Ingredients 5
Steps:
- Place enough peanut oil in a 4 to 5-quart cast iron Dutch oven to come halfway up the side of the pot. Place over medium-high heat and bring to 390 to 400 degrees F.
- Remove the pickles from their brine and cut lengthwise into quarters, like spears. Lay the spears on a sheet pan lined with paper towels and pat them dry.
- Place the buttermilk in 1 shallow dish and mix together the cornmeal and salt in a separate dish. Dip each pickle, 1 at a time, first into the buttermilk, then into the cornmeal and then repeat.
- Carefully place each spear into the hot oil and cook until golden brown, approximately 2 minutes. You can fry 3 to 4 pickles in the pot at a time.
- Transfer the pickles to a cooling rack set in a half sheet pan and allow to cool for 5 minutes before eating. Season with additional salt, if desired.
Nutrition Facts : Calories 67.8, Fat 0.8, SaturatedFat 0.2, Cholesterol 0.6, Sodium 915.8, Carbohydrate 13.9, Fiber 1.5, Sugar 2.1, Protein 2
Tips:
- Choose fresh, firm cucumbers for the best pickles.
- Use a variety of dill, garlic, and other spices to create unique flavors.
- Make sure the brine is completely cool before pouring it over the cucumbers.
- Keep the pickles in a cool, dark place for at least 2 weeks before eating.
- Enjoy your pickles as a snack, on sandwiches, or as a side dish.
Conclusion:
Alton Brown's Good Eats Dill Pickles are a delicious and easy-to-make snack or side dish. With a few simple ingredients and a little time, you can create perfectly crisp and flavorful pickles that will be the hit of any party or gathering. So next time you're looking for a tasty treat, give this recipe a try. You won't be disappointed!
Are you curently on diet or you just want to control your food's nutritions, ingredients? We will help you find recipes by cooking method, nutrition, ingredients...
Check it out »
You'll also love