**Ghost Cake: A Spooktacular Treat for Halloween**
Looking for a hauntingly delicious dessert for your Halloween party? Look no further than the ghost cake! This ghostly treat is perfect for any Halloween celebration, and it's easy to make with our simple recipe. Our ghost cake is a moist and fluffy white cake with a creamy filling and a smooth white chocolate ganache. It's decorated with spooky meringues and candy eyes to create a ghostly effect.
For those who prefer a gluten-free option, we also have a gluten-free ghost cake recipe. This recipe uses almond flour and coconut flour instead of wheat flour, and it's just as delicious as the original.
And if you're looking for something a little different, try our chocolate ghost cake recipe. This recipe uses chocolate cake mix and chocolate frosting, and it's sure to be a hit with chocolate lovers.
No matter which recipe you choose, you're sure to have a spooktacular time making and eating these ghost cakes. So gather your ingredients and get ready to bake up a batch of these festive treats!
GHOST-BUSTED PIñATA CAKE

This cake is both a trick and a treat - a ghostly delight filled with red velvet cake and candy.
Provided by Zac Young
Categories Dessert
Time 1h15m
Yield 1 cake, 12 serving(s)
Number Of Ingredients 20
Steps:
- Preheat oven to 350 degrees. Spray 2 8 x 3-inch cake pans line the bottom of each pan with parchment.
- Whisk flour, cocoa and salt in a bowl.
- Place oil and sugar in bowl of an electric mixer fitted with the paddle attachment and beat at medium speed until well blended. Beat in eggs one at a time. With machine on low, very slowly add red food coloring and vanilla (Take care: it may splash.) Add flour mixture alternately with buttermilk in two batches. Scrape down bowl and beat just long enough to combine.
- Place baking soda in a small dish, stir in vinegar and add the mixture to batter with the machine running. Beat for 10 seconds.
- Divide batter among cake pans, place in oven and bake until a cake tester comes out clean, about 30 to 40 minutes. Let cool completely.
- In the bowl of a stand mixer fitted with the paddle attachment, beat the butter until soft. Add the powdered sugar, cream cheese, salt and vanilla. Beat on medium high until light and fluffy about 5 minutes.
- Once the cakes are cooled, cut the tops of the cakes level, reserve the scraps. Divide each cake evenly into two layers. Using a 3 or 3 ½-inch cookie cutter, punch out the center of two of the cake layers. Reserve the scraps.
- Place 1 of the whole cake layers on the cake board or plate and spread a thin layer of cream cheese frosting on top. Place the second whole cake layer on top. Pipe or spread a ring of frosting on the outside of the top layer and add one of the punched layers on top. Pipe or spread a layer of frosting on top of the ring of cake and add the final punched layer. Apply a thin coat of frosting around the sides of the cake.
- Line the bowl with plastic wrap letting it come up over the sides. Add a little bit of cream cheese frosting to the bottom of the bowl and spread it up the sides. Place pieces of the cake scraps into the bowl to approximate layers, adding frosting as needed. Make a 3 to 3 ½ inch hole in the center of the bowl (to match up with the hole in the center of the layer cake). Place the bowl in the freezer for 3 hours. Place the cake in the fridge. Keep the remaining frosting covered at room temperature until ready to finish assembly.
- Remove the cakes from the fridge and freezer. Using the plastic wrap to help, pull the cake dome out of the bowl. Remove the plastic wrap.
- Fill both holes with the candy. Spread a thin layer of frosting on the top ring of the layer cake. Flip the dome of cake on top. To prevent the candy from falling out of the top, I recommend placing a piece of cardboard over the bottom of the cake dome, flipping it upside-down, using the cardboard to prevent spillage then sliding the cardboard out once the dome is almost touching the base cake.
- Use the remaining frosting to smooth out and even the entire cake. Place cake in the fridge or freezer to firm while you get the decorations ready.
- Roll out the black fondant to ¼ inch think, spread the top with sanding sugar then use the rolling pin to press it inches Cut out desired eyes and mouth.
- Roll the white fondant, using cornstarch to prevent sticking, to ¼ inch thick in a roughly 16-inch circle.
- Remove the cake from the fridge. Roll the fondant around the rolling pin and place over the cake. Using corn starch on your hands, work the fondant down from the top, letting it drape and form ghost-like pleats.
- Use water to adhere the eyes and mouth. Refrigerate until ready to serve.
Nutrition Facts : Calories 1388.3, Fat 104.1, SaturatedFat 43.7, Cholesterol 232, Sodium 1124, Carbohydrate 109, Fiber 2.2, Sugar 77.9, Protein 10.7
GHOST CAKE
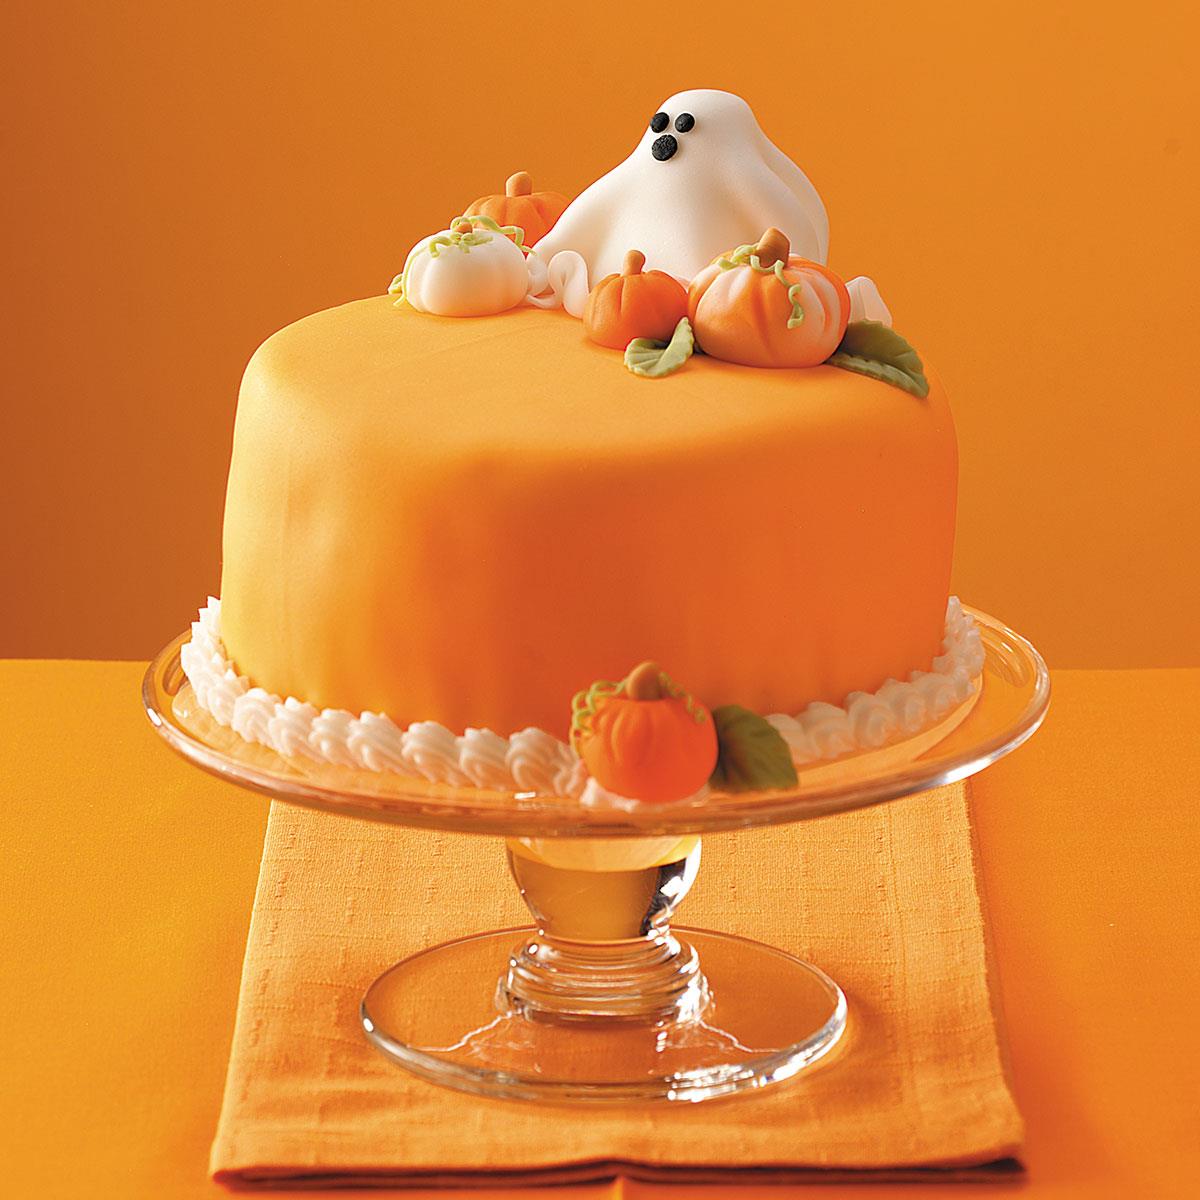
For a perfect centerpiece at your next Halloween party, try making this cake. Guests will think it is more cute then scary with its decorative ghost on top!-Doree Tateoka, Salt Lake City, Utah
Provided by Taste of Home
Categories Desserts
Time 3h30m
Yield 8 servings.
Number Of Ingredients 12
Steps:
- In a large bowl, combine the cake mix, eggs and water; beat on low speed for 30 seconds. Beat on medium for 2 minutes. Pour 2-1/4 cups batter into each of two greased and floured 6-in. round baking pans (discard remaining batter). Bake at 350° for 30-35 minutes or until a toothpick inserted in the center comes out clean. Cool for 10 minutes before removing from pans to wire racks to cool completely., For frosting, in a large bowl, combine confectioners' sugar and meringue powder. In a large bowl of a heavy-duty stand mixer, combine the shortening, water and vanilla. Beat in sugar mixture (mixture will be stiff)., Using a serrated knife, level tops of cakes. Place one cake layer on a serving plate. Spread with 3/4 cup frosting. Top with remaining cake layer. Spread 1-1/2 cups frosting over top and sides of cake., Cut fondant block in half lengthwise so that one half is slightly larger than the other. Tint the larger half orange; set aside a small amount of orange fondant for pumpkins. Cover fondant with plastic wrap when not in use. On a clean work surface, roll out remaining orange fondant into a 14-in. circle. Slide an icing knife between fondant and work surface to loosen; transfer to cake. Smooth top and sides of cake. Trim any overlapping fondant with a pizza cutter., For ghost: Form a 2-1/4 in. tall cone from white fondant; attach to cake with additional vanilla. Roll a 1/2-in. cube of fondant into a 6-in. circle. Drape over cone. Tint a small amount of fondant black. Form three small dots; attach to face of ghost., For pumpkins, leaves and tendrils: Tint reserved orange fondant a darker shade of orange with red coloring. Using dark orange and/or white fondant, form five pumpkins; add imprint lines with a veining tool or toothpick. For stems, tint a very small amount of white fondant brown. Shape into stems; attach to pumpkins using vanilla. Tint a 1-in. cube of white fondant green. Roll out; cut five leaves with a 1-1/4-in. leaf-shaped cookie cutter. For tendrils, using a pizza cutter cut remaining portion into thin strips. Carefully wrap strips around toothpicks; set aside to dry., To finish cake: Carefully remove tendrils from toothpicks and attach to pumpkins using vanilla. Attach pumpkins and leaves to cake. Using shell pastry tip #18 and remaining frosting, pipe shell border along bottom edge of cake.
Nutrition Facts : Calories 920 calories, Fat 34g fat (9g saturated fat), Cholesterol 48mg cholesterol, Sodium 397mg sodium, Carbohydrate 148g carbohydrate (123g sugars, Fiber 1g fiber), Protein 4g protein.
PEEK-A-BOO GHOST 'BOXED' POUND CAKE RECIPE BY TASTY
Here's what you need: vanilla pound cake, pound cake mix, cocoa powder, butter, chocolate, milk, eggs
Provided by Rie McClenny
Categories Desserts
Yield 8 servings
Number Of Ingredients 7
Steps:
- Preheat the oven to 350˚F (180˚C).
- Line a 8x4-inch (20x10 cm) loaf pan with parchment paper and generously grease the pan.
- Slice the vanilla pound cake as the same thickness as a ghost shaped cookie cutter. Cut out the cake with using a ghost-shaped cookie cutter. Set aside.
- In a medium bowl, combine pound cake mix, cocoa powder, butter, melted chocolate, milk, and eggs. Mix until well combined.
- In the lined and greased loaf pan, add ⅓ of the batter. Line the cut out ghost-shaped pound cake in the middle of the pan.
- Pour rest of the batter over the ghost-shaped cake.
- Smooth the top and bake for 35-40 minutes, or until inserted toothpick comes out clean. Cool completely on cooling rack
- Enjoy!
Nutrition Facts : Calories 407 calories, Carbohydrate 69 grams, Fat 12 grams, Fiber 1 gram, Protein 6 grams, Sugar 40 grams
Tips:
- Prep Your Ingredients: Before you begin, gather and measure all ingredients. This will help ensure you have everything you need and avoid scrambling during the baking process.
- Use Room Temperature Ingredients: For best results, bring ingredients like eggs, butter, and milk to room temperature before mixing. This allows them to combine more smoothly and evenly, resulting in a better texture.
- Cream Butter and Sugar Together: In most ghost cake recipes, creaming butter and sugar together is a crucial step. This process incorporates air into the mixture, creating a light and fluffy texture.
- Gradually Add Eggs: Add eggs one at a time, beating well after each addition. This prevents the batter from curdling and ensures the eggs are evenly distributed.
- Sift Flour and Baking Powder: Sifting these dry ingredients together aerates them, creating a lighter cake. Be sure to measure the flour correctly to avoid adding too much or too little.
- Mix Dry and Wet Ingredients Alternately: To avoid overmixing, add dry ingredients and wet ingredients alternately, beginning and ending with dry ingredients. Mix just until combined to prevent a tough texture.
- Bake at the Right Temperature: The baking temperature and time specified in the recipe are crucial. Ovens vary, so use an oven thermometer to ensure accurate temperature. Overbaking can result in a dry cake.
- Cool Completely: Allow the ghost cake to cool completely before frosting or decorating. This helps the cake set properly and prevents the frosting from melting.
Conclusion:
Creating a ghost cake is a delightful and rewarding experience, perfect for Halloween celebrations or any spooky occasion. With careful preparation, attention to detail, and a touch of creativity, you can achieve a stunning and delicious dessert that will impress your friends and family. Remember to have fun with the decorating process, letting your imagination run wild to create a hauntingly delightful masterpiece.
Are you curently on diet or you just want to control your food's nutritions, ingredients? We will help you find recipes by cooking method, nutrition, ingredients...
Check it out »
You'll also love


