Are you looking for a fun and easy dessert to make for your next party or gathering? Look no further than the adorable Dumb Bunny Cake! This delightful treat is not only visually appealing but also incredibly delicious. Made with layers of moist chocolate cake, creamy vanilla frosting, and decorated with adorable bunny faces, this cake is sure to be a hit with people of all ages.
In this article, we will provide you with step-by-step instructions on how to make this delightful dessert, along with variations and additional recipes to elevate your baking experience. Whether you are a seasoned baker or a novice in the kitchen, we have all the tips and tricks you need to create a perfect Dumb Bunny Cake that will impress your friends and family. So, gather your ingredients, preheat your oven, and let's embark on this sweet adventure together!
**Variations and Additional Recipes:**
* **Rainbow Bunny Cake:** Add a touch of whimsy by using different colored cake batters to create a rainbow effect. You can also use different colors of frosting to decorate the bunny faces.
* **Chocolate Chip Bunny Cake:** For a richer flavor, add chocolate chips to the cake batter. You can also sprinkle chocolate chips on top of the frosting before decorating.
* **Bunny Cupcakes:** If you prefer individual servings, bake the cake batter in cupcake pans instead of a cake pan. Decorate each cupcake with a bunny face and enjoy!
* **Bunny Cake Pops:** For a fun and portable treat, make bunny cake pops by rolling cake balls in melted chocolate and decorating them with bunny faces.
* **Bunny Cake Truffles:** Create decadent bunny cake truffles by combining cake crumbs, frosting, and melted chocolate. Roll the mixture into balls and decorate with bunny faces.
No matter which recipe you choose, the Dumb Bunny Cake is sure to be a delightful addition to your dessert table. So, grab your apron, turn up the music, and let's create some sweet memories!
BUNNY CAKE
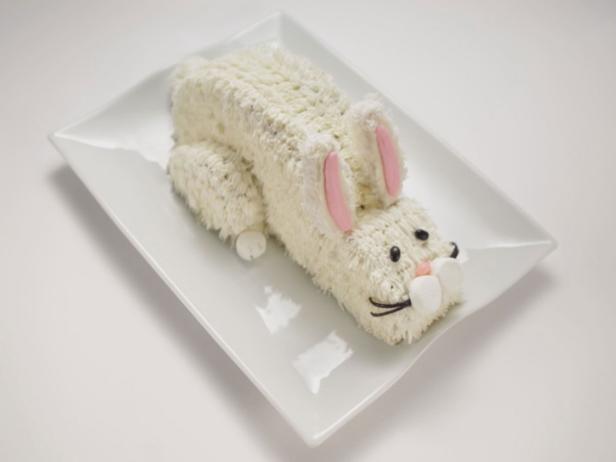
Steps:
- Spread a thin layer of frosting (about 2/3 cup) on the flat side of one cake layer and top with the flat side of the second cake layer. Measure 5 inches across the top of the cake and cut down through the layers, creating 2 layered pieces that are slightly different sizes.
- Place the larger piece of cake cut-side down on a large platter or cake board. If using a rectangular cake board, place the larger piece so that the long edges are parallel with the long edges of the board. This is the body of the bunny. Cut the smaller piece of cake in half crosswise, so you have 2 layered wedges. Place one wedge in front of the body, with one flat side on the board and the other flat side against the body. The curved side will be on top. Take a serrated knife and round off the sharp edges on top of the head. Cut the tip off (the nose) at a 45-degree angle. Reserve all scraps in a bowl.
- Separate the layers of the remaining wedge of cake. These will be the back legs. Round the sharp edges of the cake wedges with your knife and add to the scrap bowl. Place one piece on each side of the bunny, with one flat side down and the other flat side facing forward (the round side towards the back of the bunny), about 1 inch from the end of the bunny's body.
- Mix the cake scraps in the bowl with a fork until mashed and then pack into a ball with your hands. Place the ball behind the bunny's body and adhere with a dab of frosting. This is the bunny's tail.
- Frost the entire bunny, tail and all, using 2 to 3 cups of the frosting, keeping some definition with the bunny parts and frosting more generously around any sharp edges to give a rounded look to the bunny parts. Sprinkle the bunny with the coconut to fully cover. Gently pat to adhere.
- Insert the biscotti between the head and body, pressing into the cake to secure them. These are the ears. Place the base of the ears close together at the center of the head and angle them out. Frost the front of each biscotti with some frosting. Then, using the pink decorating icing, frost a smaller strip in the center of each biscotti, going down to where the ears meet the head but not going all the way to the top.
- To make the face, press a black jelly bean into each side of the head for the eyes. Cut one of the marshmallows into 3 circles, discard the middle piece and press the 2 end circles, cut-sides in, into the front of the face for the bunny cheeks. Push the white jelly bean halves into the face below the cheeks, round-sides out, for the teeth. Place the pink jelly bean above for the nose.
- Unroll the licorice wheel and cut 2 pieces, each about 1 1/2 inches long. For each piece, peel the strips apart halfway down and then cut each separated strip in half lengthwise so you end up with a piece looking a bit like a broom. Repeat with the second piece of licorice. Tuck each piece, with a dab of frosting, behind a marshmallow cheek, with the cut ends facing out for the whiskers.
- Cut the second marshmallow in half lengthwise. Make 3 slits in each half, going about halfway through (these are the toes), and place in front of the legs for the bunny's feet. Adhere the bottom of the feet with frosting if necessary.
- Combine the butter, confectioners' sugar and salt in the bowl of a stand mixer fitted with a paddle attachment. Mix on low speed until mostly incorporated. Add the vanilla, increase the speed to medium-high and mix until smooth. Adjust the consistency with milk as desired.
- Preheat the oven to 350 degrees F. Spray two 10-inch round cake pans with baking spray.
- Beat the butter and granulated sugar in a stand mixer fitted with the paddle attachment on medium-high speed until fluffy, about 4 minutes.
- While you are beating your butter, whisk the flour, baking powder and salt together in a separate bowl.
- Beat the eggs into the butter mixture, one at a time, scraping down the bowl as needed. Beat in the vanilla.
- Reduce the mixer speed to medium low; beat in half the flour mixture, then all of the milk, then the remaining flour mixture until just combined.
- Divide the batter evenly between the prepared cake pans. Bake until a toothpick inserted in the center of a cake comes out clean, about 35 minutes, rotating the pans halfway through.
- Transfer the pans to a rack and let cool 10 minutes, then invert the cake layers onto a wire rack and cool completely before decorating.
AUNT MARY'S DELICIOUS BUNNY CAKE
This cake is great to make in character pans such as a Santa Claus, train pan, or bunny mold. Buttercream frosting is great but you can use other frostings if desired. Color your frosting with desired shade of food coloring.
Provided by Dabney
Categories Desserts Cakes Yellow Cake Recipes
Time 4h30m
Yield 10
Number Of Ingredients 15
Steps:
- Place a rack into the lower third of oven.
- Preheat oven to 325 degrees F (165 degrees C).
- Grease and flour a cake mold pan (such as a bunny cake or train cake mold) using vegetable shortening.
- Sift flour, baking powder, and salt in a bowl.
- Mix 1 1/3 cup milk, lemon extract, 1 1/4 teaspoons vanilla extract, and orange extract in a separate bowl.
- Beat unsalted butter in a large mixing bowl with an electric mixer on medium speed until butter is creamy and smooth, 1 to 2 minutes. Beat in white sugar and continue beating until the mixture is light and fluffy, about 5 more minutes. Scrape the sides of the bowl occasionally.
- Beat in eggs, one at a time, beating each egg in thoroughly before adding the next.
- Reduce mixer speed to low and beat in flour mixture in several additions, alternating with milk mixture; begin and end with flour mixture. Do not overbeat. Scrape bowl occasionally.
- Pour batter evenly into prepared cake pan.
- Bake in the preheated oven until lightly browned and a toothpick inserted into the middle of the cake comes out clean, 30 to 45 minutes.
- Place cake in pan on a wire rack and allow to cool for 15 minutes before inverting pan to remove cake. Allow cake to completely cool on wire rack, 3 to 4 hours.
- Beat vegetable shortening, 1/2 cup butter, confectioners' sugar, 2 tablespoons milk, and 1 teaspoon clear vanilla extract in a bowl until frosting is smooth and creamy.
- Pack the frosting into a heavy resealable plastic bag; force the frosting into one corner of the bag. Clip a small corner off the plastic bag, seal the bag, and pipe the frosting onto the cooled cake in desired pattern.
Nutrition Facts : Calories 893.7 calories, Carbohydrate 120.8 g, Cholesterol 156.6 mg, Fat 43.3 g, Fiber 1 g, Protein 7.9 g, SaturatedFat 22.6 g, Sodium 488.2 mg, Sugar 91.1 g
EASY BUNNY CAKE
A simple version of a coconut white cake shaped like a bunny head!
Provided by Joni Ehman
Categories Desserts Cakes Cake Mix Cake Recipes
Time 1h25m
Yield 12
Number Of Ingredients 5
Steps:
- Heat oven and prepare two 9 inch round baking pans as directed on cake box. Prepare cake batter with as directed on package adding in 1/2 cup of coconut. Divide batter evenly between the prepared pans. Bake and cool cake as directed on package.
- When cooled, place one whole 9 inch cake layer on serving tray, forming the bunny's head. Cut 2 convex shaped ears from each side of the second layer, place on each side of head to form ears. Use concave shaped piece for the bowtie, place about 1/2 inch below head.
- Frost entire bunny covering top and sides of bunny. Pat remaining 3 1/4 cup coconut evenly over top and sides. Decorate the bunny face and bowtie with jellybeans and use the licorice to make whiskers.
Nutrition Facts : Calories 456.6 calories, Carbohydrate 68.8 g, Cholesterol 0.9 mg, Fat 19.6 g, Fiber 2.7 g, Protein 2.8 g, SaturatedFat 9.3 g, Sodium 361.8 mg, Sugar 48 g
EASTER BUNNY CAKE
Provided by Food Network Kitchen
Categories dessert
Time 1h
Yield 12 to 14 servings
Number Of Ingredients 14
Steps:
- For the frosting: Combine the sugar, butter and salt in the bowl of a stand mixer fitted with a paddle attachment (or in a large bowl if using a hand-held electric mixer). Mix on low speed until mostly incorporated. Add the vanilla, increase the speed to medium high and mix until smooth. Adjust the consistency with milk until the frosting is easy to spread.
- For the bunny: Spread a thin layer of frosting (about 2/3 cup) on the flat side of one cake layer and top with the flat side of the second cake layer. Measure 5 inches across the top of the cake and cut down through the layers, creating 2 layered pieces that are slightly different sizes.
- Place the larger piece of cake cut-side down on a large platter or cake board. If using a rectangular cake board, place the larger piece so that the long edges are parallel with the long edges of the board. This is the body of the bunny. Cut the smaller piece of cake in half crosswise, so you have 2 layered wedges. Place one wedge in front of the body, with one flat side on the board and the other flat side against the body. The curved side will be on top. Take a serrated knife and round off the sharp edges on top of the head. Cut the tip off (the nose) at a 45-degree angle. Reserve all scraps in a bowl.
- Separate the layers of the remaining wedge of cake. These will be the back legs. Round the sharp edges of the cake wedges with your knife and add to the scrap bowl. Place one piece on each side of the bunny, with one flat side down and the other flat side facing forward (the round side towards the back of the bunny), about 1 inch from the end of the bunny's body.
- Mix the cake scraps in the bowl with a fork until mashed and then pack into a ball with your hands. Place the ball behind the bunny's body and adhere with a dab of frosting. This is the bunny's tail.
- Frost the entire bunny, tail and all, using 2 to 3 cups of the frosting, keeping some definition with the bunny parts and frosting more generously around any sharp edges to give a rounded look to the bunny parts. Sprinkle the bunny with the coconut to fully cover. Gently pat to adhere.
- Insert the biscotti between the head and body, pressing into the cake to secure them. These are the ears. Place the base of the ears close together at the center of the head and angle them out. Frost the front of each biscotti with some frosting. Then, using the pink decorating icing, frost a smaller strip in the center of each biscotti, going down to where the ears meet the head but not going all the way to the top.
- To make the face, press a black jelly bean into each side of the head for the eyes. Cut one of the marshmallows into 3 circles, discard the middle piece and press the 2 end circles, cut-sides in, into the front of the face for the bunny cheeks. Push the white jelly bean halves into the face below the cheeks, round-sides out, for the teeth. Place the pink jelly bean above for the nose.
- Unroll the licorice wheel and cut 2 pieces, each about 1 1/2 inches long. For each piece, peel the strips apart halfway down and then cut each separated strip in half lengthwise so you end up with a piece looking a bit like a broom. Repeat with the second piece of licorice. Tuck each piece, with a dab of frosting, behind a marshmallow cheek, with the cut ends facing out for the whiskers.
- Cut the second marshmallow in half lengthwise. Make 3 slits in each half, going about halfway through (these are the toes), and place in front of the legs for the bunny's feet. Adhere the bottom of the feet with frosting if necessary.
BUNNY CAKE

Make a cake for your next celebration that will really wow your guests with this Bunny Cake recipe from My Food and Family! For this Bunny Cake recipe, make a spongy white cake and top it off with tasty candies like licorice, gumdrops and jelly beans.
Provided by My Food and Family
Categories Recipes
Time 30m
Yield 16 servings
Number Of Ingredients 4
Steps:
- Leave 1 cake whole. Use serrated knife to cut remaining cake into 3 pieces as shown in video. Arrange on large foil-covered board or platter to resemble a bunny's head and bow tie, using small amount of COOL WHIP to attach pieces to each other.
- Frost cake with remaining COOL WHIP.
- Sprinkle with coconut. Decorate with remaining ingredients as shown in photo. Keep refrigerated.
Nutrition Facts : Calories 260, Fat 11 g, SaturatedFat 7 g, TransFat 1 g, Cholesterol 0 mg, Sodium 270 mg, Carbohydrate 0 g, Fiber 1 g, Sugar 0 g, Protein 3 g
HIPPITY HOP BUNNY CAKE
This cute, festive cake will have your guests 'hopping' with happiness! Make the cake ahead and add the decorations close to it's debut at your party or special occasion. - Taste of Home Test Kitchen
Provided by Taste of Home
Categories Desserts
Time 2h25m
Yield 20 servings.
Number Of Ingredients 28
Steps:
- To prepare orange curd, in a small saucepan, combine sugar, cornstarch and salt. Stir in orange juice until smooth. Bring to a boil; cook and stir until thickened, 1 minute. Remove from the heat. Stir a small amount of hot mixture into egg yolks; return all to the pan, stirring constantly. Bring to a gentle boil; cook and stir 1 minute longer. Remove from the heat; gently stir in butter and orange zest. Cool to room temperature without stirring. Refrigerate for 1 hour., Preheat oven to 350°. Line bottoms of three 6-in. round baking pans with parchment; grease pans., Cream butter and sugar until light and fluffy, about 5-7 minutes. Add egg whites, one at a time, beating well after each addition. Beat in vanilla and zest. Combine the flour, baking powder and salt; add to creamed mixture alternately with the milk. , Transfer batter to prepared pans. Bake until a toothpick inserted in each center comes out clean, 30-35 minutes. Cool in pans 10 minutes before removing to wire racks; remove parchment. Cool completely., Meanwhile, prepare buttercream by microwaving chocolate and cream in a small microwave-safe bowl until melted, stirring every 30 seconds until smooth. Set aside to cool slightly. In heatproof bowl of stand mixer, whisk egg whites, sugar, cream of tartar and salt until blended. Place over simmering water in a large saucepan over medium heat. Whisking constantly, heat mixture until a thermometer reads 160°, 5-7 minutes., Remove from heat. With whisk attachment of stand mixer, beat on high speed until cooled to 90°, about 5 minutes. Gradually beat in butter, a few tablespoons at a time, on medium speed until smooth; beat in vanilla and white chocolate mixture., Spread curd between layers. Spread buttercream over top and sides of cake; sprinkle coarse sugar over top and sides of cake. Decorate with candies to look like a bunny, as desired. Store in refrigerator.
Nutrition Facts : Calories 479 calories, Fat 28g fat (17g saturated fat), Cholesterol 93mg cholesterol, Sodium 261mg sodium, Carbohydrate 55g carbohydrate (42g sugars, Fiber 0 fiber), Protein 5g protein.
Tips:
- Use fresh ingredients whenever possible, especially for the frosting.
- Make sure your cake is completely cool before frosting it, or the frosting will melt.
- If you don't have a piping bag, you can use a zip-top bag with the corner snipped off.
- To make the bunny's ears, cut two ovals out of pink fondant.
- To make the bunny's eyes, use two black nonpareils.
- To make the bunny's nose, use a pink nonpareil.
- To make the bunny's whiskers, use three strands of white yarn.
- If you don't have any nonpareils, you can use chocolate chips or sprinkles.
Conclusion:
The Dumb Bunny Cake is a fun and easy cake to make that is perfect for any occasion. It is sure to be a hit with kids and adults alike. With its simple ingredients and easy-to-follow instructions, this cake is a great choice for beginner bakers. So next time you're looking for a fun and festive cake to make, give the Dumb Bunny Cake a try!
Are you curently on diet or you just want to control your food's nutritions, ingredients? We will help you find recipes by cooking method, nutrition, ingredients...
Check it out »
You'll also love


