Best 2 Classic Homemade Raspberry Jam Recipes


Indulge in a delightful culinary journey with our comprehensive guide to preparing classic homemade raspberry jam. This timeless recipe has been passed down through generations, capturing the essence of summer's sweet and tangy raspberries. Whether you're a seasoned jam maker or a novice cook looking to explore new flavors, this article provides a step-by-step guide to creating a delectable raspberry jam that will elevate your breakfast toast, pastries, and desserts. Discover the art of balancing sweetness and acidity, achieving the perfect consistency, and preserving your homemade jam for lasting enjoyment. Along with the classic recipe, we also present variations to suit different tastes, including a low-sugar option for those seeking a healthier alternative, and a zesty orange twist for a unique flavor profile. Get ready to tantalize your taste buds and create a jar of homemade raspberry jam that will become a staple in your kitchen.
Here are our top 2 tried and tested recipes!
RASPBERRY JAM
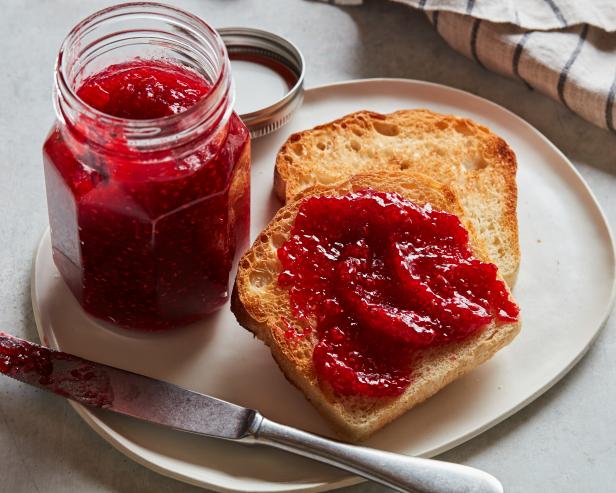
In just under an hour and with only three ingredients, you can make a batch of raspberry jam that's bursting with flavor and color. We found that macerating the berries prior to cooking helps release more of their natural fruit pectin, eliminating the need for any additional thickener. Serve the jam on toast, as part of a cheese board or over yogurt or even ice cream.
Provided by Food Network Kitchen
Categories condiment
Time 40m
Yield 2 1/2 cups
Number Of Ingredients 3
Steps:
- Toss the raspberries, sugar and lemon zest and juice in a medium saucepan to combine, then mash slightly to release some of the berry juice. Set aside for 10 minutes to allow the raspberries to macerate and the sugar to dissolve. Meanwhile, place a small plate in the freezer to chill; this will be used to test the doneness of the jam.
- Place the saucepan over medium-high heat. Bring the mixture to a boil and then reduce the heat to medium, stirring frequently. Continue to cook until the jam becomes thick and syrupy, about 25 minutes. To test doneness, place a small amount of the jam onto the chilled plate and freeze for 2 minutes. Drag your finger or spoon through it. If the jam holds its shape and thickness, the jam is done; remove from the heat. If it's runny, continue to cook and test again in 5-minute increments. Once the jam has reached the right consistency, transfer to jars and cool completely before storing, covered tightly. Jam will keep in the refrigerator up to 6 months.
RASPBERRY JAM
This delicious jam recipe is courtesy of Gretchen Sweet, Martha's friend from Maine. All it takes to make it are three basic ingredients-fresh or frozen raspberries, granulated sugar, and lemon juice.
Provided by Martha Stewart
Yield Makes five 8-ounce jars
Number Of Ingredients 3
Steps:
- Place 5 clean 8-ounce jars right side up on a rack in a boiling-water canner. Fill the canner and jars with hot water, about 1 inch above the tops of jars. Boil jars over high heat for 10 minutes. Remove and drain hot sterilized jars one at a time, reserving hot water for processing filled jars. Place jars on a wire rack set over a rimmed baking sheet.
- In a large saucepan filled with water, bring to a boil over high heat and reduce to a simmer, add clean lids and lid rings. Simmer for 10 minutes; do not boil, as this may cause problems in sealing jars. Drain lids and rings; set aside.
- Combine all ingredients in a medium saucepan and bring to a boil over high heat. Cook, stirring and skimming foam from surface, until mixture reaches 221 degrees on a candy thermometer, 5 to 10 minutes. To test, remove mixture from heat. Pour a small amount of jam on a cold plate and transfer to freezer, for 2 to 3 minutes. If mixture gels, it is ready to fill. If not, return to heat and retest.
- Fit a jar with a wide-mouth funnel. Ladle jam mixture into jar up to the fill line. Repeat process with remaining jars. Put lids and rings on jars and tighten; do not over-tighten. At this point, jam may be kept refrigerated, up to 1 month.
- To store jars at room temperature for up to one year, reheat water in the canner until it reaches at least 180 degrees, within 10 minutes of filling the jars. Place filled jars into the canner one at a time, using a jar lifter that is securely positioned below the neck of the jar. Keep jars upright at all times.
- Add more boiling water, if needed, so that water covers jars by at least 1 inch. Increase heat to high and cover. Once water begins boiling, heat jars for 5 minutes. Turn off heat and gently transfer jars to a wire rack set over a rimmed baking sheet and invert, spacing each jar at least 1 inch apart. Avoid placing jars on a cold surface or near a cold draft.
- Let jars sit undisturbed until fully cooled, 12 to 24 hours. Do not tighten ring bands on the lids or push down on the center of the flat metal lid until jar has cooled completely.
- Once jars have cooled completely, test to make sure each jar is completely sealed. Press down on the middle of the lid with a finger. If lid springs up when finger is released, the jar is unsealed. Store sealed jars in a cool place for up to one year. If any of the jars are unsealed, store in the refrigerator and use within several days. Always refrigerate jam after opening.
Tips:
- To ensure the best quality jam, select ripe, flavorful raspberries. Overripe or bruised berries can compromise the taste and texture of the jam.
- Use a large, heavy-bottomed pot to make the jam. This will help to distribute the heat evenly and prevent the jam from burning.
- Stir the jam frequently while it is cooking. This will help to prevent the fruit from sticking to the bottom of the pot and will also help to distribute the sugar evenly.
- Use a candy thermometer to determine when the jam is ready. The jam should reach a temperature of 220 degrees Fahrenheit (104 degrees Celsius). If you don't have a candy thermometer, you can test the jam by dropping a small amount onto a cold plate. If the jam wrinkles when you push it with your finger, it is ready.
- Allow the jam to cool slightly before transferring it to jars. This will help to prevent the jars from cracking.
- Process the jars in a boiling water bath for 10 minutes. This will help to seal the jars and ensure that the jam is shelf-stable.
Conclusion:
Homemade raspberry jam is a delicious and versatile spread that can be enjoyed on toast, scones, pancakes, and more. It is also a great way to preserve fresh raspberries and enjoy their flavor all year long. With a little time and effort, you can easily make your own classic homemade raspberry jam using the tips and instructions provided in this article.
Are you curently on diet or you just want to control your food's nutritions, ingredients? We will help you find recipes by cooking method, nutrition, ingredients...
Check it out »
You'll also love