Indulge in the delightful world of chocolate ladyfingers, a classic Italian pastry that combines the rich flavors of chocolate and the delicate texture of ladyfingers. These elegant cookies are perfect for any occasion, whether you're hosting a dinner party or simply craving a sweet treat. In this article, we present three irresistible recipes for chocolate ladyfingers: the classic chocolate ladyfingers, the chocolate-dipped ladyfingers, and the chocolate-filled ladyfingers. Each recipe offers a unique twist on this beloved dessert, ensuring that there's something for everyone to enjoy. From the simplicity of the classic recipe to the decadence of the chocolate-filled ladyfingers, these recipes will tantalize your taste buds and leave you craving more. So, gather your ingredients, preheat your oven, and let's embark on a culinary journey to create these delectable chocolate ladyfingers.
Let's cook with our recipes!
CHOCOLATE LADYFINGERS
Provided by Food Network
Categories dessert
Time 25m
Yield About 50 ladyfingers
Number Of Ingredients 6
Steps:
- Preheat the oven to 400 degrees F.
- Sift the cake flour and cocoa powder together in a small mixing bowl and set aside. Place the egg whites in a large mixing bowl and whip until foamy with an electric mixer set on medium speed. Make a French meringue by adding the sugar 1 tablespoon at a time. When you whip egg whites, add the sugar slowly to allow the whites to gain some volume. When you have volume, add the rest of the sugar. Increase the mixer speed to medium-high and whip to stiff but not dry peaks, about 5 minutes. When the whites are slightly stiff, reduce the mixer speed to low to allow even more air to be incorporated without over whipping the egg whites. Let the egg whites continue to whip for about another 2 minutes. Stop whipping them if they begin to look dry or separated.
- Very gently, fold the egg yolks into the whipped egg whites with a rubber spatula until they are partially incorporated. Carefully fold the sifted mixture into the egg mixture. It is important to fold as gently as possible to avoid deflating the batter. Remember to fold all the way to the bottom of the bowl to fully incorporate both mixtures.
- Place the batter in a pastry bag fitted with a 3/4-inch plain tip. To pipe the ladyfingers, hold the pastry bag at a slight angle and allow the tip to touch the parchment paper as you start to pipe. Squeeze gently, applying even pressure as you pipe the desired length, then stop squeezing and lift the tip straight up, leaving a small tail on the end of each ladyfinger. Pipe evenly shaped ladyfingers about 3/4-inch wide on a parchment paper-covered sheet pan. Space them about 1/2-inch apart to allow them room to spread as they bake. Dust the tops of the ladyfingers with powdered sugar to give them a nice crust.
- Bake the ladyfingers until light and evenly browned, about 5 minutes. (The browning may be difficult to discern with the chocolate ladyfingers.) Remove from the oven and immediately move to a wire rack to prevent the heat of the pan from continuing to bake the ladyfingers. Set aside until ready to use. When cooled, the ladyfingers can be stored in an airtight container at room temperature for up to 2 days, or in the freezer, well wrapped in plastic wrap, for up to 2 weeks.
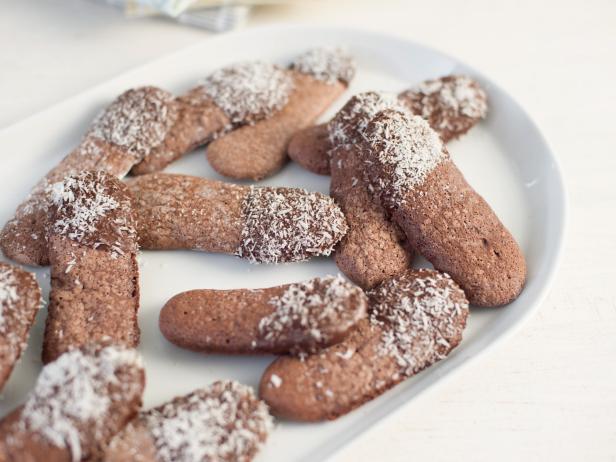
DARK CHOCOLATE LADYFINGERS
Provided by Trisha Yearwood
Categories dessert
Time 2h
Yield 32 ladyfingers
Number Of Ingredients 10
Steps:
- For the ladyfingers: Preheat the oven to 350 degrees F. Line a rimmed baking sheet with parchment paper and dust lightly with confectioners' sugar.
- Sift together the flour, cocoa powder and salt in a bowl.
- Put the egg whites in a large bowl and beat with an electric mixer on medium-high speed until frothy. Gradually add 1/2 cup of the granulated sugar and beat until stiff, shiny peaks form, about 6 minutes.
- In a medium bowl, beat the yolks and remaining 1/4 cup granulated sugar until pale and thick. Beat in the vanilla. Gently fold the yolks into the egg whites; it's okay if some streaks remain. Add the flour mixture and fold gently, but thoroughly, until well mixed.
- Spoon the mixture into a piping bag fitted with a 3/4-inch plain tip. Pipe 3-inch-long, 1-inch-wide ladyfingers about 1/2 inch apart. Dust the tops of the cookies lightly with confectioners' sugar. Bake until springy to the touch, 16 to 18 minutes. Cool completely.
- For the decoration: Combine the chocolate and coconut oil in a small microwave-safe bowl. Microwave, stirring every 30 seconds, until melted. Dip one end of each ladyfinger in the chocolate, then sprinkle with the coconut over parchment paper. Place on a serving platter.
- Refrigerate until set. Serve immediately or keep refrigerated until ready to serve, up to 4 hours (ladyfingers dry out quickly).
CHOCOLATE LADYFINGERS AND CAKE ROUNDS
Use this recipe to make our decadent Chocolate-Coconut Charlotte.
Provided by Martha Stewart
Categories Food & Cooking Dessert & Treats Recipes Cake Recipes
Yield Makes ladyfingers and 2 cake rounds for one 6-inch charlotte
Number Of Ingredients 6
Steps:
- Preheat oven to 350 degrees. Sift flour, cocoa powder, and salt into a small bowl.
- Whisk whites with a mixer on medium-high speed until soft peaks form. Gradually add 2/3 cup sugar, whisking until stiff, shiny peaks form, about 5 minutes. Whisk yolks with remaining 2 tablespoons sugar in a medium bowl until thick and pale, about 3 minutes. Fold yolk mixture into whites, then fold in flour mixture in 2 additions.
- Line 2 baking sheets with parchment. On 1 piece, draw two 6-inch circles, then flip parchment over. Spoon batter into a pastry bag fitted with a 1/2-inch round tip. Starting in the center of each circle, pipe a spiral, leaving a 1-inch border around inside edge of circle. Bake until springy to the touch, 15 to 18 minutes. Transfer parchment with rounds to a wire rack, and let cool.
- On the other piece of parchment, draw 4 rows, each 3 1/2 inches wide for the ladyfingers. Pipe 1-inch-wide ladyfingers horizontally between pairs of lines, so they're touching, and lightly dust with cocoa. Bake until springy to the touch, about 15 minutes. Transfer parchment with ladyfingers to a wire rack, and let cool. Use immediately.
Tips:
- Mise en Place: Before starting, ensure all ingredients and equipment are ready. This will ensure a smooth and efficient baking process.
- Precise Measurements: Use a kitchen scale to accurately measure ingredients, especially for baking, to achieve consistent results.
- Quality Ingredients: Use high-quality chocolate and other ingredients for the best flavor and texture. Fresh eggs are also essential.
- Properly Melt Chocolate: To avoid burning or seizing, melt chocolate slowly over a double boiler or in a microwave in short bursts, stirring continuously.
- Chill the Dough: Chilling the dough before baking helps prevent spreading and results in a more defined ladyfinger shape.
- Baking Temperature: Bake the ladyfingers at a moderate temperature (around 350°F) to ensure even cooking and prevent over-browning.
- Cooling and Storage: Allow the ladyfingers to cool completely before filling or using. Store them in an airtight container at room temperature or in the freezer for longer storage.
Conclusion:
These chocolate ladyfingers are a versatile and delicious treat that can be enjoyed on their own, used as a base for desserts like tiramisu, or incorporated into other recipes. With careful attention to detail and following the tips provided, you can create perfect ladyfingers that will impress your friends and family. Remember, practice makes perfect, so don't be discouraged if your first attempt doesn't turn out as expected. Keep experimenting and refining your technique, and you'll soon be a pro at making these delightful ladyfingers.
Are you curently on diet or you just want to control your food's nutritions, ingredients? We will help you find recipes by cooking method, nutrition, ingredients...
Check it out »
You'll also love


