Best 5 Chocolate Dipped Vanilla Creams Recipes


Indulge in a delightful culinary experience with our irresistible Chocolate-Dipped Vanilla Creams, a perfect treat for any occasion. These bite-sized morsels combine the richness of dark chocolate with the velvety smoothness of homemade vanilla cream, creating a symphony of flavors that will tantalize your taste buds. Each cream is lovingly crafted using fresh ingredients and a touch of culinary magic, ensuring a delectable experience in every bite.
Our collection features three tempting variations: Classic Chocolate-Dipped Vanilla Creams, a timeless treat that embodies the essence of this classic combination; Chocolate-Dipped Vanilla Creams with Salted Caramel, a delightful twist that adds a touch of savory sweetness; and Chocolate-Dipped Vanilla Creams with Peanut Butter, a decadent indulgence that combines the irresistible flavors of chocolate, vanilla, and peanut butter.
With step-by-step instructions and helpful tips, our recipes make it easy to recreate these delectable treats in the comfort of your own kitchen. Whether you're a seasoned baker or just starting out, you'll find everything you need to whip up a batch of these chocolate-dipped vanilla creams that will impress your friends and family.
So, gather your ingredients, preheat your oven, and embark on a delightful journey into the world of these exquisite confections. Let your senses be captivated by the rich aroma of chocolate and vanilla as you create these delectable treats that are sure to become a cherished favorite.
AMAZING FANNIE MAY VANILLA BUTTERCREAM RECIPE

Fannie May is well known for its delicious and decadent chocolate treats. Many people grew up eating their amazing confections. This amazing Fannie May vanilla buttercream recipe is just like the famous buttercreams Fannie May is well known for.
Provided by cakedecorist.com
Categories Dessert
Time 3h40m
Number Of Ingredients 6
Steps:
- In a large bowl, using an electric; mixer, mix together the butter and cream cheese on medium speed.
- Add the vanilla and mix until the ingredients are fully combined.
- Gradually at the powdered sugar at low speed until the ingredients are fully mixed.
- Shape the buttercream into rounded balls, one inch in size. Place the balls onto the wax paper, loosely cover and refrigerate for two hours or overnight.
- In a saucepan, melt the chocolate and shortening over low heat. Stir constantly and heat for three to four minutes, or until fully melted. You may also microwave the chocolate and shortening on 30-second intervals, stirring each time, until fully melted.
- Take the buttercream balls and carefully dip them into the chocolate using a fork. Turn the buttercream balls over in the chocolate to fully coat, let the remaining chocolate drip off. Place them onto a waxed paper-lined baking sheet to let them set. Refrigerate buttercreams for at least half an hour before serving.
CHOCOLATE-DIPPED ICE CREAM TACOS RECIPE BY TASTY
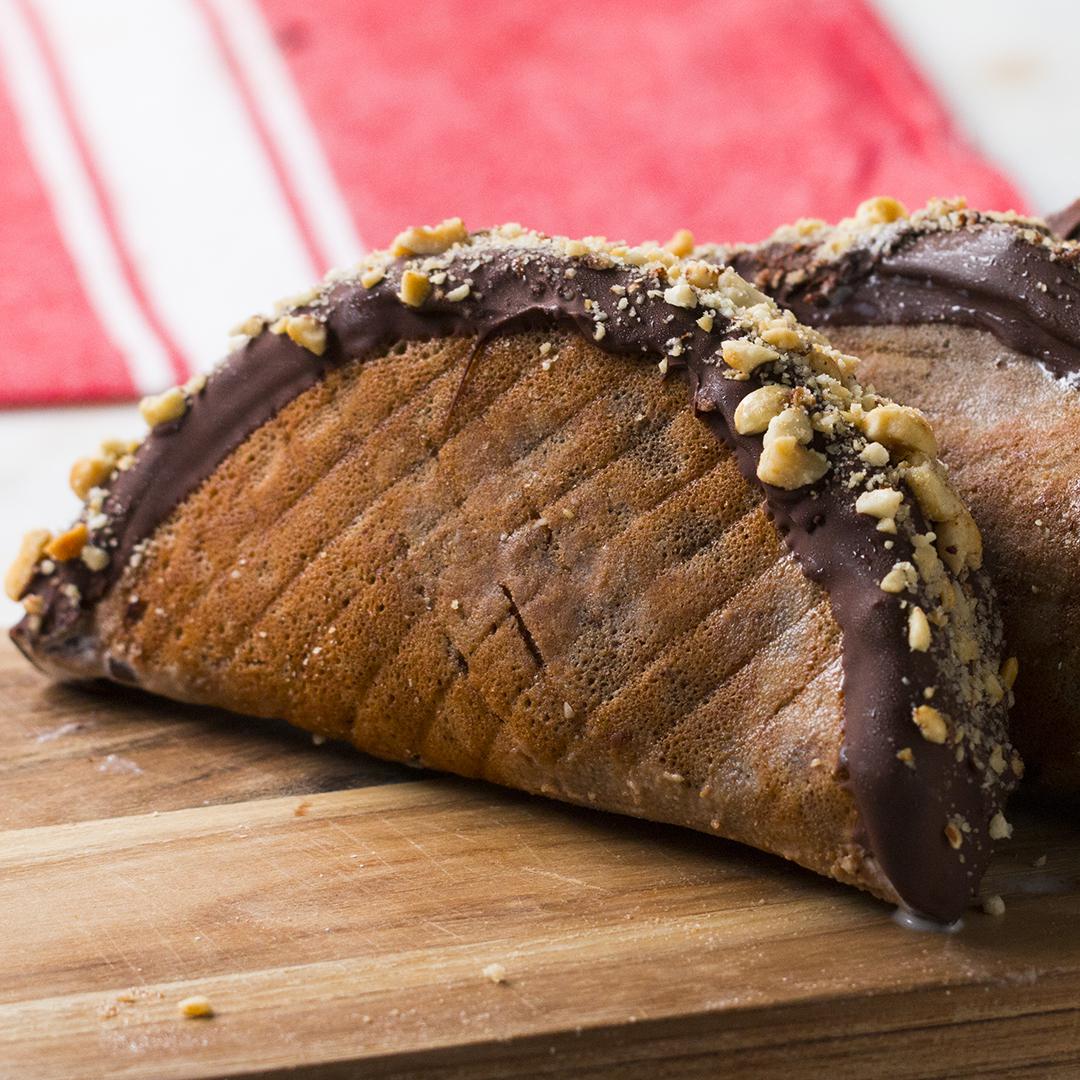
Here's what you need: large eggs, sugar, milk, vanilla extract, unsalted butter, all purpose flour, cocoa powder, good-quality chocolate, coconut oil, vanilla ice cream, salted peanut
Provided by Pierce Abernathy
Categories Desserts
Yield 8 servings
Number Of Ingredients 11
Steps:
- Make the taco shells: in a medium bowl, whisk together the eggs and sugar until combined.
- Add the milk, vanilla, and butter, and whisk until fully incorporated.
- Sift in the flour and cocoa powder. Whisk until smooth.
- Heat a small non-stick pan over medium-low heat, then add ⅓ cup (95 g) of batter at a time and tilt the pan to spread the batter evenly like a crepe.
- Cook until bubbles appear on the surface and the batter is set, about 6-8 minutes. Flip the taco shell and cook on other side for another 3-4 minutes, until cooked through.
- If desired, remove the taco shell from pan and place on a grated cooling rack while still hot. Place a sheet of parchment over the shell and press into the rack, allowing the grate marks to set into the shell. Rotate the shell 90 degrees and press the cone into the grates again for a waffled look. Or, skip to the next step.
- Place the taco shells between the cups of an inverted muffin tin to form their shape. Let set for about 10 minutes, then freeze for 20 minutes to harden.
- Make the magic shell: combine the chocolate and coconut oil in a medium bowl and microwave for 2 minutes, stirring every 30 seconds until melted and shiny.
- Remove the taco shells from the freezer and use a spoon to coat the inside of each taco shell with melted magic shell. Return to the freezer for 20 minutes, until the magic shell hardens. Reserve the leftover magic shell.
- Add the ice cream to a piping bag fitted with a round tip or a zip-top bag with the corner cut off.
- Remove the shells from the freezer and pipe in the ice cream, filling the tacos. Smooth out the tops with a knife or rubber spatula. Freeze for 2 hours.
- Microwave the reserved magic shell, if needed, to re-melt. Remove the tacos from the freezer and dip the tops of each taco in the magic shell, then immediately sprinkle with the crushed peanuts.
- Serve immediately or return to the freezer until ready to eat.
- Enjoy!
Nutrition Facts : Calories 900 calories, Carbohydrate 79 grams, Fat 63 grams, Fiber 7 grams, Protein 18 grams, Sugar 57 grams
CHOCOLATE COVERED CANDY CREAMS & OTHER STUFF

My sister, Susan, showed me how to make these back in the sixties and I used to make them at Christmas time as gifts. They are a lot of fun to do because you can make one batch, separate it into different portions and color and flavor each portion as you wish. Then when you are all done... dip them into melted chocolate and Wow!...
Provided by Marcia McCance
Categories Chocolate
Number Of Ingredients 8
Steps:
- 1. soften cream cheese in microwave -- don't melt, simply soften -- about 30 seconds
- 2. begin to add powdered sugar by cup fulls -- work into cream cheese until it gets to be like a firm batter -- play dough would be a good example of the consistency you are looking for -- and you will end up having to do it with your hands
- 3. separate the ball into as many different flavors as you would like to make -- I used to make at least 4 or 5 at a time. (Suggested flavors that people liked: vanilla, almond, mint, anise, chocolate, rum, cherry, orange, lemon, etc -- whatever you have in your cupboard or desire to purchase for this project.)
- 4. To Flavor: make a deep thumb print in one of the balls and put in a drop or 2 of coloring and a tsp of flavoring -- begin working the ball with your hands until the color is smoothly distributed -- add more powdered sugar to bring back to workable dough that is not sticky. (I liked the colors to be pastel which I always thought were more appetizing so I never added more than 1 or 2 drops of food coloring -- you may do as much as you want.)
- 5. After each ball is colored and flavored I used to decide on a different shape for each flavor so I could tell which ones were which after they were all coated with chocolate. Such as: tiny balls for one flavor, little squares for another, oblong balls for another, rectangles for another, flattened balls for another, etc.
- 6. Slowly & carefully melt chocolate on low heat on stove top (or in microwave if you are comfortable with that -- I like the stove top because I have more control over the process) -- then dip each ball or shape into the chocolate and place on waxed paper covered cookie sheets. They will harden very quickly. I did not like to get my hands all chocolate covered so I always used a spoon to dip, and roll in the chocolate, then scoop out and place on waxed paper.
- 7. After I had made these over the years, I also began to experiment with chocolate coating things that were already made (I was getting lazy LOL). One of my most favorite things was to chocolate coat gum drops. Candy manufacturers used to make chocolate covered "jellies" which I always loved... but they began to disappear over the years... gum drops were a perfect solution for someone who missed them!!
- 8. I also found that I could chocolate coat dried pineapple, or mix peanuts with the chocolate to make little peanut heaps. We used to make "hay stacks" by dumping those hard canned Chinese noodles into chocolate and making little stacks. My sister used to like a Chunky candy bar and we made our own with peanuts and raisins in chocolate dropped by spoonfulls on waxed paper.
- 9. Other people like to coat pretzels and crackers and cookies... once you get started with chocolate coating things you will find lots of individual and unique ways to make Christmas gifts that your friends will get from no other source. They will be clamoring for your home made creations. Enjoy!
CHOCOLATE SANDWICH COOKIES WITH VANILLA-CREAM FILLING

Provided by Food Network
Categories dessert
Time 19m
Yield 36 sandwich cookies
Number Of Ingredients 12
Steps:
- Set 2 racks in the middle and upper third of the oven and preheat to 375 degrees. In a food processor or the bowl of an electric mixer, thoroughly mix together the flour, cocoa, baking soda, baking powder, salt and sugar. While pulsing or on low speed, add the butter, then the egg. Process or beat until the dough is thoroughly blended and massed together. Drop rounded teaspoons of batter onto nonstick or parchment-lined cookie sheets at 2-inch intervals. With moistened fingers, round out the cookies and flatten them a little. Bake for 9 minutes, turning the pans once for even baking, until the cookies are set. Set the cookie sheets on a rack to cool.
- Vanilla-Cream Filling: Put the butter and shortening in a mixing bowl and, at low speed, gradually beat in the confectioners' sugar and vanilla, until blended. Turn the mixer up to high and beat for 2 or 3 minutes more, until fluffy.
- With a pastry bag fitted with a 1/2-inch tip, pipe teaspoon size blobs of filling onto the tops of half the cookies. Keeping the smooth bottoms of the cookies facing up, flip the remaining cookies on top of the filling and lightly press to form sandwiches.
CHOCOLATE DIPPED VANILLA CREAMS
I found this on the Wilton website.
Provided by Donna Roth
Categories Chocolate
Number Of Ingredients 5
Steps:
- 1. Chop Candy Melts (you can use a food processor). Heat whipping cream in saucepan just to boiling point. Do not boil. Remove from heat and add chopped Candy Melts, stir until smooth and glossy.
- 2. For Truffles: Add 1 tablespoon liqueur for flavor, at this point, if desired. Stir until smooth and creamy. Refrigerate until firm, roll into 1 in. diameter balls. Can be used as center for dipping, served plain or rolled in nuts, coconut or cocoa powder. Store truffles in refrigerator up to 3 weeks.
Tips:
- To ensure your chocolate coating is smooth and shiny, make sure the chocolate is completely melted and tempered before dipping your vanilla creams. You can melt the chocolate in a microwave or over a double boiler.
- For a richer chocolate flavor, use dark chocolate or semisweet chocolate instead of milk chocolate.
- If you don't have vanilla extract, you can use another flavor extract, such as almond extract, peppermint extract, or orange extract.
- To make your vanilla creams even more decadent, try filling them with a chocolate ganache or a fruit curd before dipping them in chocolate.
- You can decorate your chocolate-dipped vanilla creams with a variety of toppings, such as sprinkles, chopped nuts, or grated chocolate.
Conclusion:
Chocolate-dipped vanilla creams are a delicious and easy-to-make treat that is perfect for any occasion. With just a few simple ingredients, you can create a batch of these creamy and decadent treats that are sure to please everyone. So next time you're looking for a sweet snack, give chocolate-dipped vanilla creams a try. You won't be disappointed!
Are you curently on diet or you just want to control your food's nutritions, ingredients? We will help you find recipes by cooking method, nutrition, ingredients...
Check it out »
You'll also love