Best 4 Chocolate Cornucopia Recipes


Indulge in a delectable journey through the world of chocolate cornucopias, a feast for both the eyes and the taste buds. These edible works of art, inspired by the traditional symbol of abundance, are crafted from delicate chocolate shells and filled with an array of sweet and savory delights. From classic chocolate fillings to innovative combinations like salted caramel and raspberry coulis, these cornucopias offer a symphony of flavors that will tantalize your senses. Whether you're seeking a centerpiece for a special occasion or a delightful treat to share with loved ones, embark on this culinary adventure and discover the endless possibilities of chocolate cornucopias. Unleash your creativity and explore the diverse recipes featured in this article, ranging from easy-to-make treats perfect for beginners to elaborate masterpieces that will impress even the most discerning palates.
Here are our top 4 tried and tested recipes!
EASY SUGAR CONE CORNUCOPIAS
Sugar cones shaped like cornucopias make for a festive treat! I like to dip them in white chocolate and candied ginger, but you could dip them in sprinkles, candies, nuts, you name it! And you can fill them with any kind of fruit (fresh or dried), berries, candies, nuts--the possibilities are endless!
Provided by Kim
Categories Desserts Chocolate Dessert Recipes White Chocolate
Time 1h30m
Yield 6
Number Of Ingredients 6
Steps:
- Wrap 1 sugar cone in a paper towel and place in microwave. Microwave on high for 15 seconds, or until the sugar cone is soft and pliable. Working quickly and carefully, shape the end of the cone upwards into a cornucopia shape and hold it there until the cone re-hardens, about 20 to 30 seconds. Repeat this process with each cone.
- Place white chocolate into a microwave safe bowl. Microwave for 30 seconds, or until chocolate is melted, stirring often. Place the candied ginger in a small wide bowl. Take one of the shaped cones and dip the top of the cone into the melted chocolate, and then into the candied ginger. Set cones on a wire rack to allow the chocolate to set.
- Fill each cone with grapes. Place the cones on a serving platter and sprinkle any extra grapes around the cones.
Nutrition Facts : Calories 133 calories, Carbohydrate 25.4 g, Cholesterol 1.6 mg, Fat 3.3 g, Fiber 0.7 g, Protein 1.7 g, SaturatedFat 1.7 g, Sodium 43.2 mg, Sugar 17.1 g
BAKED CORNUCOPIA
After admiring a crafty cornucopia at a local store, Jacquelyn decided to cook up her own...one with a slightly different flavor. Instead of creating it from fabric or weaving one with reeds, this handcrafter turned to her kitchen for supplies-in the form of frozen bread dough and a disposable pizza pan she had handy-and wound up making a "knead" new horn of plenty for her family's harvest celebrations. "I often use mine to serve food such as rolls, vegetables or chunks of cheese and sausage when we have get-togethers," Jacquelyn describes. "It looks equally festive stuffed with non-edibles like gourds, greens and nuts." Ready to roll out your cornucopia? Good! Just follow Jacquelyn's easy instructions here to season your table with harvest time crafting fun.
Provided by Taste of Home
Time 1h30m
Yield 1 Cornucopia.
Number Of Ingredients 8
Steps:
Nutrition Facts :
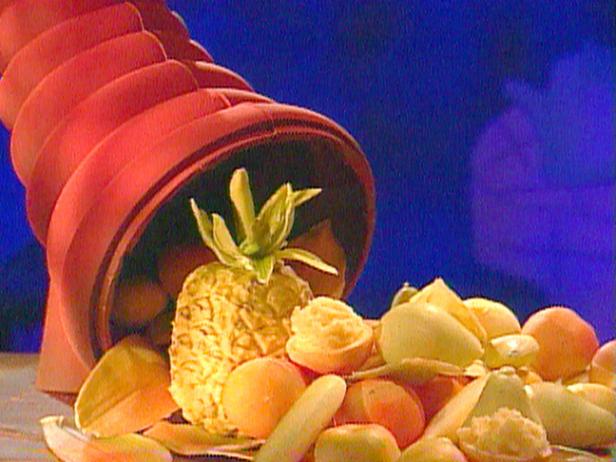
CHOCOLATE CORNUCOPIA
Steps:
- Make the chocolate fruits: Use a ladle to fill a fruit mold with white chocolate. When it is full, empty it into the bowl of chocolate. The inside of the mold should be evenly coated with chocolate. Wipe the edge of the mold clean on the side of the bowl and place it upside down on a wire rack placed over a baking sheet. Once the chocolate starts to harden, about 5 minutes, scrape the edge clean with a paring knife. Repeat to make as many fruits as you will need for your centerpiece. For my centerpiece, I used lemons, pears, oranges, bananas, pineapples and apples. When the chocolate has set, remove the fruits from the molds.
- Make the leaves: Use a pastry brush dipped in white chocolate to coat one side of the plastic leaf. Allow the chocolate to set and then peel off the plastic leaf. Repeat to make as many leaves as you would like. Use the same technique to make smaller leaves for the pineapple stem.
- Assemble the pineapple stem. I used a plastic dome mold to give my pineapple stem its final shape. You could also use a small glass bowl. Place a small dollop of white chocolate in the bottom of the mold. Add leaves resting the ends in the chocolate and the tops along the side of the bowl. Add another layer. Continue this process to make as big of a stem as you like. When the chocolate has set, pop the stem out of the mold.
- Paint the fruit and the leaves: If you use an airbrush, simply place a few drops of color in the receptacle of the airbrush and decorate as you are inspired. Use an airbrush to paint the pineapple stem and the leaves green. Use tempered chocolate to adhere the stem to the top of the pineapple. Paint each of the fruit, as you are inspired to do so.
- Make a base: Place metal rulers on a parchment paper lined surface so they form an open space that measures about 24½ by 16 inches. If you don¿t have metal rulers, you could also use modeling clay or wood rulers. Place a very large cake ring or a round of aluminum flashing that is 13½ inches in diameter inside the space. Pour tempered dark chocolate inside the ring and open space to form a 1/2-inch-thick layer. When the chocolate has set, remove the ring and the rulers and peel off the parchment paper. The ring is inside but separate from the rest of the base so you can move the finished cornucopia to any position.
- Make the base supports: Place metal rulers on a parchment paper lined surface so they form an open square that measures about 8 inches. Pour tempered chocolate inside the space to form a 1/2-inch-thick layer. When the chocolate begins to set but is not yet hard, use a knife to cut a line that resembles 3 half circles end to end. The curves in this piece match the curves in the mold of the cornucopia. When we are ready to set the cornucopia in place, it will rest on these triangles. When the chocolate has set, remove the rulers and peel off the parchment paper.
- Make the chocolate cornucopia: The mold I used was about 12 inches wide and 30 inches long. Use a ladle to pour some chocolate into 1 half of the mold. Use a pastry brush to distribute the chocolate over the entire mold. You may want to repeat this step so the finished piece is about 3/8-inch thick. Repeat with the other half of the mold. Clip the 2 halves of the mold together. Place the mold inside a box and pour chocolate inside of it. Rotate the mold so the chocolate evenly coats the inside. Pour the excess chocolate back into the mold and place the mold upside down on a wire rack placed over a baking sheet. When the chocolate is set, remove the mold.
- Stand the cornucopia on its open end. Use tempered chocolate to adhere the triangular base pieces to the cornucopia. Position them so they will support the cornucopia when it is standing in its final position.
- Prepare the paint sprayer: Place equal amounts of dark chocolate and cocoa butter over a double boiler and melt until smooth with no lumps. Place the cornucopia in the freezer for about 20 minutes. The surface of the chocolate must be chilled so the chocolate coating will harden upon contact, giving it the desired texture.
- Remove the cornucopia from the freezer and place on a flat surface. Place the chocolate mixture in a clean paint sprayer and use it to spray the dessert with the chocolate. Tip: Cleanup will be easier if you use a cardboard box as a backdrop to the mold when you spray it. Spray the chocolate with the sprayer to give it a chocolate velvet texture.
- Fill the fruits: Use a piping bag or offset spatula or spoon to fill each fruit mold with the appropriate sorbet flavor. Fill completely and place into the molded chocolate fruit back in the freezer until ready to use. You can also use tempered chocolate to close some of the fruit molds Tip: This process can be done 1 to 2 days in advance.
- Assembly: Tip: Anything that touches the cornucopia after it has been sprayed will leave a mark. If you have to move it, place your hand well inside the mold and move it by touching only the inside. Transfer the sprayed cornucopia onto the circle of the base. You can touch the base to rotate the presentation into any position.
- Arrange the frozen chocolate fruits and leaves within the cornucopia.
- SOURCES
- Cornucopia mold: Tomric Plastics
- Fruit molds: Tomric Plastics
- Plastic fruit: Industrial Plastics
- Plastic leaves: floral supply store
- R
FRIENDSGIVING CORNUCOPIA BOARD
Friendsgiving is a fun tradition worthy of indulging in--aim for a freewheeling potluck atmosphere so you can go deep on appetizers, finger foods and dips artfully arranged across a table. A festive charcuterie board takes the guesswork out of pairing by letting everyone choose their own adventure--whether that's roasted sweet potato rounds topped with turkey and a dollop of cranberry for the perfect holiday bite, or a classic pairing of sharp Cheddar and fresh apple.
Provided by Food Network
Time 50m
Yield 8 servings
Number Of Ingredients 15
Steps:
- For the roasted sweet potato rounds: Preheat the oven to 425 degrees F.
- Put the sweet potato rounds on a baking sheet and generously drizzle with olive oil on both sides. Season with a generous pinch of salt and pepper. Roast, flipping halfway through, until tender and browned on both sides, 20 to 25 minutes. Place the sweet potatoes on a rack to cool.
- For the friendsgiving board: In a small serving bowl, combine the apricot jam and Dijon mustard. Add some plain Dijon mustard to a second small bowl for serving.
- Place a cornucopia basket on the corner of a large rectangular cutting board. Put the baguette slices, Cheddar, turkey, Camembert, salami, blue cheese and crackers in and around the cornucopia, allowing them to elegantly drape over the edge onto the board. On one corner of the board, lay the apple slices, sweet potato rounds and plain Dijon mustard with a spreading knife. On the opposite corner of the board, dollop the cranberry sauce. Arrange the walnuts next to the bowl of mustard-infused apricot jam, along with a knife for spreading. Place mini pumpkins and gourds in the empty spaces of the board to fill it with fun and festive flare.
Tips:
- Before you begin, preheat your oven to 350°F (175°C).
- Use high-quality chocolate chips for the best flavor. Semi-sweet or bittersweet chocolate chips are good options.
- If you don't have a piping bag, you can use a resealable plastic bag with the corner snipped off.
- Be careful not to overfill the cornucopias, or they may burst in the oven.
- Bake the cornucopias for 10-12 minutes, or until they are set and the chocolate chips are melted.
- Let the cornucopias cool for a few minutes before filling them with your favorite treats.
Conclusion:
Chocolate cornucopias are a delicious and festive treat that are perfect for any occasion. They are easy to make and can be filled with a variety of different treats, making them a versatile dessert or snack. Serve them at your next party or gathering to impress your guests with this unique and flavorful treat!
Are you curently on diet or you just want to control your food's nutritions, ingredients? We will help you find recipes by cooking method, nutrition, ingredients...
Check it out »
You'll also love