Best 2 Chocolate Bunny Butt Cake Recipes


Indulge in the ultimate Easter delight with our irresistible Chocolate Bunny Butt Cake, a feast for the eyes and the taste buds. This playful cake is meticulously crafted to resemble a mischievous bunny's fluffy derriere, complete with a charming pink cottontail and a generous helping of chocolate chips peeking out from its irresistible cracks.
Prepare to embark on a culinary adventure with our comprehensive guide, featuring two tantalizing recipes. The Classic Chocolate Bunny Butt Cake recipe promises an irresistible treat with its moist chocolate cake base, rich chocolate ganache, and fluffy vanilla buttercream. For those seeking a gluten-free option, our Gluten-Free Chocolate Bunny Butt Cake recipe delivers the same delightful experience, ensuring everyone can join in on the festivities.
Get ready to hop into the kitchen and create this adorable cake that is perfect for Easter celebrations, birthday parties, or simply as a fun and delicious dessert. With its captivating appearance and delectable taste, the Chocolate Bunny Butt Cake is guaranteed to bring joy and laughter to all who encounter it.
CHOCOLATE COCONUT BUNNY BUTT CAKE RECIPE BY TASTY
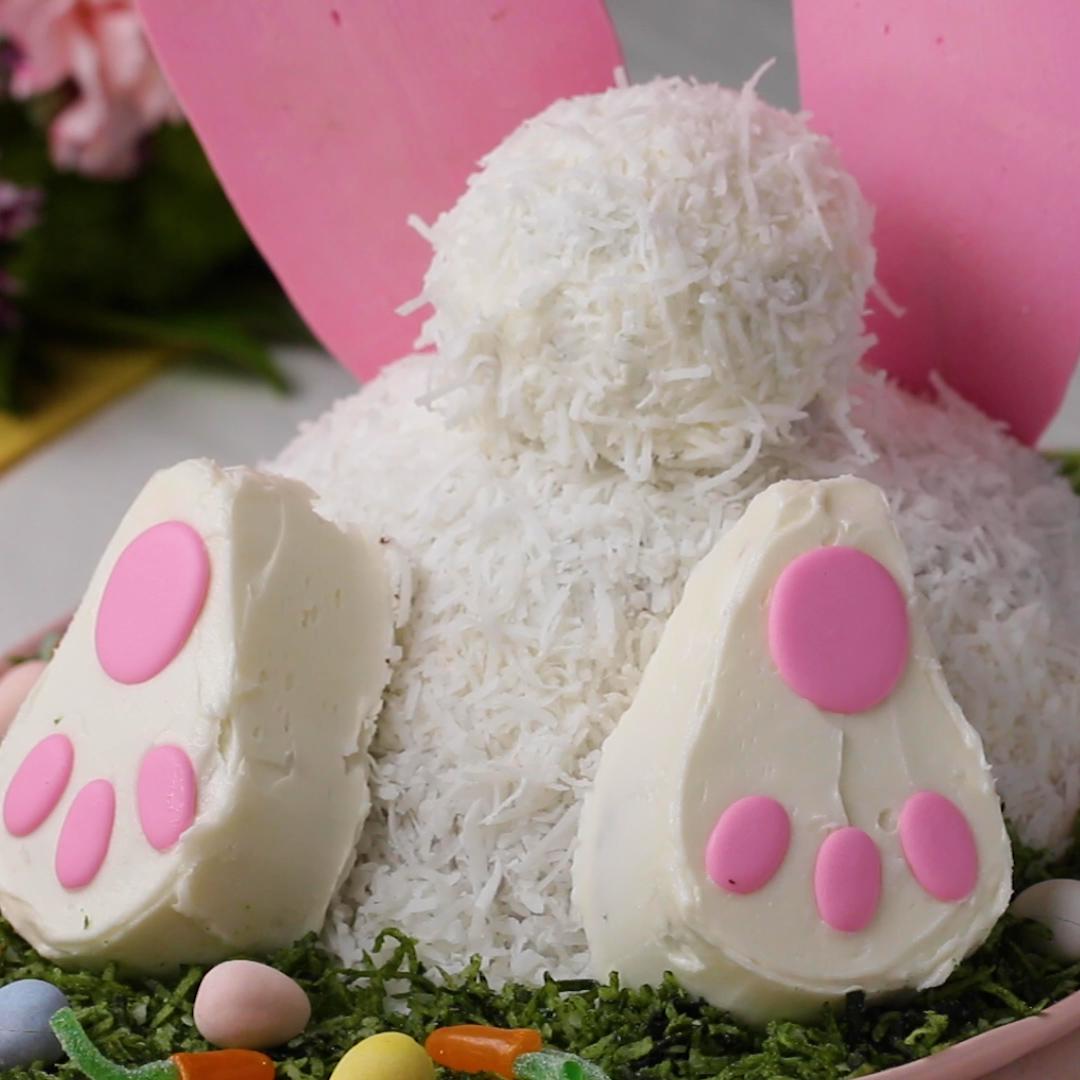
Add this adorable cake to your Easter dessert table. Everything about this cake is edible-minus the toothpicks. Cover chocolate cake in homemade vanilla buttercream and shredded coconut, form the paws using cupcakes and marshmallows, and create pawprints and ears with candy melts. Plus, check out our fun hack for making cute edible carrots.
Provided by Betsy Carter
Categories Desserts
Time 1h30m
Yield 10 servings
Number Of Ingredients 19
Steps:
- Make the chocolate cake and paws: Preheat the oven 325°F (170°C). Grease a 7-inch hemisphere-shaped cake pan or 9-inch deep oven-safe bowl and 5 cups of a 12-cup muffin tin with nonstick spray.
- Pour the chocolate cake batter into the prepared muffin tins, filling each about ¾ of the way. Bake for 12-15 minutes, until the cupcakes spring back when gently pressed.
- Fill the prepared cake pan with the remaining batter and set in a flat-bottomed cake pan to stabilize in the oven. Bake for 55-70 minutes, or until a toothpick inserted in the center comes out clean.
- Remove the cupcakes and cake from the oven and let cool at room temperature for 20-30 minutes, then transfer to the refrigerator to cool completely, at least 1 hour.
- Make the buttercream: In a large bowl, combine the butter, salt and powdered sugar. Cream with an electric hand mixer on medium speed for 5-7 minutes, until no powdered sugar remains at the bottom of the bowl. Scrape down the sides of the bowl. Beat in the vanilla. Add the milk and continue beating until the buttercream is light and fluffy, another 5 minutes.
- Make the bunny ears and paw prints: In a small, microwave-safe bowl, combine the pink and white candy melts. Microwave in 30-second intervals until melted and smooth. Transfer to a piping bag and cut a small hole at the tip.
- Line 2 small baking sheets with parchment paper.
- Place the skewers vertically at one short end of a prepared baking sheet. Starting at the tops, pipe the melted pink candy over the skewers in the shape of bunny ears, leaving 4-5 inches uncovered at the bottom to stick into the cake. Let sit until dry, about 5 minutes.
- On the remaining prepared baking sheet, use the candy melts to pipe 4 large circles, about 1 inch in diameter, and 8 small ovals, about ½ inch wide, for the paw prints. Let sit until dry, about 5 minutes. You will not need all of these for assembly, but make extra incase of breaking or improper sizing.
- Make the grass: In a medium bowl, mix together 1½ cups shredded coconut and the green food coloring until the color is evenly distributed.
- Make the carrots: Using kitchen shears, cut off the flat ends of the orange candies.
- Cut the green sour ropes crosswise into ½-inch pieces. Place 2-3 of the green ropes pieces onto the sticky, exposed sides of the orange candies for the carrot tops.
- Make the bunny tail: Add 3 cupcakes to a medium bowl and crumble finely with your hands. Mix in 1 tablespoon of the buttercream until evenly distributed, then shape the cake mixture into a ball. Transfer to the refrigerator for 1-2 hours to set.
- After chilling, coat the cake ball in buttercream, then cover with 3 tablespoons of the white shredded coconut. Return to the fridge while you assemble the rest of the cake.
- Make the feet: Place the remaining 2 cupcakes on a cutting board, with the bottoms facing up. Dab a bit of buttercream on the side of each cupcake and place a marshmallow on top of the buttercream.
- Cover the cupcakes and marshmallows with a thin coat of buttercream and place in the refrigerator for 30 minutes to set.
- Remove the feet from the refrigerator and cover with a thicker coat of buttercream, rounding the edges to blend the shape together. They should be narrower at the top and rounder at the bottom. Arrange the pink candy paw prints on the feet, with a round circle on top and the 3 smaller ovals underneath. Return to the refrigerator to set for another 20-30 minutes
- Assemble the cake: Dollop 1 tablespoon of buttercream on the center of a cake platter. Place the round cake on the center of the platter with the domed side facing up, using the buttercream to keep the cake in place.
- Spread a thin layer of buttercream all around the cake and cover with the remaining 1 ½ cups white shredded coconut.
- Place 6 toothpicks in 2 triangle shapes on one side of the cake. Remove the feet from the refrigerator and place them into the toothpicks.
- Place 4 toothpicks above the feet, then attach the tail to the toothpicks.
- Spread the coconut grass around the body, then arrange the easter eggs and carrots in the grass.
- Stick the ears in the front side of the bunny at about a 45° angle, so that they are slightly resting on the cake for support. If the skewers are too long, cut down so the ears cant rest against the cake.
- Slice and serve.
- Enjoy!
CHOCOLATE BUNNY BUTT CAKE

Is this funny bunny digging in the dirt and raiding the garden of carrots? Hop to it and make this all chocolate bunny butt cake recipe before he gets away! Learn to make this recipe with our how-to.
Provided by Betty Crocker Kitchens
Categories Dessert
Time 3h40m
Yield 15
Number Of Ingredients 12
Steps:
- Heat oven to 325°F. Grease 1 1/2-quart ovenproof bowl (8 inches across top) with shortening; coat with flour (do not use cooking spray). Lightly grease 3 muffin cups in regular-size muffin pan.
- Make cake batter as directed on box. Pour cake batter in 3 muffin cups, filling two-thirds full. Pour remaining batter into 1 1/2-quart bowl.
- Bake cupcakes 17 to 21 minutes, bowl 47 to 53 minutes or until toothpick inserted in center comes out clean. Cool 10 minutes. Remove cakes from muffin cups and bowl; place rounded sides up on cooling racks. Cool completely, about 1 hour. If necessary, cut off rounded tops of cakes.
- Spoon all but 2 tablespoons of the frosting into large bowl. Add red food color to the bowl to make desired pink color. Place bowl cake on tray cut side down; spread 1/3 cup frosting over cake. Use frosting to adhere cupcakes to bowl cake for feet and bunny tail. Use toothpicks if necessary. Place marshmallow halves, cut sides down, on tops of 2 cupcakes to make heels of feet. Spread thin layer of frosting over side and top of cake to seal in crumbs. Freeze cake 30 to 45 minutes to set frosting.
- Spread remaining frosting over cake, using reserved 2 tablespoons white frosting to frost the bunny tail. Sprinkle with coconut; press gently to adhere. Surround bunny with crushed chocolate cookies. Use rolling pin to press strawberry candies into 2 large rectangles. Cut 2 large ovals and 6 small circles out of candy. Press onto bottoms of bunny feet, using frosting if needed.
- Roll up fruit snack to make carrot shapes. Cut green sour candies in half crosswise; press into large end of each carrot to make greens on carrot. Cut ears from construction paper; wrap ends that will be inserted into cake with plastic food wrap. Insert into cake. Remove ears, plastic wrap and toothpicks before serving. Store loosely covered.
Nutrition Facts : Calories 470, Carbohydrate 67 g, Cholesterol 40 mg, Fat 4, Fiber 1 g, Protein 4 g, SaturatedFat 8 g, ServingSize 1 Serving, Sodium 460 mg, Sugar 43 g, TransFat 2 g
Tips:
- Prepare your ingredients and tools in advance: Before you start baking, make sure you have all the necessary ingredients and tools ready. This will help you stay organized and avoid any interruptions during the baking process.
- Follow the recipe carefully: Baking is a precise science, so it's important to follow the recipe carefully. Don't skip any steps or substitute ingredients unless you know what you're doing.
- Be patient: Baking takes time, so don't rush the process. Let your cakes and cookies cool completely before you decorate them. This will help them hold their shape and flavor.
- Have fun! Baking is a great way to relax and de-stress. So put on some music, pour yourself a glass of wine, and enjoy the process.
Conclusion:
Chocolate bunny butt cake is a fun and festive dessert that is perfect for any occasion. With its moist chocolate cake, creamy frosting, and adorable bunny butt design, it's sure to be a hit with everyone who tries it. If you're looking for a unique and delicious dessert to make, give this recipe a try. You won't be disappointed!
Are you curently on diet or you just want to control your food's nutritions, ingredients? We will help you find recipes by cooking method, nutrition, ingredients...
Check it out »
You'll also love