Indulge in a delightful baking adventure with our tantalizing checkerboard cookies! These visually striking treats are a perfect blend of flavors and textures, sure to impress your taste buds and captivate your eyes. With a crisp and buttery exterior that crumbles perfectly in your mouth, these cookies reveal a mesmerizing checkerboard pattern upon each bite, thanks to the intricate layering of light and dark cookie dough. The secret lies in the skillful combination of vanilla and chocolate dough, which, when swirled together, create a stunning visual masterpiece. Our article presents two delectable variations: the classic checkerboard cookie and a tempting gluten-free version, catering to various dietary preferences. Get ready to embark on a culinary journey that will leave you craving more!
Check out the recipes below so you can choose the best recipe for yourself!
CHECKERBOARD COOKIES

Though they look complicated, these tender cookies are easy to make if you use a ruler. To ensure an even design, measure the strips of dough carefully.
Provided by Martha Stewart
Categories Food & Cooking Dessert & Treats Recipes Cookie Recipes
Yield Makes about 4 dozen
Number Of Ingredients 8
Steps:
- In the bowl of an electric mixer fitted with the paddle attachment, cream butter and sugar until well blended, 1 to 2 minutes. Add vanilla extract, lemon extract, and salt. With mixer on low speed, gradually add flour, scraping down sides of bowl.
- Turn dough out onto a clean work surface; it will be loose and crumbly. Knead dough by pushing small amounts away from you with the heel of your hand for 1 to 2 minutes. Divide dough in half. Sprinkle cocoa powder over one of the halves. Knead until cocoa has been fully incorporated.
- Place each half of the kneaded dough between 2 sheets of plastic. Using a rolling pin, shape dough into two 7-inch squares, about 3/8 inch thick. Using a sharp knife and a ruler, slice each square into nine 3/4-inch-wide strips.
- Whisk together the egg and 1 tablespoon water. Cover work surface with plastic wrap. Place 3 strips of dough on plastic, alternating white and chocolate strips. Brush tops and in between the strips with egg wash. Gently press strips together. Repeat, forming second and third layers, alternating colors to create a checkerboard effect. Wrap assembled log in plastic. Repeat process for second log, reversing color pattern. Refrigerate 30 minutes, or freeze 15 minutes.
- Preheat oven to 350 degrees. Line a baking sheet with a Silpat baking mat or parchment paper. Slice each log into 1/4-inch-thick slices; place on baking sheet. Bake until done, 10 to 12 minutes. Remove baking sheet from oven, and let cookies cool 2 minutes. Transfer cookies to a wire rack to cool completely.
CHECKERBOARD COOKIES
Provided by Food Network
Categories dessert
Time 1h30m
Yield Approximately 4 dozen cookies
Number Of Ingredients 6
Steps:
- Cream butter and sugar. Add vanilla. Add flour and salt and blend well. Divide dough in half. Add cocoa to 1/2 of dough. Let rest. Roll 1/4 inch cylinders of chocolate and plain vanilla dough about 12 inches long. Arrange in checkerboard by alternating 6 cylinders of chocolate and vanilla dough, contrasting each time to six layers total. Press tightly. Wrap in plastic wrap and chill at least 1/2 hour.
- Preheat oven to 350 degrees. With a sharp knife, slice the dough into rounds about 1/3-inch thick. Place 1 inch apart on a parchment covered baking sheet. Bake for about 10 minutes or until lightly golden.
CHECKERBOARD COOKIES II
Everybody loves these chocolate and butter cookies. The checkerboard pattern creates a dazzling effect.
Provided by MARBALET
Categories Desserts Cookies Refrigerator Cookie Recipes
Yield 12
Number Of Ingredients 7
Steps:
- In a medium bowl, stir together the flour, confectioners' sugar and baking powder. Cut in the butter until the mixture has a mealy texture. Stir in the egg yolks and vanilla until dough forms. Divide dough into halves. Knead the cocoa into one half.
- Roll out each half of the dough into a rectangle, 8x10 inches. Slice each rectangle lengthwise into 8-1x10 inch strips. Place two strips of opposing colors next to each other. Place two more on top of those, placing opposing colors on top of each other. Repeat until the checkerboard is four strips high. Repeat with remaining strips. Wrap in plastic and refrigerate for at least an hour.
- Preheat oven to 350 degrees F (175 degrees C). Grease cookie sheets.
- Unwrap dough and slice into 1/4 inch slices. Place slices 1 inch apart onto the prepared cookie sheets.
- Bake for 8 to 10 minutes in the preheated oven, until firm. Remove from baking sheets to cool on wire racks.
Nutrition Facts : Calories 245.7 calories, Carbohydrate 29.7 g, Cholesterol 81.7 mg, Fat 13.1 g, Fiber 1.2 g, Protein 3.3 g, SaturatedFat 7.9 g, Sodium 125.3 mg, Sugar 12.4 g
RED AND BLACK CHECKERBOARD COOKIES
Provided by Valerie Bertinelli
Categories dessert
Time 3h15m
Yield 24 cookies
Number Of Ingredients 7
Steps:
- Beat the butter, sugar, vanilla and salt together in a large bowl with an electric mixer on high speed until light and fluffy, about 3 minutes. Add 1 1/2 cups flour and beat on low until incorporated.
- Divide the dough in half. (This recipe relies on precision, so use a scale if you have one.)
- Return half of the dough to the bowl and add about 8 drops food coloring and the remaining 2 tablespoons flour. Beat until thoroughly incorporated. Add more food coloring until the dough is a true, bright red, beating well to fully distribute the color. Wrap the dough in plastic and refrigerate until just firm, about 30 minutes.
- Put the remaining dough in the bowl and add the cocoa powder. Beat until evenly distributed. Wrap the dough in plastic and refrigerate until just firm, about 30 minutes.
- Use a ruler to draw a 7-inch square on 2 pieces of parchment. Invert one piece of parchment and put one piece of dough in the square. Cover with another, unmarked parchment and pat and roll the dough to the dimensions of the square, making sure it is an even thickness. Trim the edges of the square if necessary. Carefully transfer the dough on the parchment to the refrigerator and chill until firm.
- Meanwhile, repeat with the other piece of dough and chill.
- Take out one square of dough and use a ruler to carefully cut it into 9 3/4-inch-thick strips (there may be extra dough). Carefully return the dough to the refrigerator until firm and repeat with the other square of dough. Refrigerate until firm.
- Lay out a clean piece of parchment paper. Carefully arrange three strips of dough directly next to each other on the parchment, alternating colors (i.e. red, black, red). Top each strip with a strip of the opposite color to make a second layer. Continue to layer, again alternating colors, to make a cookie brick; it will be 3-by-6 inches. Use a ruler or the side of a bench scraper to straighten the edges of the brick. Wrap the brick in the parchment paper, gently turning and pressing against the work surface to flatten out all the sides. Refrigerate until firm, about 30 minutes.
- Position oven racks in the upper and lower thirds of the oven and preheat to 350 degrees F. Line 2 baking sheets with parchment.
- Slice the brick crosswise into 1/4-inch-thick cookies, arranging them about 1/2 inch apart on the prepared baking sheets.
- Bake the cookies, switching the positions of the baking sheets halfway through, until slightly puffed and just set, 12 to 13 minutes.
- Cool on the pans 5 minutes, then transfer to a rack to cool completely.
CHOCOLATE ORANGE CHECKERBOARD COOKIES
I use these for gifts during the holidays because I like the elegant flavor combination of chocolate and orange. The shortbread texture melts in your mouth, and the walnuts add a nice crunch.-Sandy Paige, Ramstein Air Base, Germany
Provided by Taste of Home
Categories Desserts
Time 40m
Yield about 3-1/2 dozen.
Number Of Ingredients 10
Steps:
- In a large bowl, cream butter, confectioners' sugar and salt until blended. Beat in egg and vanilla. Gradually beat in flour. Stir in pecans., Divide dough in half. Mix baking cocoa into one half; mix orange zest and extract into remaining half., Shape each portion into a 5-1/2x2x2-in. block. Wrap each block in plastic; refrigerate 30 minutes. , Unwrap dough; cut each block lengthwise into quarters, making four 5-1/2x1x1-in. sticks. Switch two of the chocolate sticks with two of the orange sticks, forming two checkerboard blocks. Gently press sticks together to adhere. Rewrap in plastic; refrigerate 2 hours or until firm., Preheat oven to 350°. Unwrap and cut dough crosswise into 1/4-in. slices. Place 1 in. apart on ungreased baking sheets. Bake 9-11 minutes or until set. Remove from pans to wire racks to cool.
Nutrition Facts :
CHECKERBOARD COOKIES I
An oldie but goodie!
Provided by Rosina
Categories Desserts Cookies Refrigerator Cookie Recipes
Yield 72
Number Of Ingredients 8
Steps:
- Melt chocolate in double boiler over low heat and stir until smooth. Remove from heat.
- Mix together flour, baking powder and salt and set aside. In large bowl, cream butter or margarine and sugar together, beat in eggs, then vanilla extract. Gradually add dry ingredients and mix well.
- Put one half of prepared dough into another bowl and blend the melted chocolate into it. You now have one half chocolate dough and one half plain dough
- Divide each of these in half. You now have four pieces of dough, two chocolate and two vanilla. Form each of these into a squared off log 6 to 8 inches long.
- On a large sheet of foil place one chocolate log and one plain log next to each other. Brush each with water. Place remaining plain log on top of the chocolate side. Place the remaining chocolate log on top of the plain side. Wrap the four logs firmly in the foil and refrigerate at least 8 hours or overnight.
- Preheat oven to 400 degrees F (205 degrees C).
- Remove dough from foil and cut into 1/4 inch slices. Place cookies 1 inch apart on ungreased cookie sheet. Bake 8-10 minutes or lightly browned. Cool on wire racks.
Nutrition Facts : Calories 47.9 calories, Carbohydrate 6.3 g, Cholesterol 10.3 mg, Fat 2.2 g, Fiber 0.1 g, Protein 0.7 g, SaturatedFat 1.3 g, Sodium 36.9 mg, Sugar 3 g
CHECKERBOARD COOKIES
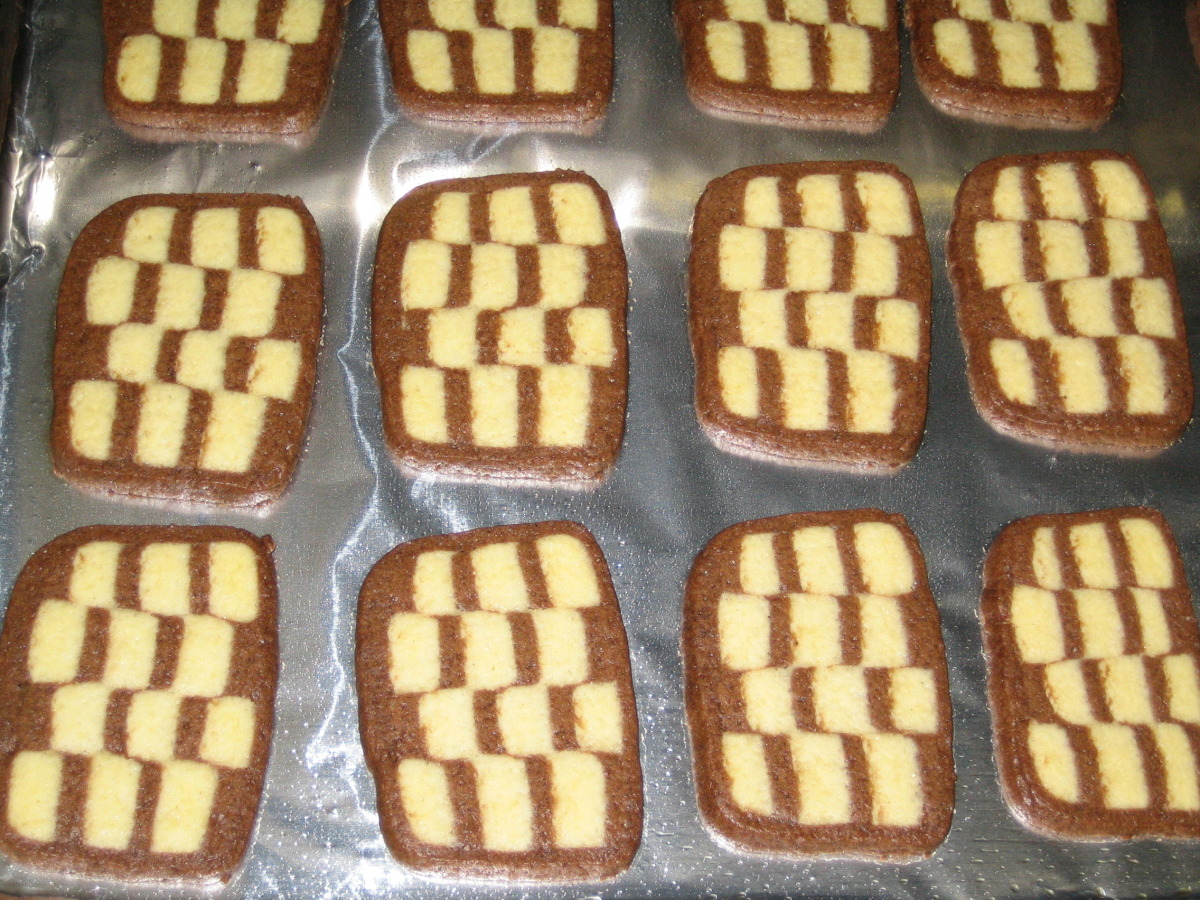
I adopted this recipe from the RecipeZaar account. I have not had a chance to make this myself. Original Chef's notes: "Although this recipe is long, it is really not difficult and produces a stunning cookie. They can be frozen, sliced and baked when needed."
Provided by Saturn
Categories Dessert
Time 1h37m
Yield 36 cookies
Number Of Ingredients 9
Steps:
- Preheat oven to 350° F (177° C) and place rack in center of oven.
- Bake hazelnuts for 15 minutes or until skins start to blister. Remove from oven and wrap in a clean towel so the nuts can steam for 5 minutes. Rub the towel briskly in a back and forth motion to remove the skins from the hazelnuts. Set aside to cool.
- When cool, place the hazelnuts in a food processor along with the cocoa powder and process until the hazelnuts are finely ground. Set aside.
- In a small bowl whisk together the flour and salt. Set aside.
- In bowl of electric mixer, beat the butter and sugar until light and fluffy (about 2 to 3 minutes). Add the egg, vanilla extract and orange zest and beat until well blended. Add the flour mixture and beat just until incorporated.
- Divide the dough in half and place one half of the dough back into the bowl of electric mixer. Add the cocoa and hazelnut mixture to the dough and beat until incorporated. Set aside.
- Lay out two large sheets of parchment paper (about 10 x 12 inch) (25 x 30 cm) and on one sheet of parchment roll out the white dough into a 6 1/2 inch by 10 1/2 inch (22.5 x 26.25 cm) rectangle, making sure both sides of the dough are smooth.
- Wrap dough and place on a baking sheet in the freezer for about 15 minutes or until dough is firm.
- Meanwhile, take the chocolate dough and remove 1/2 cup (used later for wrapping the checkerboard log) and cover with plastic wrap. Set aside.
- On the second sheet of parchment roll out the chocolate dough into a 6 1/2 inch by 10 1/2 inch (22.5 x 26.25 cm) rectangle, making sure both sides of the dough are smooth.
- Wrap dough and place on a baking sheet in the freezer for about 15 minutes or until dough is firm.
- When both the white and chocolate doughs are firm, remove from freezer and lay the white dough on a cutting board, removing the parchment paper.
- Lightly brush the top of the dough with a little water or lightly beaten egg white (this helps the layers to stick together).
- Remove the parchment paper from the chocolate dough and place it evenly on top of the white dough.
- Trim the edges of the two doughs so the rectangle now measures 6 inches by 10 inches (21.25 x 25 cm).
- (Take the chocolate dough trimmings and add to the 1/2 cup of reserved chocolate dough.) Lengthwise cut the rectangle into thirds (3- 2 inch by 10 inch stripes) (5 x 25 cm).
- Place one strip on a piece of plastic wrap.
- Brush the top of the dough with water and place the second strip on top of the first (alternate colors so you have white, black, white, black).
- Brush the top of the second layer with water and stack the third layer.
- Press down lightly on the top of the dough and then wrap and freeze for 15 minutes, or until firm.
- When firm, remove from freezer and unwrap, placing the dough on a cutting board.
- Using a sharp long knife, cut the layers lengthwise into 1/4 inch (0.6 cm) wide and 10 inch (25 cm) long strips (You will end up with 8 strips).
- Stack the layers, turning every other strip so top faces down and bottom faces up, to produce the checkerboard effect.
- Re-wrap stack and place in freezer again to firm up.
- Meanwhile, take the reserved chocolate trimmings and 1/2 cup of chocolate dough and roll out on a piece of parchment paper into approximately 9 1/2 x 10 1/2 inch (24 x 26.25 cm) rectangle, making sure the dough is smooth - Cover and refrigerate until slightly firm.
- Remove stack of checkerboard dough from freezer and place in center of chocolate dough.
- Wrap the chocolate dough around the checkerboard layers until you have a smooth surface that encloses the checkerboard design. Wrap in plastic and freeze until firm.
- Can freeze dough for up to 2 weeks.
- Preheat oven to 350° F (177° C) and place rack in center of oven.
- Line a baking sheet with parchment paper.
- Remove dough from freezer and place on a cutting board.
- With a sharp knife cut the block of dough into 1/8 to 1/4 inch (0.5 cm) thick slices.
- Place on prepared baking sheet about 1 inch (2.54 cm) apart.
- Bake for about 5-7 minutes or until cookies just start to brown around the edges.
- Remove from oven and place on wire rack to cool.
- Baked cookies can be stored in an airtight container up to one week.
CHECKERBOARD COOKIES
Make and share this Checkerboard Cookies recipe from Food.com.
Provided by Alia55
Categories Dessert
Time 45m
Yield 3 dozen
Number Of Ingredients 9
Steps:
- Place toasted hazelnuts in your food processor along with the cocoa powder and process until the hazelnuts are finely ground. Set aside.
- Preheat oven to 350 degrees F
- In a small bowl whisk together the flour and salt. Set aside.
- With a hand mixer, beat the butter and sugar until light and fluffy. Add the egg, vanilla extract and orange zest and beat until well blended. Add the flour mixture and beat just until incorporated.
- Divide the dough in half and place one half of the dough back into the bowl of your electric mixer.
- Divide the dough in half and place one half of the dough back into the bowl and add the cocoa and hazelnut mixture to the dough and beat until incorporated. Set aside.
- Lay out two large sheets of parchment paper (about 10 x 12 inch) and on one sheet of parchment roll out the white dough into a 6 1/2 inch by 10 1/2 inch rectangle, making sure both sides of the dough are smooth. Wrap dough and place on a baking sheet in the freezer for about 15 minutes or until dough is firm.
- Meanwhile, take the chocolate dough and remove 1/2 cup and cover with plastic wrap. Set aside.
- On the second sheet of parchment roll out the remaining chocolate dough into a 6 1/2 inch by 10 1/2 inch rectangle, making sure both sides of the dough are smooth. Wrap dough and place on a baking sheet in the freezer for about 15 minutes or until dough is firm.
- When both the white and chocolate dough are firm, remove from freezer and lay the white dough on a cutting board, removing the parchment paper.
- Lightly brush the top of the white dough with a little water
- Remove the parchment paper from the chocolate dough and place it evenly on top of the white dough.
- Trim the edges of the two dough's so the rectangle now measures 6 inches by 10 inches.
- Take the chocolate dough trimmings and add to the 1/2 cup of reserved chocolate dough.
- Lengthwise cut the rectangle into thirds (3 - 2 inch by 10 inch stripes)
- Place one strip on a piece of plastic wrap. Brush the top of the dough with water and place the second strip on top of the first (alternate colors so you have white, black, white, black pattern). Brush the top of the second layer with water and stack the third layer. Press down lightly on the top of the dough and then wrap and freeze for 15 minutes, or until firm.
- When firm, remove from freezer and unwrap, placing the dough on a cutting board. Using a sharp long knife, cut the layers lengthwise into 1/2 inch wide and 10 inch long strips. (You will end up with 4 strips).
- Stack the layers, turning every other strip so top faces down and bottom faces up, to produce the checkerboard effect. Rewrap stack and place in freezer again to firm up.
- Meanwhile, take the reserved chocolate trimmings and 1/2 cup of chocolate dough and roll out on a piece of parchment paper into approximately 9 1/2 x 10 1/2 inch rectangle, making sure the dough is smooth. Cover and refrigerate until slightly firm.
- Remove stack of checkerboard dough from freezer and place in center of chocolate dough.
- Wrap the chocolate dough around the checkerboard layers until you have a smooth surface that encloses the checkerboard design.
- Wrap in plastic and freeze until firm.
- Preheat oven to 350 degrees F
- Line a baking sheet with parchment paper.
- Remove dough from freezer and place on a cutting board.
- With a sharp knife cut the block of dough into 1/4 inch thick slices.
- Place on prepared baking sheet spacing about 1 inch apart.
- Bake for about 5-7 minutes or until cookies just start to brown around the edges.
- Remove from oven and place on wire rack to cool.
Tips:
- Use high-quality butter for the best flavor and texture.
- Make sure the butter is cold before creaming it with the sugar. This will help the cookies hold their shape.
- Don't overmix the dough. Overmixing will make the cookies tough.
- Chill the dough for at least 30 minutes before rolling it out. This will help the cookies hold their shape even more.
- Use a sharp knife to cut the dough into even strips. This will help the cookies look neat and professional.
- Bake the cookies at a moderate temperature. This will help the cookies bake evenly without burning.
- Let the cookies cool completely before frosting them. This will help the frosting set properly.
Conclusion:
Checkerboard cookies are a delicious and festive treat that is perfect for any occasion. They are relatively easy to make, but they do require a little bit of time and effort. By following the tips above, you can make sure your checkerboard cookies turn out perfect every time. So, what are you waiting for? Get baking!
Are you curently on diet or you just want to control your food's nutritions, ingredients? We will help you find recipes by cooking method, nutrition, ingredients...
Check it out »
#weeknight #time-to-make #course #preparation #desserts #cookies-and-brownies #dietary #low-sodium #low-in-something #number-of-servings #4-hours-or-less
You'll also love


