Best 3 Candy Jewels Recipes


Indulge your sweet tooth with a delightful journey into the world of Candy Jewels! Embark on a culinary adventure where sugar takes center stage, transforming into shimmering gems that will tantalize your taste buds and captivate your senses. From the classic allure of Hard Candy Jewels to the vibrant burst of Lollipop Jewels, each recipe in this collection is a masterpiece of confectionery art, handcrafted with precision and passion. Let your imagination soar as you explore the boundless possibilities of candy making, creating edible jewels that will add a touch of magic to any occasion. Whether you're a seasoned candy maker or a novice explorer of the sugary arts, these recipes will guide you through the process with easy-to-follow instructions, ensuring a sweet success story. So gather your ingredients, prepare your tools, and let the enchanting world of Candy Jewels unfold before you!
Here are our top 3 tried and tested recipes!
CANDY GEMS

Any extract, such as orange or almond, can be used in place of cinnamon. Present to your Valentine in a handmade jewelry box.
Provided by Martha Stewart
Categories Food & Cooking Dessert & Treats Recipes
Yield Makes 3 dozen
Number Of Ingredients 5
Steps:
- Bring 1 cup sugar, 1/4 cup water, and 2 tablespoons corn syrup to a boil in a small saucepan over medium-high heat. Heat until syrup registers 300 degrees on a candy thermometer. Remove from heat, and stir in 1/8 teaspoon cinnamon extract and 1 or 2 drops food coloring using a rubber spatula. (Mixture will steam and bubble when liquid is added, so be careful.) Transfer mixture to a liquid measuring cup, and let the bubbles settle slightly, about 15 seconds.
- Slowly pour mixture into gem candy molds just below the top. Let cool until candies harden, about 30 minutes. Remove candies from molds. Repeat with remaining 1 cup sugar, 1/4 cup water, 2 tablespoons corn syrup, 1/8 teaspoon cinnamon extract, and 1 or 2 drops food coloring (same color as first batch).
- Let second batch cool slightly, about 3 minutes. Top with first batch of hardened candies, flat sides together, matching sizes and shapes. Let harden and cool completely before removing from molds.
JEWELED DIVINITY
Provided by Ree Drummond : Food Network
Categories dessert
Time 1h30m
Yield 24 candies
Number Of Ingredients 6
Steps:
- Butter a straight-sided 8-inch square cake pan and set aside. Line with a single sheet of parchment paper.
- Attach a candy thermometer to the side of a saucepan. Add the sugar, corn syrup and 1/4 cup water to the pan and bring to boil, stirring until the sugar has just dissolved. Continue to cook until the syrup reaches 255 to 260 degrees F on the candy thermometer.
- Meanwhile, in the bowl of an electric mixer fitted with a whisk attachment, beat the egg whites until stiff peaks form.
- When the syrup reaches temperature, slowly (and carefully) drizzle it into the egg whites with the mixer on high. Once the syrup is fully added, pour in the vanilla and continue to beat until the mixture is no longer glossy and holds its shape, 7 to 8 minutes.
- Remove the bowl from the stand mixer and, moving quickly, fold 1 cup of the gummy candies into the mixing bowl using a wooden spoon. Transfer the mix to the prepared pan and do your best to spread into an even layer--it will be very sticky. Sprinkle the remaining candies over the top, lightly pressing them in to ensure they stay.
- Allow the divinity to cool completely, about 1 hour. Cut into 1 1/2-inch squares and store in an airtight container.
ISOMALT JEWELS
Make and share this Isomalt Jewels recipe from Food.com.
Provided by ChristineMcConnell
Categories Candy
Time 3h20m
Yield 60 jewels
Number Of Ingredients 2
Steps:
- Additional Tools Needed:.
- Plastic or glass jewels you want to replicate.
- Food-safe Moldable putty.
- toothpicks.
- hot glue gun.
- HOW TO:.
- I recently came upon the wonder that is isomalt! I've been making my own candy glass for years, and while I'm glad I have that experience under my belt, isomalt is worlds easier to work with and nowhere near as finicky! It's available to order online or pick up at your local cake supply store. If you're on a budget or don't have time to pick up isomalt, please see my candy glass recipe (in the ingredient section under Hocus Pocus Cottage Cake) for a homemade substitute!
- I will say the same danger applies here as candy glass and you should use extreme caution when working with either. This liquid is EXTREMELY hot! I made the mistake of working in bare feet, and a single drop caused a really unpleasant burn! So long sleeves, thick pants, eye protection, shoes, and gloves are what I recommend! You may look like a lunatic, but who cares!?.
- Instructions:.
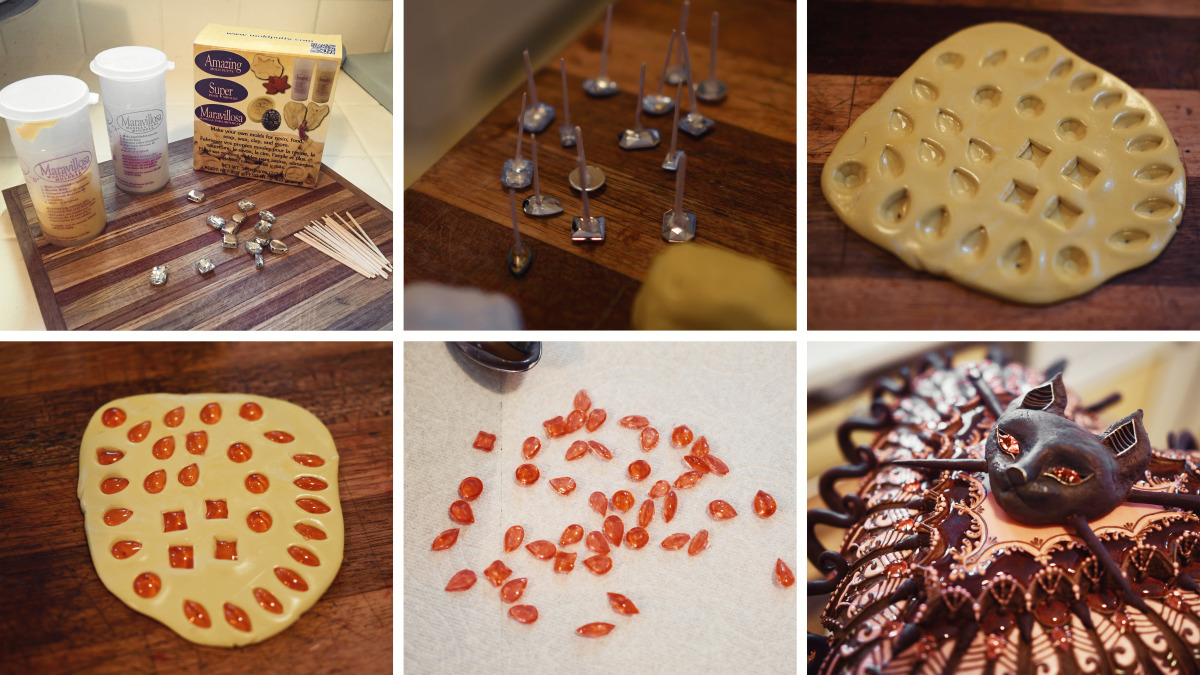
- Break toothpicks in half and using your hot glue gun adhere to the backs of your jewels to use as a handle when pressing the shapes into your mold.
- Follow molding putty directions by mixing equal parts of the two putty's and rolling out with a rolling pin. Press jewels into the putty and remove immediately to create molds. Allow to set (About 30 minutes or so).
- Put 2 cups isomalt crystals into a pot and melt at medium heat, stirring occasionally until all crystals are dissolved, and the mixture is bubbling. Remove from heat and add coloring. Wait till the mixture is clear before using.
- Once ready, using a small metal spoon or measure, pour tiny amounts into your jewel molds one at a time. Use a toothpick or needle to sharpen or perfect edges.
- Allow to cool. Remove from molds and apply directly to your cookie! I adhered mine by resting the jewels in the places I wanted and piped royal icing as brackets to fasten. Once the royal icing had dried completely, I used gold luster dust to paint the brackets gold giving them a fairly realistic jewel look.
Nutrition Facts :
Tips:
- Choose high-quality ingredients: Use real fruit juice, pure honey, and natural flavorings for the best results.
- Cook the sugar mixture to the right temperature: This is essential for achieving the desired consistency and texture of your candy jewels.
- Be patient: Making candy jewels takes time and patience. Don't rush the process, or you'll end up with a sticky mess.
- Use a candy thermometer: This is the best way to ensure that the sugar mixture reaches the correct temperature.
- Work quickly: Once the sugar mixture is ready, you need to work quickly to pour it into the molds and let it cool.
- Be creative: You can use different flavors, colors, and shapes to create your own unique candy jewels.
Conclusion:
Making candy jewels at home is a fun and rewarding experience. With a little patience and practice, you can create beautiful and delicious treats that are perfect for any occasion. So next time you're looking for a sweet treat, why not try making your own candy jewels?
Are you curently on diet or you just want to control your food's nutritions, ingredients? We will help you find recipes by cooking method, nutrition, ingredients...
Check it out »
You'll also love