**Introducing Brown Butter Mochi: A Hawaiian Delicacy with a Twist**
Mochi, a traditional Japanese rice cake, takes on a delightful new dimension with the addition of browned butter in this delectable recipe. This chewy, flavorful treat is a fusion of cultures, combining the best of both worlds. The browned butter adds a rich, nutty flavor that perfectly complements the chewy texture of the mochi. This recipe provides detailed instructions for both a classic mochi and a variation with a luscious haupia filling, a traditional Hawaiian coconut pudding. Whether you prefer the simplicity of the classic mochi or the indulgent richness of the haupia filling, this recipe has something for every palate. Additionally, it includes a vegan mochi option for those with dietary restrictions, ensuring that everyone can enjoy this unique and delicious dessert. Get ready to embark on a culinary journey that blends tradition and innovation, resulting in an unforgettable taste experience.
BUTTER MOCHI

Butter mochi is a party staple in Hawaii. Made with mochiko (Japanese sweet rice flour) and coconut milk, the dessert is beloved for its sweet, buttery taste and chewy, pleasingly dense texture. A little goes a long way, so avoid cutting the pieces too big. (You can scale down the recipe, but the measurements for the mochiko and coconut milk are really convenient for a 9-by-13-inch baking pan.) If you'd like to add another layer of coconut, sprinkling the top of the batter with shredded coconut before baking is a lovely touch (but by no means necessary).
Provided by Food Network Kitchen
Categories dessert
Time 2h30m
Yield 18 to 20 servings
Number Of Ingredients 9
Steps:
- Position an oven rack in the middle of the oven and preheat to 350 degrees F. Line the bottom and sides of a 9-by-13-inch baking pan with parchment.
- Whisk together the mochiko, sugar, baking powder and salt in a large bowl.
- Whisk together the milk, vanilla, eggs and coconut milk until smooth in a separate large bowl. (If you have trouble incorporating the coconut milk solids, you can use an electric mixer on medium speed for this step, and the following ones, if you like.) Whisk the milk mixture into the dry ingredients just until combined. Whisk in the melted butter until the batter is smooth.
- Pour the batter into the prepared baking pan and tap the pan on the counter a few times to get rid of any air bubbles. Bake until the butter mochi is set and the top is golden brown, 1 hour to 1 hour 10 minutes. Let cool completely in the pan on a wire rack, about 1 hour.
- Carefully lift the parchment paper out of the pan from both short ends and set the butter mochi on a cutting board. Cut into about twenty 2-by-3-inch rectangles and serve immediately or store in an airtight container for up to 3 days.
BUTTER MOCHI

Tender and chewy, this big-batch dessert - as comforting as cake and as fun as bar cookies - is always a hit at parties. Mochiko, sweet rice flour, not only gives it its distinctive marshmallow-like softness, but it also lends a natural sweetness. This version of butter mochi uses only coconut milk for its richness and subtle nutty taste, but you can substitute equivalent amounts of whole milk, evaporated milk or a combination of those liquids. Butter mochi develops a crackly top that stays crunchy the day it's baked, making it a delicious dessert to eat without adornment. But, if you'd like more crunch, you can sprinkle dried shredded coconut evenly over the top before baking, or, for a tangy, colorful top, you can coat it with the passion fruit glaze below.
Provided by Genevieve Ko
Categories cakes, dessert
Time 2h
Yield 1 (9-by-13-inch) cake
Number Of Ingredients 11
Steps:
- Make the mochi: Heat the oven to 350 degrees. Lightly butter a 9-by-13-inch cake pan, then line the bottom and sides with parchment paper.
- Whisk the mochiko, baking powder and salt in a medium bowl. Prepare the batter in a stand mixer or in a large bowl with an electric hand mixer or whisk: Whisk the eggs and sugar until pale yellow and thick. Continue whisking while pouring in the coconut milk, then the butter and vanilla. Continue whisking while gradually adding the mochiko mixture. Whisk until the batter is completely smooth. Pour into the prepared pan, then tap it against the counter to get rid of any air bubbles.
- Bake until golden brown and crackly, 1 hour 15 minutes to 1 1/2 hours. When you press the center, it should bounce back but not indent at all. Cool completely in the pan on a wire rack. Use the parchment paper to slide the cooled mochi out of the pan.
- The mochi is delicious plain, but you can add a glaze if you'd like: Mix the confectioners' sugar with 2 tablespoons passion fruit pulp until smooth. It should be thick but drippy. If needed, add another 1 to 2 tablespoons pulp. If you'd like to create an ombré or sunset effect, scrape some into another bowl or multiple bowls and tint with food coloring. Spread the glaze evenly over the mochi, in stripes if you'd like, and let stand until set.
- Cut the mochi into squares or bars. Serve immediately, or keep in an airtight container at room temperature for up to 3 days.
BUTTER MOCHI
Butter mochi is a mainstay at any island party: a perfectly chewy, slightly sticky, and just-dense-enough coconut-custard glutinous rice cake.
Provided by Alana Kysar
Categories Dessert Hawaii Coconut Tree Nut Free Vegetarian Soy Free Dairy Summer
Yield Makes 20 pieces
Number Of Ingredients 11
Steps:
- Preheat the oven to 350°F. Grease a 9 by 13-inch baking pan with butter or oil.
- In a bowl, whisk together the eggs, vanilla, and milk. In another larger bowl, whisk together the mochiko, sugar, baking powder, and kosher salt. Pour the wet ingredients into the dry ingredients and, with a wooden spoon stir until well combined. Add the melted butter and coconut milk and mix until fully incorporated. Pour the mixture into the prepared pan and rap the pan on the counter a couple of times to bring any air bubbles up to the surface. Evenly sprinkle the shredded coconut on top of the mixture, a handful at a time, being careful not to jiggle the pan too much, as you want the coconut to stay on the top. Then sprinkle on a few pinches of flaky salt, if desired.Bake until the mochi is set and golden brown on top, about 1 hour. Set the pan on a wire rack and let cool completely before slicing into rectangles using a plastic knife to minimize sticking; I cut four columns and five rows to make twenty 2 1⁄4 by 2 1⁄2-inchpieces. If the knife seems to be sticking, rub it with a little unsalted butter or neutral oil. Store in an airtight container at room temperature for up to 3 days.
BUTTER MOCHI
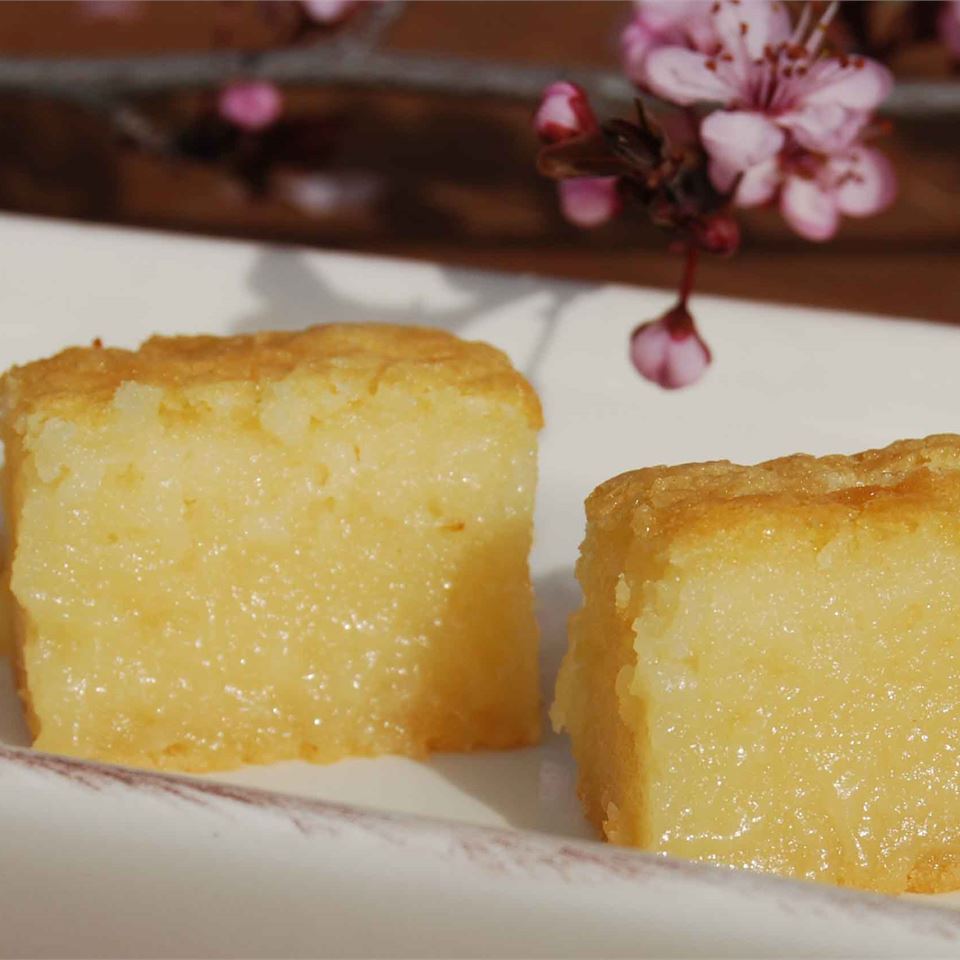
This is a great recipe for butter mochi if you like the coconut flavor without the chewy coconut bits.
Provided by Lea Kanaya Wong
Categories World Cuisine Recipes Asian Japanese
Time 3h15m
Yield 24
Number Of Ingredients 9
Steps:
- Preheat an oven to 350 degrees F (175 degrees C). Grease a 9x13 inch baking dish. Whisk the rice flour, sugar, and baking powder together in a mixing bowl.
- Beat the eggs, coconut extract, and vanilla extract in a mixing bowl until the eggs are smooth. Whisk in the milk, coconut milk, and melted butter until incorporated. Stir in the flour mixture a little at a time until no lumps remain; scrape into the prepared baking dish, and smooth the top.
- Bake in the preheated oven until the mochi is golden brown, about 1 hour. Cool to room temperature before cutting into 24 pieces to serve.
Nutrition Facts : Calories 255.6 calories, Carbohydrate 41.2 g, Cholesterol 50.5 mg, Fat 9 g, Fiber 0.2 g, Protein 3.9 g, SaturatedFat 6.1 g, Sodium 174.2 mg, Sugar 22.1 g
Tips:
- Use high-quality glutinous rice flour. This will give your mochi the best texture and flavor.
- Brown the butter until it is a deep golden brown color. This will give the mochi a rich, nutty flavor.
- Be careful not to overcook the mochi. It should be cooked through, but still have a slightly chewy texture.
- Serve the mochi warm, topped with your favorite toppings. Some popular toppings include coconut flakes, toasted sesame seeds, and fresh fruit.
Conclusion:
Brown butter mochi is a delicious and easy-to-make dessert that is perfect for any occasion. It is a great way to use up leftover rice, and it can be customized with your favorite toppings. Give this recipe a try today, and you won't be disappointed!
Are you curently on diet or you just want to control your food's nutritions, ingredients? We will help you find recipes by cooking method, nutrition, ingredients...
Check it out »
You'll also love


