Best 5 Better Than Pita Grill Bread Recipes


**Introducing the Deliciousness: A Culinary Journey through the World of Pita Grill Bread**
Embark on a tantalizing culinary adventure as we delve into the world of pita grill bread, a delectable flatbread that has captivated taste buds across cultures. Originating from the vibrant streets of the Middle East, this versatile bread has become a staple in kitchens worldwide, earning its reputation as the perfect accompaniment to an array of dishes. From the classic shawarma wrap to the hearty falafel sandwich, pita grill bread serves as a sturdy and flavorful base, elevating every bite. With its distinctively crispy exterior and soft, chewy interior, this bread offers a symphony of textures that will leave you craving more.
**A Collection of Culinary Delights: Recipes to Satisfy Every Palate**
This culinary exploration takes you on a journey through a diverse selection of pita grill bread recipes, each offering a unique taste experience. Discover the secrets to creating the perfect pita dough, ensuring that every bite bursts with flavor. Learn how to grill your bread to perfection, achieving that irresistible combination of crispiness and chewiness. Unleash your creativity with a variety of topping and filling ideas, transforming your pita grill bread into a culinary masterpiece.
**Embark on a Culinary Adventure:**
1. **Classic Pita Grill Bread:** Master the art of creating the traditional pita grill bread, a versatile flatbread that pairs perfectly with dips, spreads, and grilled meats.
2. **Whole Wheat Pita Grill Bread:** Discover a healthier twist on the classic pita grill bread, using whole wheat flour for a nutritious and fiber-rich alternative.
3. **Za'atar Pita Grill Bread:** Journey to the Middle East with this flavorful pita bread topped with a fragrant blend of za'atar, sesame seeds, and olive oil.
4. **Pita Pizza:** Create a quick and easy meal with this pita pizza recipe. Top your pita bread with your favorite pizza toppings and bake until golden brown.
5. **Falafel Pita Pockets:** Indulge in a satisfying and protein-packed meal with these falafel pita pockets. Stuff your pita bread with crispy falafel balls, fresh vegetables, and a tangy tahini sauce.
6. **Pita Chips:** Transform your pita bread into a crispy and addictive snack with this pita chips recipe. Simply cut your pita bread into wedges, brush with olive oil, and sprinkle with your favorite seasonings before baking until golden brown.
**Additional Tips and Tricks for Pita Grill Bread Perfection:**
- Use high-quality flour for the best results. Bread flour or all-purpose flour works well.
- Let your dough rise in a warm place for at least an hour, or until it has doubled in size.
- Grill your pita bread over medium heat until it is cooked through and has grill marks.
- Store your pita bread in an airtight container at room temperature for up to 3 days.
- Freeze your pita bread for up to 3 months. Thaw before using.
GRILLED PITA
Common throughout the Middle East and Mediterranean, pita is traditionally baked at high temperatures in a tandoor (clay) oven. The versatile staple is served with kebabs, falafel, souvlaki, hummus, baba ganoush and many other preparations. It's popular in America, too, but our store-bought pita generally leaves a lot to be desired. (For starters, by the time we get it, it's often several days old.) The good news is that pita is easy to make at home and the soft, tender and fragrant result is well worth it. Although you can bake it in a regular oven, we use a grill to replicate a bit of that smoky tandoor flavor. Cooking the dough on a griddle rather than directly on the grill grates means there's less chance of sticking, making the bread easier to flip.
Provided by Food Network Kitchen
Time 2h40m
Yield 8 pitas
Number Of Ingredients 6
Steps:
- Whisk 2 1/2 cups flour and the yeast, salt and sugar in a large bowl. Add the water and mix using a rubber spatula until the dough comes together. The dough should be a little sticky, but soft and able to hold its shape. Add up to 1/2 cup more flour, if needed. Transfer the dough to a floured surface and knead until it's soft, smooth and elastic, 5 to 7 minutes. Alternatively, you can use a stand mixer and knead until the dough becomes soft and elastic, about 5 minutes. The dough might be just a little sticky and that's okay.
- Place the dough in a clean bowl and cover with plastic wrap and a kitchen towel. Place in a draft-free area, such as a turned-off oven, until doubled in size, about 90 minutes.
- Gently deflate the dough by pressing it down with your hands. Transfer the dough to a lightly floured surface and divide into 8 pieces. Shape each piece into a ball and gently flatten. Cover with a kitchen towel and let rest for 20 minutes.
- Meanwhile, place a cast-iron griddle on an outdoor grill and heat it to medium high (450 degrees F) with the lid closed. Alternatively, you can use a large cast-iron skillet.
- Use a lightly floured rolling pin to roll out 1 piece of dough into a round about 1/4-inch thick, flipping the dough a few times to prevent it from sticking. Meanwhile, keep the remaining pieces of dough covered with a kitchen towel. Transfer the rolled-out pitas to a baking sheet and cover with a kitchen towel. Repeat with the remaining dough, stacking the rounds with a flour-dusted piece of parchment or wax paper between each round to prevent them from sticking.
- Brush the griddle lightly with olive oil. Sprinkle a little water on a rolled-out pita and place it on the griddle. You can cook 2 pitas at a time on a grill pan and 1 pita at a time on a cast-iron skillet. Close the grill and cook until there are small light brown spots on the pita, about 2 1/2 minutes on each side. Some of the pitas will puff up as they cook. Transfer to a platter and cover with a clean towel to prevent them from drying out. Repeat with the remaining rolled-out pitas. (It shouldn't be necessary to re-oil the griddle if it is well-seasoned.) Serve warm.
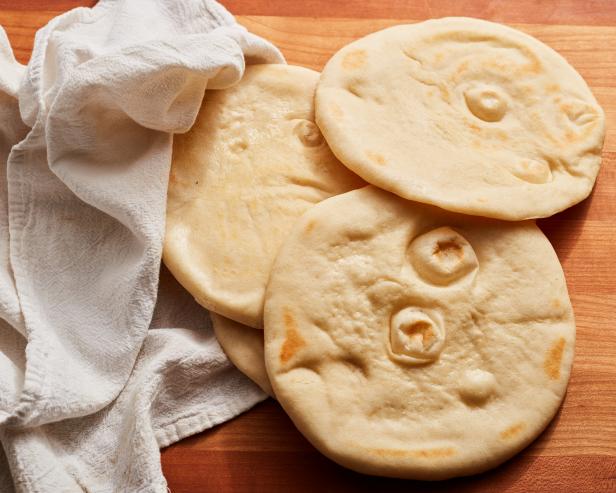
HOMEMADE PITA BREAD

Is it worth making pita at home? Absolutely. Store-bought pita (like store-bought sandwich bread) is often several days old. Warm, fragrant home-baked pita is obviously superior, and there's a bit of a thrill when the breads puff up in the oven. And once you get the hang of it, it's not difficult. For the best flavor, try to get freshly milled whole-wheat flour. Even though only a little is called for in the recipe, it makes a difference.
Provided by David Tanis
Categories appetizer, side dish
Time 2h
Yield 8 six-inch diameter breads
Number Of Ingredients 6
Steps:
- Make sponge: Put 1 cup lukewarm water in a large mixing bowl. Add yeast and sugar. Stir to dissolve. Add the whole-wheat flour and 1/4 cup all-purpose flour and whisk together. Put bowl in a warm (not hot) place, uncovered, until mixture is frothy and bubbling, about 15 minutes.
- Add salt, olive oil and nearly all remaining all-purpose flour (reserve 1/2 cup). With a wooden spoon or a pair of chopsticks, stir until mixture forms a shaggy mass. Dust with a little reserved flour, then knead in bowl for 1 minute, incorporating any stray bits of dry dough.
- Turn dough onto work surface. Knead lightly for 2 minutes, until smooth. Cover and let rest 10 minutes, then knead again for 2 minutes. Try not to add too much reserved flour; the dough should be soft and a bit moist. (At this point, dough may refrigerated in a large zippered plastic bag for several hours or overnight. Bring dough back to room temperature, knead into a ball and proceed with recipe.)
- Clean the mixing bowl and put dough back in it. Cover bowl tightly with plastic wrap, then cover with a towel. Put bowl in a warm (not hot) place. Leave until dough has doubled in size, about 1 hour.
- Heat oven to 475 degrees. On bottom shelf of oven, place a heavy-duty baking sheet, large cast-iron pan or ceramic baking tile. Punch down dough and divide into 8 pieces of equal size. Form each piece into a little ball. Place dough balls on work surface, cover with a damp towel and leave for 10 minutes.
- Remove 1 ball (keeping others covered) and press into a flat diskc with rolling pin. Roll to a 6-inch circle, then to an 8-inch diameter, about 1/8 inch thick, dusting with flour if necessary. (The dough will shrink a bit while baking.)
- Carefully lift the dough circle and place quickly on hot baking sheet. After 2 minutes the dough should be nicely puffed. Turn over with tongs or spatula and bake 1 minute more. The pita should be pale, with only a few brown speckles. Transfer warm pita to a napkin-lined basket and cover so bread stays soft. Repeat with the rest of the dough balls.
Nutrition Facts : @context http, Calories 189, UnsaturatedFat 3 grams, Carbohydrate 33 grams, Fat 4 grams, Fiber 2 grams, Protein 5 grams, SaturatedFat 1 gram, Sodium 110 milligrams, Sugar 0 grams
GARLIC-OREGANO GRILLED PITA BREAD
Provided by Gina Marie Miraglia Eriquez
Categories Bread Garlic Side Kid-Friendly Quick & Easy Backyard BBQ Family Reunion Grill Grill/Barbecue Potluck Oregano Gourmet Sugar Conscious Kidney Friendly Vegan Vegetarian Pescatarian Dairy Free Peanut Free Tree Nut Free Soy Free No Sugar Added Kosher Small Plates
Yield Makes 6 servings
Number Of Ingredients 5
Steps:
- Heat oil in a small heavy skillet over medium heat until it shimmers. Cook garlic, turning once, until pale golden, about 1 minute. Discard garlic and remove skillet from heat, then stir in oregano.
- Prepare grill for direct-heat cooking over medium-hot charcoal (medium-high heat for gas); see Grilling Procedure .
- Oil grill rack. Grill pitas, 3 at a time, covered only if using a gas grill, turning once, until grill marks appear, about 2 minutes total per batch. Transfer to a cutting board and brush both sides with garlic-oregano oil. Cut pitas into wedges. Sprinkle with kosher salt. Serve warm.
PITA
If you've only ever had dry supermarket pita, this homemade version is a different animal entirely: puffed up like a pillow, savory on its own, and ready to scoop up anything you like.
Provided by Alon Shaya
Categories Bread Flat Bread Bake
Yield Makes 8 pitas
Number Of Ingredients 5
Steps:
- Make the dough:
- Combine the water and yeast in a large mixing bowl (if you have a stand mixer, use that bowl) and let sit for 5 minutes.
- Reserve ½ cup (60 grams) bread flour and add the remaining 4 cups to the mixing bowl along with the canola oil.
- If you have a stand mixer, fit it with the dough hook and knead the mixture on low speed for about 3 minutes, until a sticky but cohesive dough starts to form. Pause occasionally to scrape down the bowl if the flour is clinging to the sides and bottom or climbing up the hook. If you're making the dough without a stand mixer, mix it with a wooden spoon. In either case, loosely cover the bowl with plastic wrap or a dish towel and let rest for 30 minutes.
- With your stand mixer on low or while stirring by hand in the mixing bowl, add the salt and, over the course of 2 or 3 minutes, add the remaining ½ cup flour, 2 tablespoons at a time. The dough should be more tense; it will feel soft but tacky, although it will pull from the sides of the bowl.
- Flour your hands generously and use them to pull the dough onto a clean, unfloured work surface. Cup your hands around the dough, rolling it in short, circular strokes and using the sides of your hands to nudge it into a relatively smooth ball.
- Lightly wipe the inside of a large bowl with canola oil and place the dough inside, flipping it once or twice to coat. Loosely cover the bowl and let the dough rise at a warm room temperature for 1 hour.
- After 1 hour, the dough will be stretchy but very soft. Leaving it inside the bowl, stretch opposite sides of the dough over the center. Rotate the bowl a quarter- turn and stretch the dough in the same way, then flip the whole mound of dough upside down and cover again. Let rise for 1 hour.
- Repeat this series of folds one more time, allow it to rise at room temperature for 1 hour, then tightly cover the bowl and refrigerate overnight or up to 2 days. The longer the dough is refrigerated, the more flavor it will have. After this rise, it's ready to be shaped; bear in mind that, once it's shaped, it will need more time for a final rise, so plan ahead.
- Shape and cook the pita:
- Wipe a bit of canola oil on a large baking sheet. Dump the dough onto a clean, dry counter, and use a bench scraper or sharp knife to cut it into eight equal pieces; make clean, decisive cuts rather than use a sawing motion, so you don't deflate all the air inside.
- Lightly flour your hands and place one palm directly over the dough ball, with all your fingertips touching the counter to make a sort of "cage" around the dough. Roll it in brisk, small circles on the countertop so it tightens itself into a smoother, more taut ball.
- Space the rounds of dough a few inches apart, seam side down, on the sheet, and roll to coat them lightly in oil. Tightly cover the sheet with plastic wrap so the dough doesn't dry out, and let them rise at room temperature for 2 to 4 more hours, until they're pillowy.
- Meanwhile, set a baking stone on the center rack of your oven and turn on the broiler. You're emulating a 700°F wood- burning oven, so you need to give the stone a good long while to preheat before you bake.
- When the dough is ready, lightly flour a work surface, and use a bench scraper or thin metal spatula to coax one piece into your palm; be sure you don't manhandle it or you'll force out the pockets of air that formed while it rose. Dust a little more flour on the top of the dough and onto your rolling pin.
- With firm, even pressure, briskly roll the dough a few times along its length. Flip it upside down, rotate it a quarter- turn, and roll it the same way, keeping it as round as possible. Repeat, dusting a little extra flour as needed, until it's about 6 inches across.
- This next part happens fast and furiously, so make sure you have no distractions-screaming children and natural disasters will have to wait. Use tongs or a good oven mitt to pull the oven rack with the baking stone partially out. Carefully pick up the pita, drape it over your palm, and slap it down onto the stone as if you're giving it a high- five (just be careful not to touch the hot stone!). Set a timer for 1 minute, and close the oven. Broilers vary in strength but all are quite hot, so don't turn your back on the oven or the pita may burn. Check on it- it should puff up and build in color, with some beautiful blistered spots. If it's still pale, close the oven and let it keep baking for 30- second intervals.
- Use tongs to flip the pita, and let it finish baking with the oven door cracked so you can watch it finish. Pull it out when the second side is as pretty as the first; this can take anywhere from 30 seconds to 2 minutes, depending on your broiler.
- Bake off the rest of the dough this way; as you get the hang of it, feel free to bake two pitas at a time. Serve these hot or at room temperature.
GRILLED PITA BREAD !

This is such an easy recipe... and it looks and tastes great!
Provided by Colleen Sowa
Categories Other Appetizers
Time 10m
Number Of Ingredients 2
Steps:
- 1. Lightly brush olive oil on both sides of pita breads
- 2. Place the pita breads on the grill for about 35 seconds to a minute on each side (just til lightly toasted and it looks pretty). Remove from grill and cut into triangle shapes using a pizza cutter. Serve with dip. https://www.justapinch.com/recipe/colleen-sowa/cannellini-hummus-dip-for-grilled-breads/quick-easy-healthy-crackers
Tips:
- Use the right flour: All-purpose flour is the most common type of flour used for pita bread, but you can also use bread flour or a combination of the two. Bread flour has a higher protein content than all-purpose flour, which results in a chewier bread.
- Knead the dough properly: Kneading the dough is an important step in the process of making pita bread. It helps to develop the gluten in the flour, which gives the bread its structure. Knead the dough for at least 5 minutes, or until it is smooth and elastic.
- Let the dough rise: After kneading, the dough needs to rise in a warm place until it has doubled in size. This will take about 1 hour. Rising the dough allows the yeast to produce gas, which will create air pockets in the bread.
- Shape the dough: Once the dough has risen, divide it into 8 equal pieces. Roll each piece of dough into a ball, then flatten it into a circle. The circles should be about 6 inches in diameter.
- Cook the bread: Pita bread can be cooked in a variety of ways. You can cook it in a skillet, on a griddle, or in a tandoor oven. If you are cooking the bread in a skillet, heat the skillet over medium heat and brush it with oil. Cook the bread for 2-3 minutes per side, or until it is golden brown and puffed up.
Conclusion:
Pita bread is a delicious and versatile bread that can be used in a variety of dishes. It is a popular choice for sandwiches, wraps, and dips. Pita bread is also a good source of fiber and protein. If you are looking for a healthy and tasty bread to add to your meals, pita bread is a great option.
Are you curently on diet or you just want to control your food's nutritions, ingredients? We will help you find recipes by cooking method, nutrition, ingredients...
Check it out »
You'll also love